Yay for Spring! I know, the official First Day of Spring was back on March 20th, which would mean that I’m fairly late in this post. However, back in March, we still had snow. In fact, where we live, we usually get snow in April (sometimes a lot of snow). So, I’ve never really considered Spring to begin until May. Our snow has finally melted, the grass is turning green, flowers are blooming, birds are chirping, and there is an abundance of perfectly warm days to soak up and enjoy! To celebrate our newest season, we’ve been busy creating a bunch of fun, and flowery, Springtime Toddler Crafts!
Plastic Bottle-Stamped Flowers
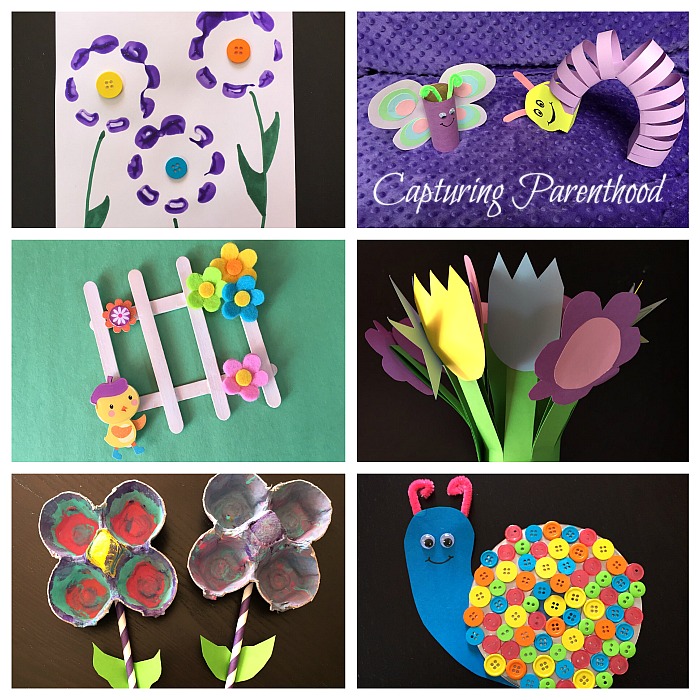
This simple craft is so much fun for toddlers to make! First they get to dip a plastic bottle into the paint color(s) of their choice, and then they get to stamp the bottle down onto a piece of paper to make flowers. Once the paint has dried, they can use a dab of Elmer’s glue to adhere a colorful button in the center of each flower. Feel free to add some flower stems with a green crayon or marker, for the finishing touch.
I came across this idea for Bottle Print Button Flowers, over at Crafty Morning (http://www.craftymorning.com/make-bottle-print-button-flowers/). Michelle used a Dasani water bottle, which appears to make wonderful flower petals. We used an Aquafina bottle, which did not create as elaborate of flower petals as Michelle’s, but we enjoyed this craft all the same.
Toilet Paper Roll Butterfly
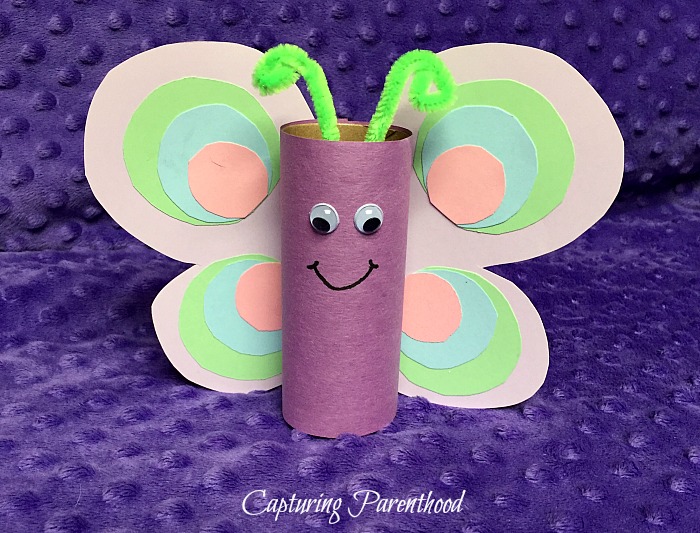
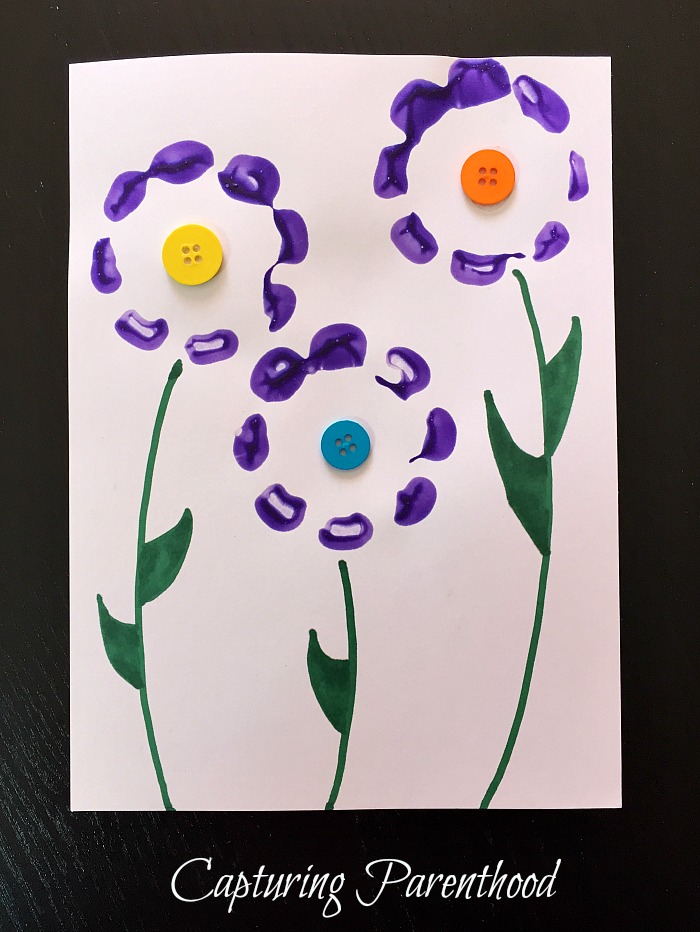
How cute is this Toilet Paper Roll Butterfly? We had the best time picking out all of the colors for our butterfly, and gluing everything together. I stumbled across the idea for Toilet Paper Tube Butterflies over at Creative Me, Inspired You (http://creativemeinspiredyou.com/toilet-paper-tube-butterflies/).
All you need to create a butterfly of your own, is an empty toilet paper roll, construction paper in varying colors, glue, googly eyes, a pipe cleaner, and a black marker.
Start by covering your toilet paper roll in an adequately-sized piece of construction paper. Glue (or tape) it together. Then cut out some butterfly wings. Continue by cutting some circles in various sizes and hues. Glue all of the decorative circles onto your butterfly wings (you can glue them on the back and the front). Then, using some more glue, adhere the toilet paper roll to the butterfly wings, and set aside to dry. Finally, glue on a pair of googly eyes, draw on a smile (using the black marker) and lastly, glue on your pipe cleaner antennae – don’t forget to curl the ends!
3D Paper Caterpillar
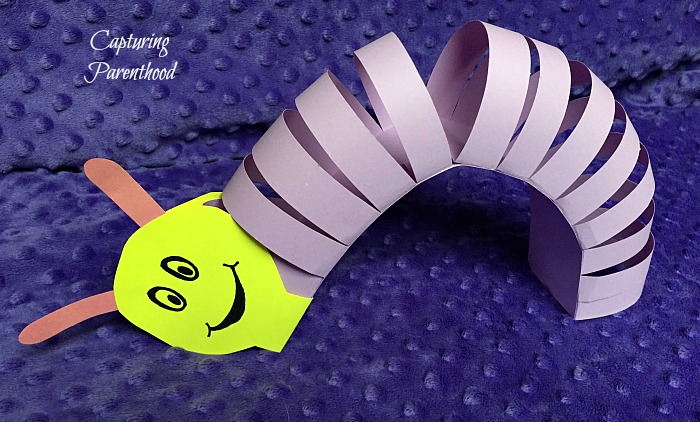
My little nugget was able to witness the life cycle and transformation of caterpillars at school recently. Each classroom received a set of caterpillars that they were responsible for taking care of. And within a couple of weeks, the caterpillars had all turned into butterflies! So, we couldn’t make a paper butterfly, without first creating a paper caterpillar.
I absolutely loved this 3D Paper Caterpillar Craft that Andreja, over at Easy Peasy and Fun, shared (http://www.easypeasyandfun.com/3d-paper-caterpillar-craft/). She even makes it super easy to make your own with a printable template! But, we wanted the added challenge of making our own, from scratch. So, we gathered three colors of construction paper, a pair of scissors, a glue stick, and a black marker, and we started crafting!

Tip: I really wanted our caterpillar to be able to stand (while curled up, and not flat) on our dining room table. In order to make this possible (once the caterpillar was constructed), I taped a quarter inside the head of the caterpillar, and I taped a penny inside the last piece of the caterpillar’s body – it worked like a charm!
Popsicle Stick White Picket Fence
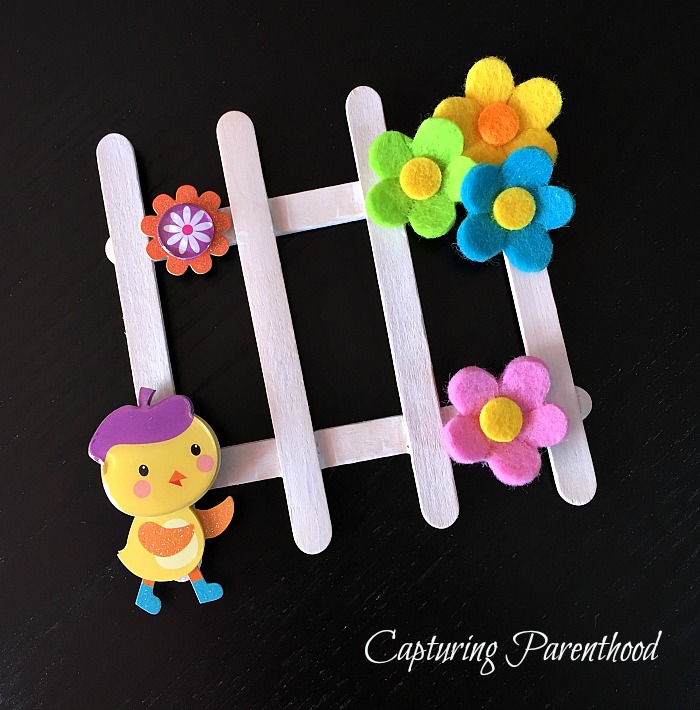
I absolutely love this cute, and flowery, Popsicle Stick White Picket Fence craft, and it is perfect for Spring! In order to make one with your little ones, you will need some Popsicle sticks, white paint, and a few felt flower stickers (I found mine at a craft store). I also love the addition of the little chick sticker! My little nugget had a blast painting the Popsicle sticks white, she even helped me put all of the stickers on – this truly is an easy and fun creation!
I saw this awesome craft idea over at the Glued To My Crafts blog (http://gluedtomycraftsblog.com/2015/03/popsicle-stick-picket-fence-kid-craft.html).
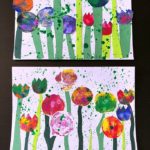
Paper Flower Bouquet

I was beyond excited when I found this super simple Paper Flower Bouquet craft over at Fun Crafts Kids (http://funcraftskids.com/paper-flower-bouquet/). I had never seen anything else like it, and it was the perfect springtime craft to display on our dining room table!
The only supplies you need for this craft are a piece of green construction paper, other varying colors of construction paper, a pair of scissors, a stapler, and a glue stick. Optional supply: felt flower stickers (I used the ones leftover from our Popsicle Stick White Picket Fence, for our second bouquet – yep, we made two)!
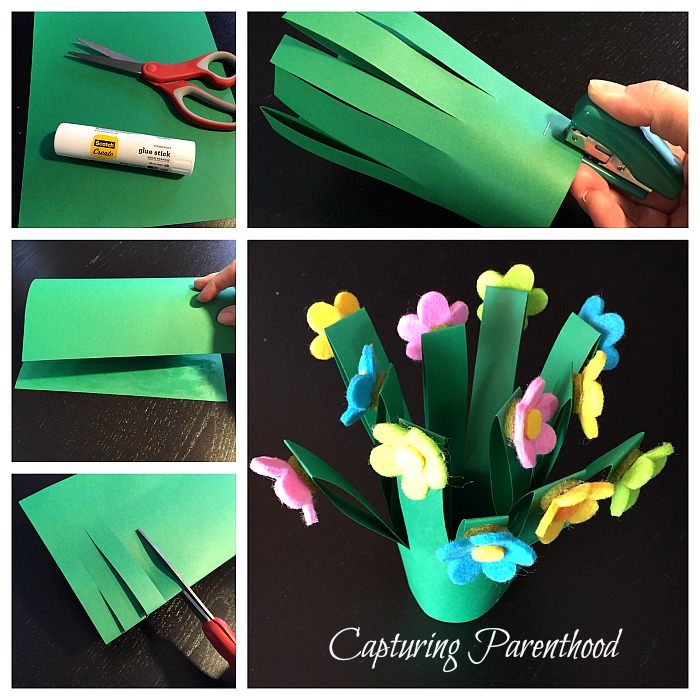
Fold your green paper in half and glue the bottom 1″ – 2″ together, using your glue stick. On the opposite side (from the glue), cut 1/2″ strips along the entire length of paper. Roll the paper up into a circle and, using your stapler, staple the two ends together. Next, spread out the top pieces of paper (stems). With the remaining construction paper, cut and create various flowers to glue to the tops of the flower stems. Or, adhere the felt flower stickers to the top of each stem.
Egg Carton Flowers
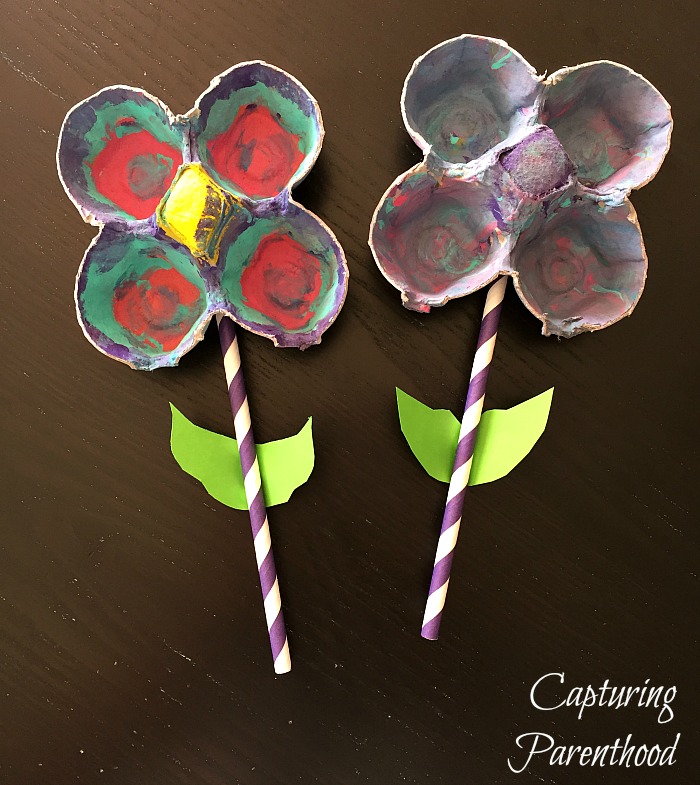
Do you have any empty egg cartons sitting in your recycling bin? Grab one, remove the lid, and then cut our a section of four. Our egg carton had really tall middle points, so I cut them down as well, and glued a cotton ball in the middle instead. Then I sat down with my little nugget, and we went to town painting our egg cartons (inside and out). Once we were finished, we set them aside to dry completely. To finish, I glued a straw to each flower (for the stems), and cut out some green leaves from a piece of construction paper, and glued those onto the straws. Ta Da!
I came across this resourceful craft idea over at I Heart Arts n Crafts (http://www.iheartartsncrafts.com/egg-carton-flowers-kids-craft/). Jackie used small poms for the center of her flowers, and they turned out beautifully!
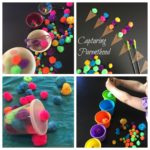
Button Snail
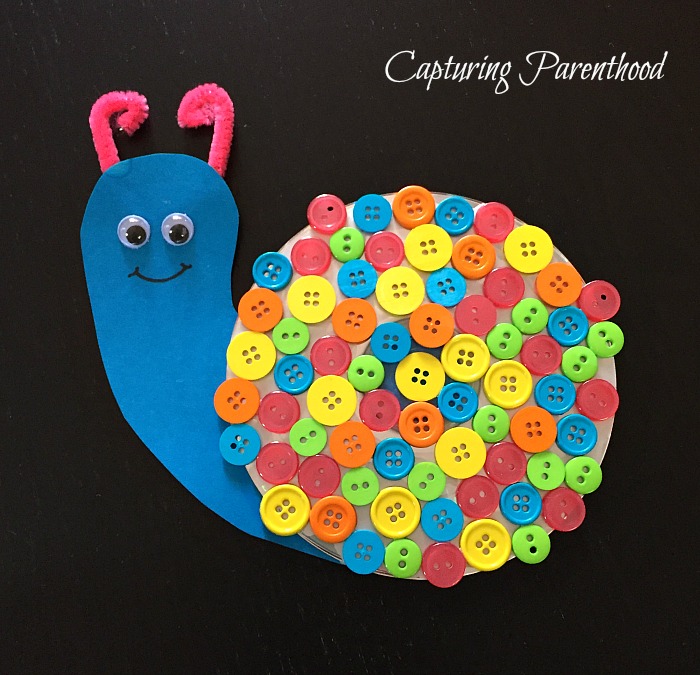
I’m saving the best for last! This Button Snail is my (and my daughter’s) absolute favorite thing that we created for our springtime crafts! Cute, adorable, colorful, fun! We just can’t get enough of him! We had the best time gluing him all together. My little nugget loved playing with all of the different buttons, and our snail is still a regular topic of conversation in our house, as he is proudly displayed on our art wall.
When I saw this Button Snail Craft from Jackie (again!) over at I Heart Arts n Crafts (http://www.iheartartsncrafts.com/button-snail-craft-kids/), I immediately added it to my “must make” list. I mean, how could you not want to create one of these adorable creatures?
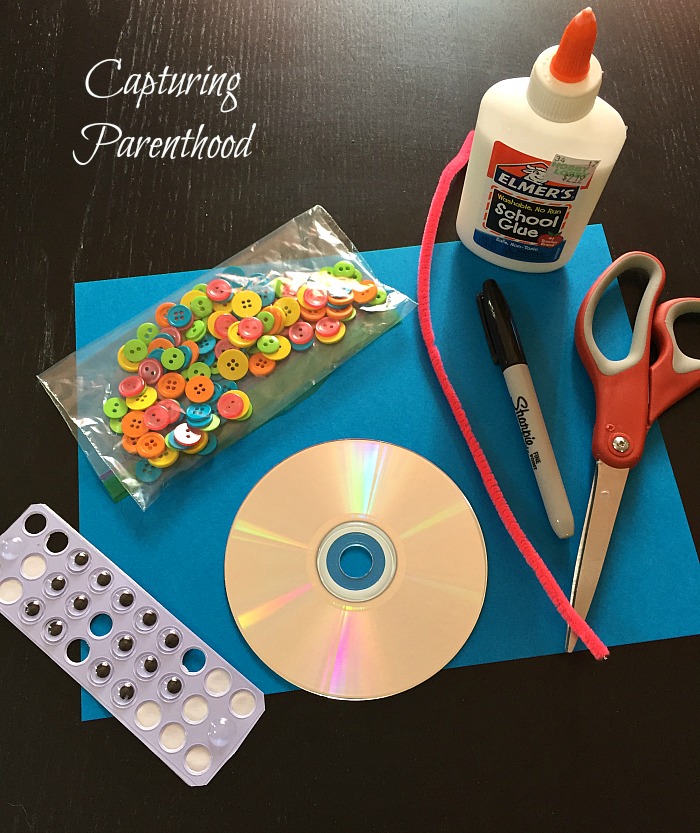
You will need a piece of construction paper, an old CD, various sizes and colors of buttons, a pair of googly eyes, a pipe cleaner, some Elmer’s glue, and a black marker.
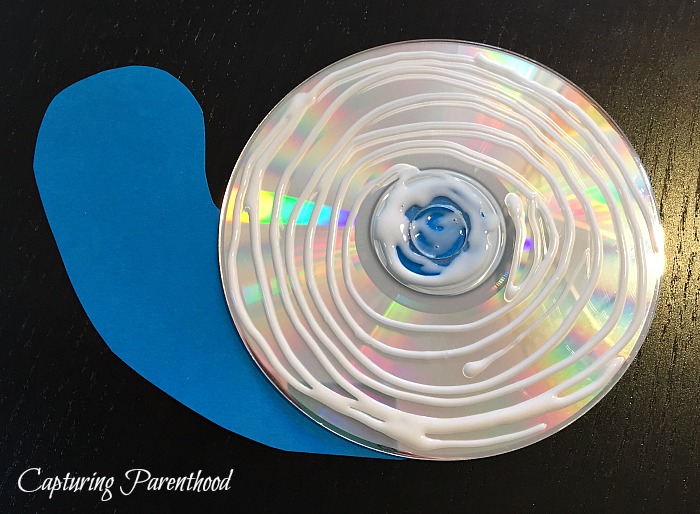
Start by cutting out your snail’s body from the construction paper. Glue the CD onto the the round portion of the snail’s body and let dry. Next, apply a decent amount of glue to the CD and start adding all of the buttons. Once the CD is completely covered in buttons, set the snail aside to dry completely. To complete this adorable craft, add the googly eyes, draw on a grin (using the black marker), and glue on some antennae (pipe cleaner) – don’t forget to curl the ends!
And there you have it, our favorite springtime crafts for 2017! What are some of your family’s favorite springtime crafts? I would love to hear about them in them comments below.
Happy Spring!