• Home
  • About
  • Kid Zone
    • Activities
    • Arts + Crafts
    • Books Books Books
  • Food
    • Family-Friendly
    • Kids
    • Sweets
    • Dog-Friendly
  • Life + Motherhood
    • Pregnancy
    • Parenting
    • House + Home
  • Let’s Party
    • Birthdays
    • Holidays
    • Instagram
    • Pinterest

Capturing Parenthood

Camping Crafts for Kids

in Arts + Crafts, Toddler Zone on August 9, 2018

I’ve loved going camping for as long as I can remember. Most of my summer vacations as a child involved camping…usually on one of the beautiful sandy beaches of Lake Powell. Luckily, I married someone with the same love for spending time outdoors. Our simple car camping trips progressed into longer backpacking adventures over the years. We’ve been lucky enough to camp in some pretty remote, yet spectacular places. We would like to instill the same love and appreciation that we have for camping and the outdoors, in our little nugget. And one of the fun ways that we’ve found to celebrate the world of camping with her, is by creating some fantastic Camping Crafts for Kids!

Camping Crafts for Kids Β© Capturing Parenthood

We introduced our daughter to the wonders of sleeping under the stars last summer…with a couple of backyard camping trips. She didn’t last through the entire night in the tent, so we gave it another shot this summer. We pitched our tent, and tossed in our sleeping bags and pillows (along with a few bedtime stories and stuffed animals). We sat by the crackling fire in our fire pit, roasted marshmallows, and devoured s’mores. And when it was well past our daughter’s normal bedtime, we crawled in the tent to go to sleep. We survived the night, and our little nugget has been begging to camp out every single night since. πŸ™‚

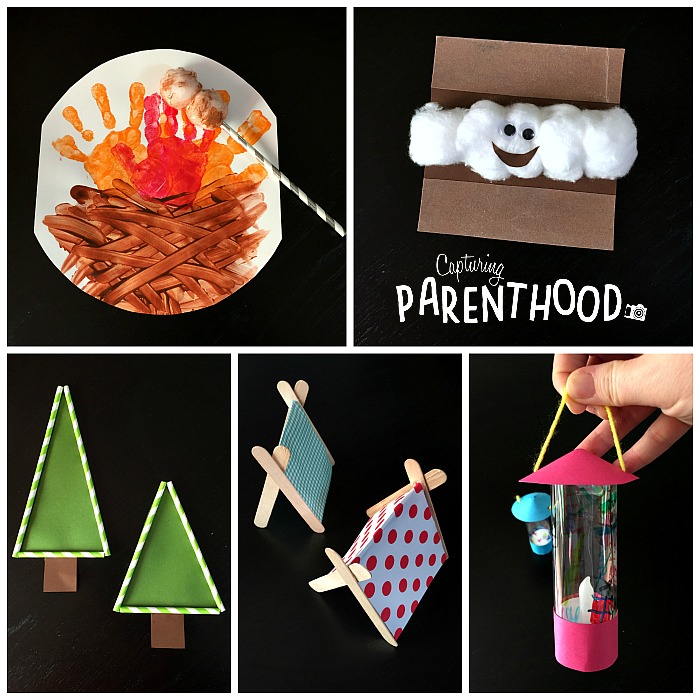
To tide her over, we decided to have a camping craft session, where she made her very own campfire with roasted marshmallows, a smiley s’more, evergreen trees, tents for her dinosaurs to enjoy, and her very own (functioning) camping lantern!


Handprint Campfire

Camping Crafts for Kids Β© Capturing Parenthood

Our little nugget is all about handprint and finger-painting art, so when I stumbled across this fun Handprint Campfire idea, over on the Glued to My Crafts blog, I knew it would be a hit!

Camping Crafts for Kids Β© Capturing Parenthood

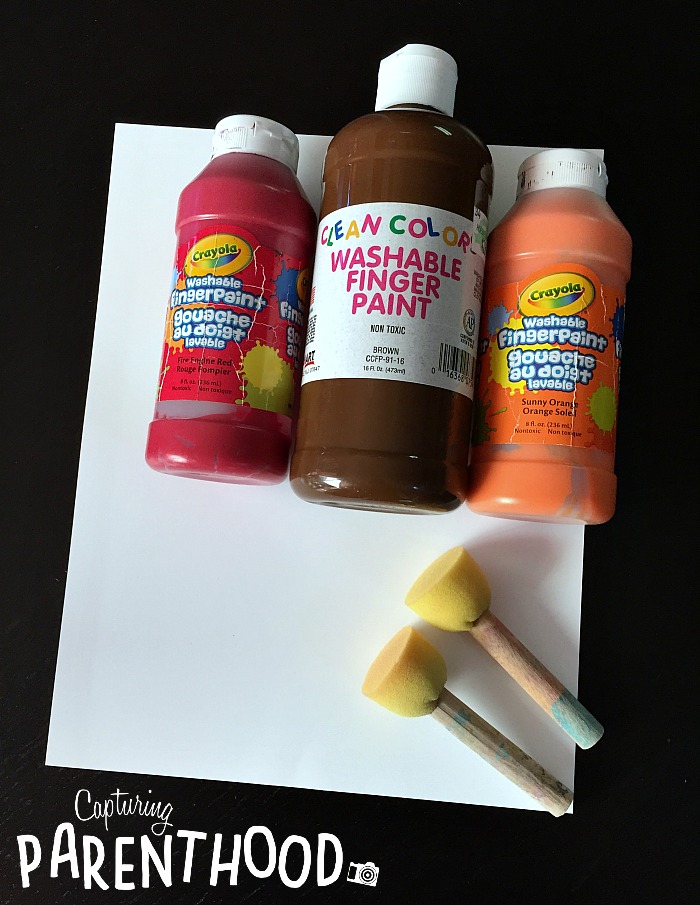
To create your very own handprint campfire, you will need the following supplies: white paper or card stock, paint (red, orange, and brown), and a sponge applicator (or paintbrush). We find that sponge applicators work the best for us when we’re doing handprint painting. If you would also like to add some roasted marshmallows (because, what’s a campfire without marshmallows), grab a paper straw and a couple of cotton balls as well.

Camping Crafts for Kids Β© Capturing Parenthood

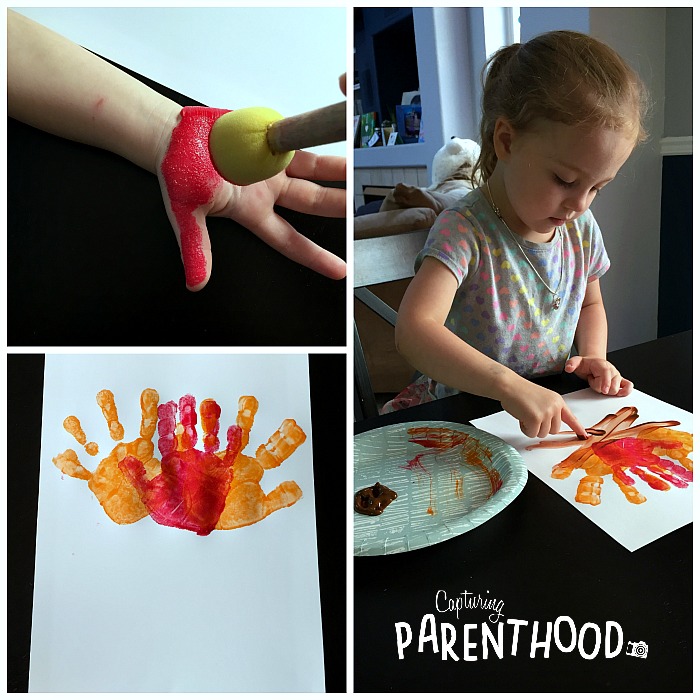
Start by applying orange paint to one of your child’s hands. Place it down on the paper, toward the left-hand side, and press firmly to create the handprint. Apply another coat of orange paint to the same hand and make another handprint toward the right-hand side of the paper. Apply red paint to your child’s other hand, and create one final handprint in the center of the two orange prints. Now you have fire! Wash the paint from your child’s hands. Once their hands are clean, grab some brown paint to use to create the logs of the campfire. Our daughter created the logs by moving her paint-covered finger in a large “x” shape below the flames. We wanted our marshmallows to look like they were actually roasting in the fire, so I gently dabbed them in some of our extra brown paint and then blotted them on a dry paper towel. Once the paint had dried completely, we glued our cotton balls to our paper straw, and then glued our marshmallow stick on top of our campfire.

If you’re roasting marshmallows in a campfire, odds are you’re getting ready to create some s’mores…the notoriously delicious and messy camping treat! Roasted marshmallows on their own are pretty tasty…but, you’ve got to have at least one s’more, am I right? πŸ™‚

Smiley S’more

Camping Crafts for Kids Β© Capturing Parenthood

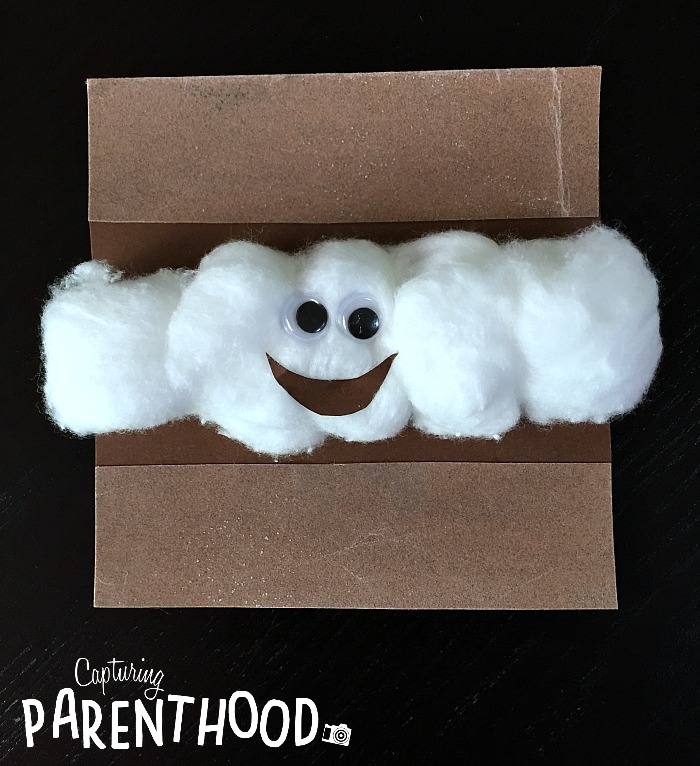
So, while I was admiring Stacey’s handprint campfire craft (over on the Glued to My Crafts blog), I happened to spy a picture of her Paper Plate S’mores craft, as well. That single photo inspired us to create our very own smiley s’more!

Camping Crafts for Kids Β© Capturing Parenthood

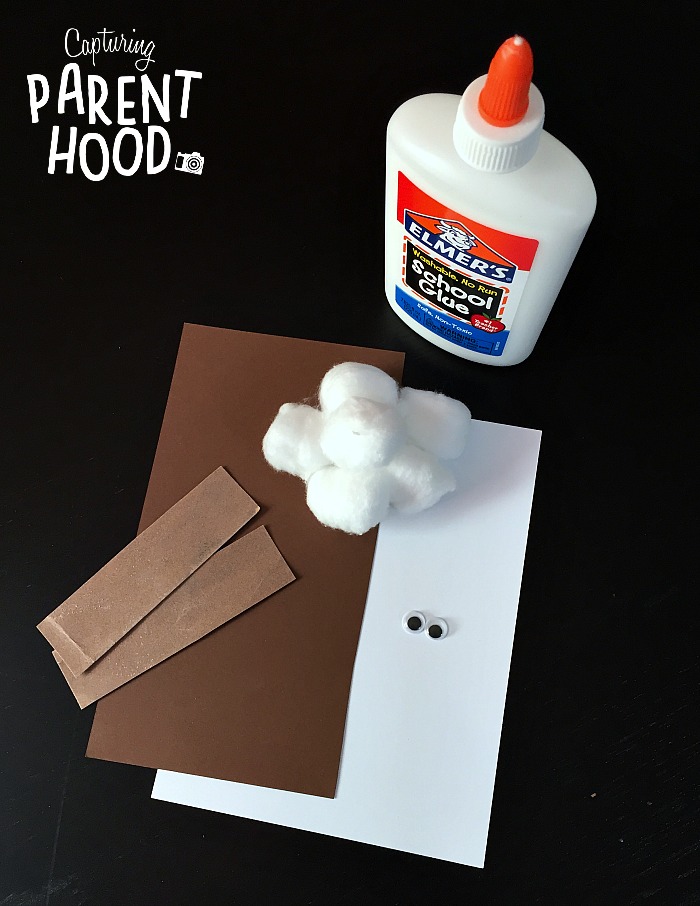
We were all set to use different shades of brown paper for our graham crackers and chocolate, when I decided that it would be more exciting to use some sandpaper for our graham crackers…to add a fun textural element! Therefore, the supplies that we used to create this adorable smiling s’more are as follows: paper or card stock, sandpaper, dark brown construction paper, cotton balls, two googly eyes, and glue.

Camping Crafts for Kids Β© Capturing Parenthood

We cut a square of white card stock, in the overall size that we wanted our s’more to be…we just needed a piece of paper, as a background, to adhere everything else to. We glued a square of dark brown construction paper (chocolate) in the middle. Next, we glued a strip of sandpaper (graham cracker) to the top and bottom of our card stock, covering the edges of our brown paper. We glued our cotton balls (marshmallows) across the center of our s’more, making sure not to completely cover the chocolate layers. Once the cotton balls were adhered, we carefully glued two googly eyes and a brown paper smile, in the middle of the cotton balls. Bon appetite! Just kidding…please don’t eat this s’more! πŸ™‚

Paper Straw Trees

Camping Crafts for Kids Β© Capturing Parenthood

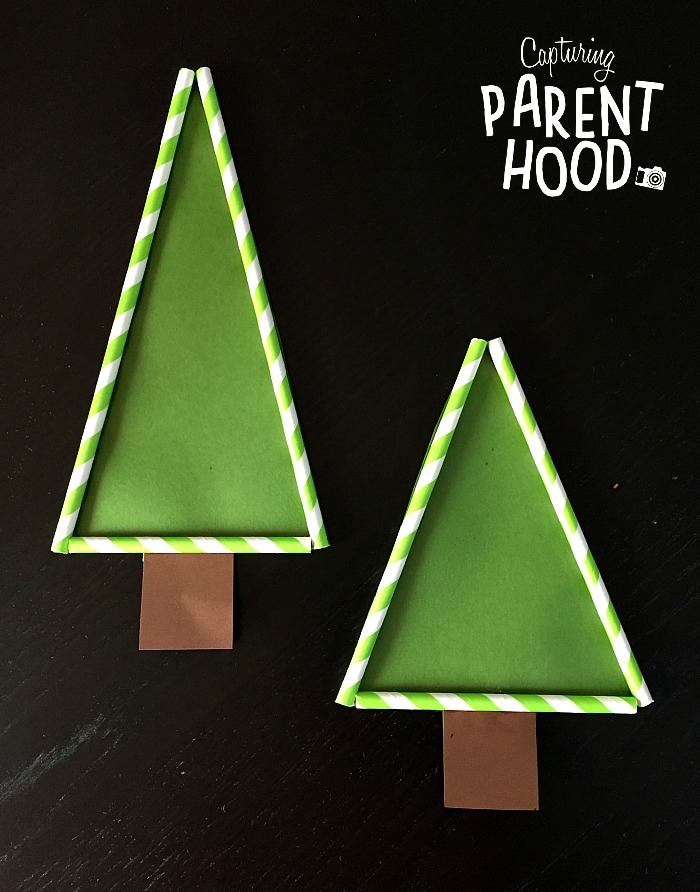
It just wouldn’t be camping if there were no trees. Luckily, we have a lot of lush green trees in our backyard. πŸ™‚ One of my favorite things to do while camping is to watch aspen leaves blowing in the wind on a sunny day…it’s magical and hypnotizing. In Colorado, we also have a lot of pine trees, so I figured it would be fun to create some simple evergreen trees using some green and white paper straws.

Camping Crafts for Kids Β© Capturing Parenthood

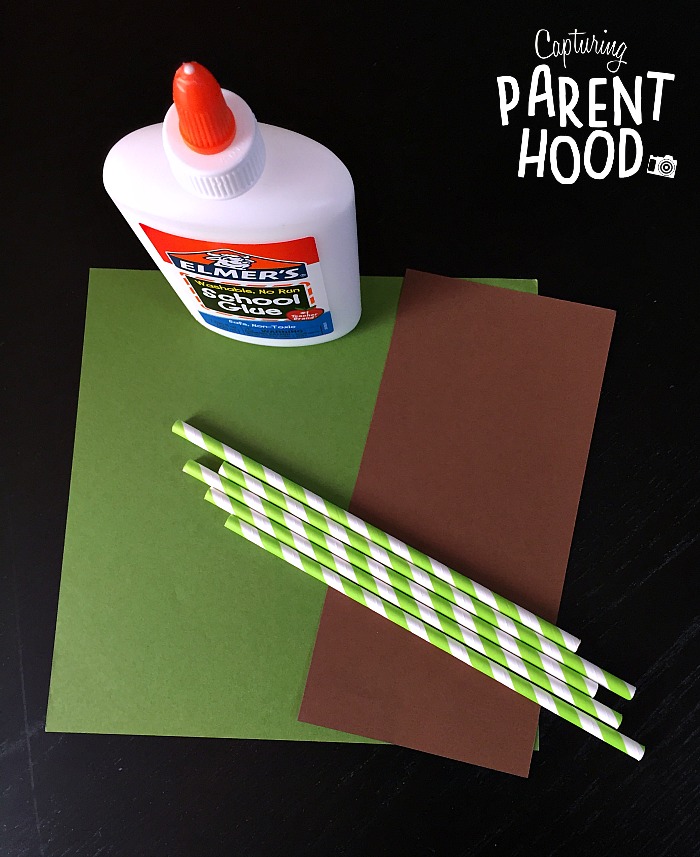
We also utilized some green and brown construction paper, glue and a pair of scissors. We piped a strip of glue on the back side of two straws and adhered them to the green paper, in a triangular shape. I cut another straw to fit as the base of our tree. We made a second, shorter tree the same way. Once the glue had dried completely, we cut around the trees, along the outside edge of the straws. To complete the look, we glued a brown rectangular trunk onto the bottom of each tree. Easy peasy! I love how they add the much-needed natural element to all of our camping crafts.

Popsicle Stick Tents

Camping Crafts for Kids Β© Capturing Parenthood

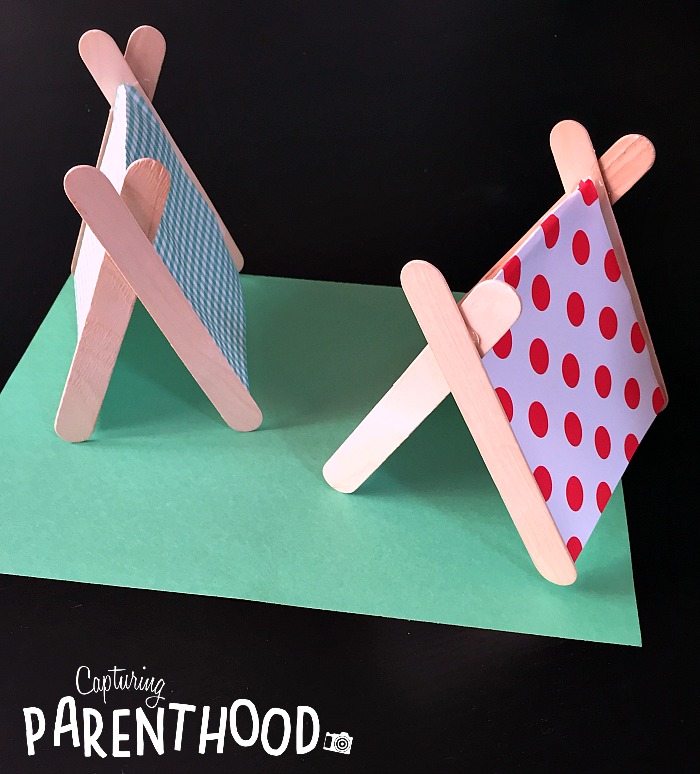
We almost always sleep in a tent when we go camping, so we absolutely needed to craft one (or two). I noticed that Stacey (Glued to My Crafts) had an adorable one-dimensional popsicle stick tent craft featured on her blog, but we wanted our tents to be three-dimensional. And that’s when I happened upon a photo of this cute little Camping Set Craft, utilizing sticks and paper, over on Artsy Craftsy Mom.

Camping Crafts for Kids Β© Capturing Parenthood

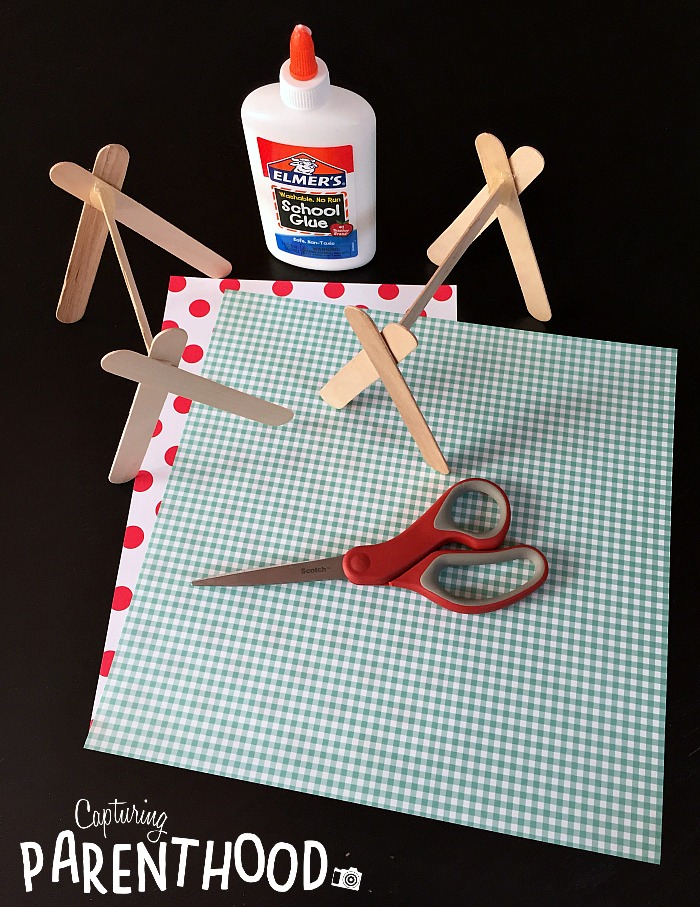
To create your own popsicle stick tents, you will need the following supplies: popsicle sticks (we used the larger size), hot glue gun, Elmer’s glue, colorful paper (we used some printed scrapbook paper), and a pair of scissors.

Camping Crafts for Kids Β© Capturing Parenthood

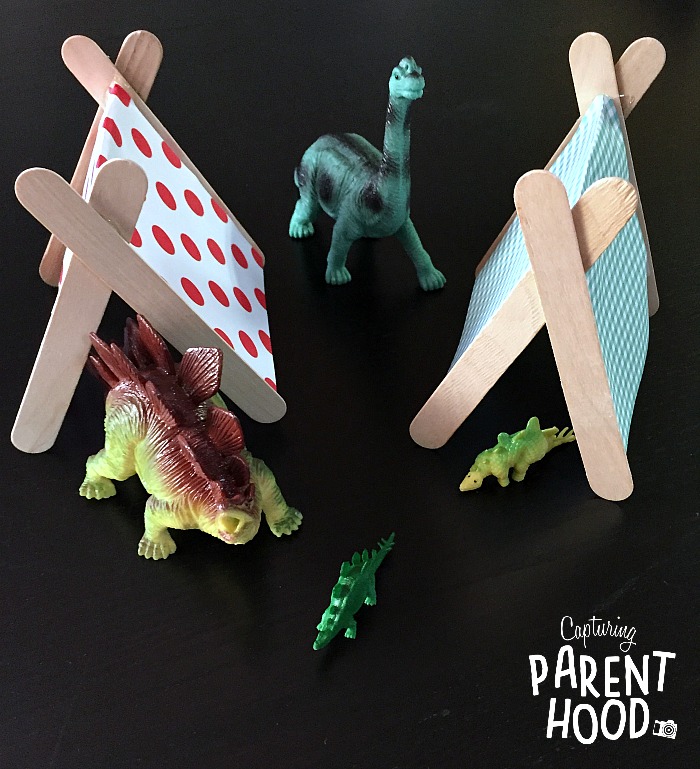
Start by hot-gluing two popsicle sticks together (creating an “x” toward the top of the sticks). Glue together another pair. You now have the end pieces to make one tent. Next, you want to carefully hot glue one more popsicle stick in between the two ends (“x” marks the spot). I did this by gluing the middle stick to one end at a time, and holding it in place for several minutes…until the glue hardened. Once the structure is glued together, and the glue has dried completely, cut a piece of scrapbook paper to fit within the two ends of the tent. You want the paper to be long enough to bend over the middle stick and go all the way down the sides of the tent. Once you have your paper measured and cut, pipe a thin line of Elmer’s glue on top of the middle popsicle stick. Place the folded paper on top, pressing gently to adhere. Let the glue dry completely and then gather all of your small dinosaurs or figurines, and set up a small camping expedition! πŸ™‚

Mini Tealight Lanterns

Camping Crafts for Kids Β© Capturing Parenthood

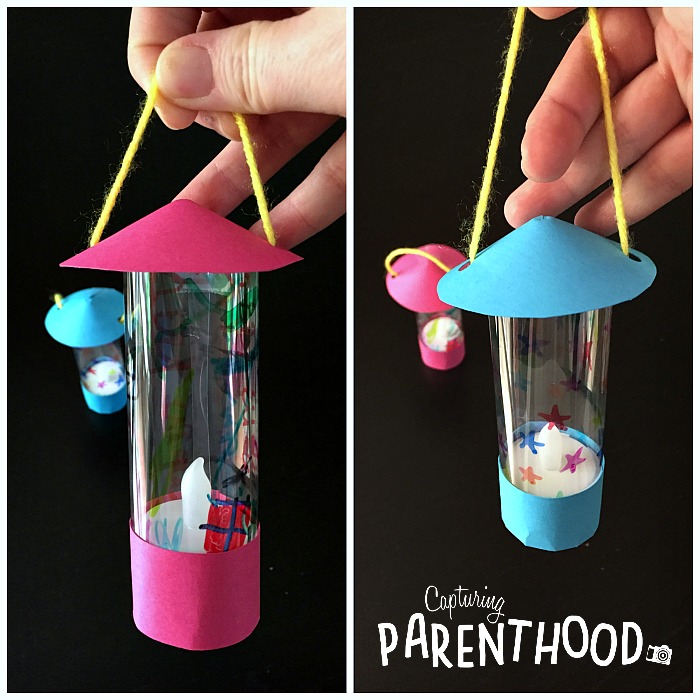
These mini tealight lanterns are hands-down the family favorite of all of our camping crafts! It’s likely because they are completely functional…and cute to boot! I was extremely excited when I stumbled upon this amazing LED Tealight LanternsΒ idea, over on Atomic Shrimp. I was actually giddy!

Camping Crafts for Kids Β© Capturing Parenthood

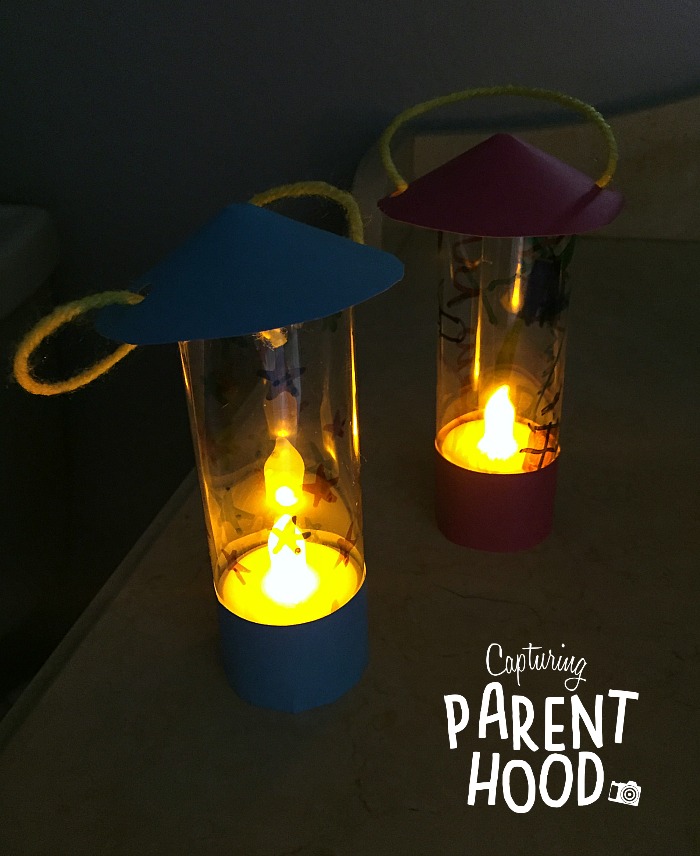
I mean…just look at them! I’m still giddy! We have them hanging amongst our camping crafts on our dining room art wall, and I love that we can flip them on at night to create a little ambiance. We just might have to try them out on our next backyard camping adventure!

Camping Crafts for Kids Β© Capturing Parenthood

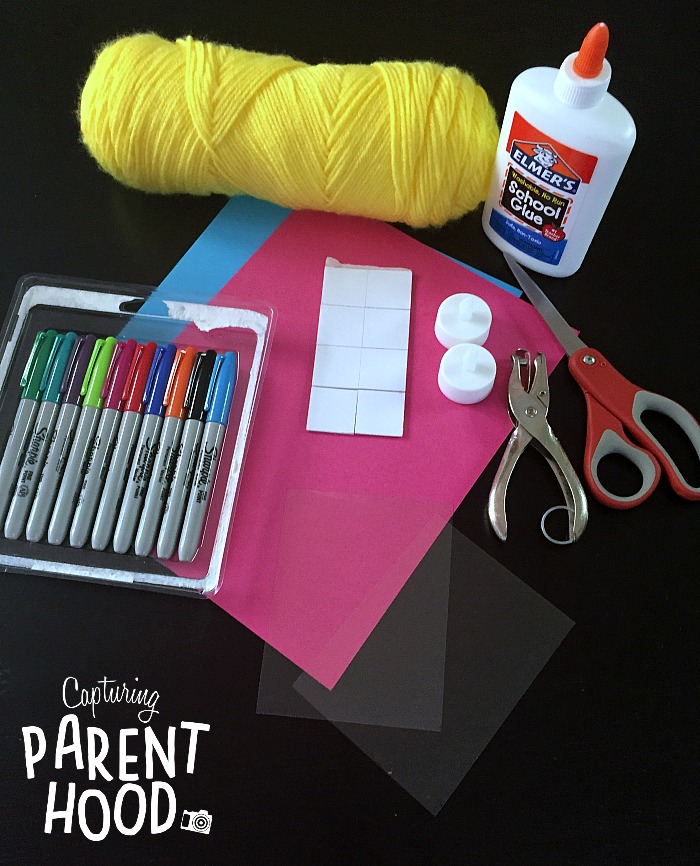
To make your own mini tealight lantern you will need the following supplies: a sheet of projector film or a similar sheet of plastic (we actually utilized the plastic from the front of an old cheap picture frame), scissors, permanent markers, tealight candle, double-sided tape, colored paper or card stock, hole punch, yarn or string, and Elmer’s glue (you don’t want to use hot glue, it will melt the plastic film).

Camping Crafts for Kids Β© Capturing Parenthood

Start by cutting the plastic film to size. You want it wide enough to wrap all the way around your tealight candle, plus a bit extra (approximately 14 cm). Cut the length to approximately 8 cm tall. Using the permanent markers, decorate the plastic any way you choose. I love the stained glass effect that they used on Atomic Shrimp, but I didn’t have the patience for that kind of design. πŸ™‚ Once the decorating is complete, it’s time to assemble the lantern.

Camping Crafts for Kids Β© Capturing Parenthood

Place some double-sided tape on the sides of the tealight candle. Cut a strip of colored paper to wrap around the base of the lantern (approximately 3 cm by 14 cm). Remove the backing of the double-sided tape and wrap the bottom of the plastic film around the candle (making sure the marker-side is facing inward). Adhere the strip of paper to the remaining (exposed) double-sided tape, to form the base of the lantern. You can also utilize a small piece of clear tape, if necessary. Using the hole punch, punch two holes in the top of the plastic, on opposite sides of the lantern. Next, cut a small circle from the same colored paper (I traced the rim of a small drinking glass). Cut from one edge of the paper to the center of the circle. Glue or tape the cut pieces of the circle together, to create the cone-shape of the lantern top. Punch two holes in the paper circle, on opposite sides, to match the two holes in the top of the plastic. Cut a small piece of yarn and feed it down through the two holes in the paper circle, then through the two holes in the top of the plastic film (from the outside in). Tie it in a knot. Pipe a thin layer of Elmer’s glue around the top of the plastic film and press the paper top down firmly to adhere. Pull up on the slack in the yarn to create the lantern handle. Ta Da!

This craft can be a little bit tricky. Atomic Shrimp provides step-by-step instructions, as well as a detailed video…so feel free to visit their site for more information.


Camping Crafts for Kids Β© Capturing Parenthood

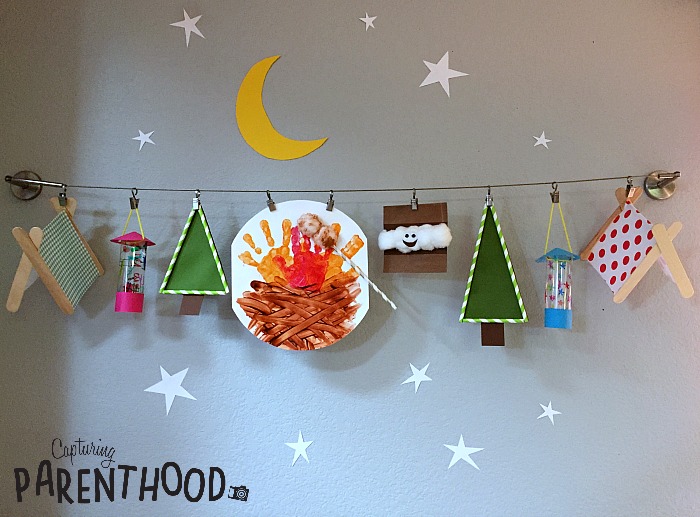
I am in love with our camping crafts! After hanging them on display in our dining room, we decided to add a crescent moon, and a handful of stars, to really round out the whole camping theme. Star-gazing is another one of our favorite camping activities, and we love the magical night skies that we find when we get out of the city. I can’t wait until we take our little nugget on a real camping adventure, where she can look up and see more than just a few stars shining down. We just might have to bite the bullet and head out into the wilderness in the next few weeks!

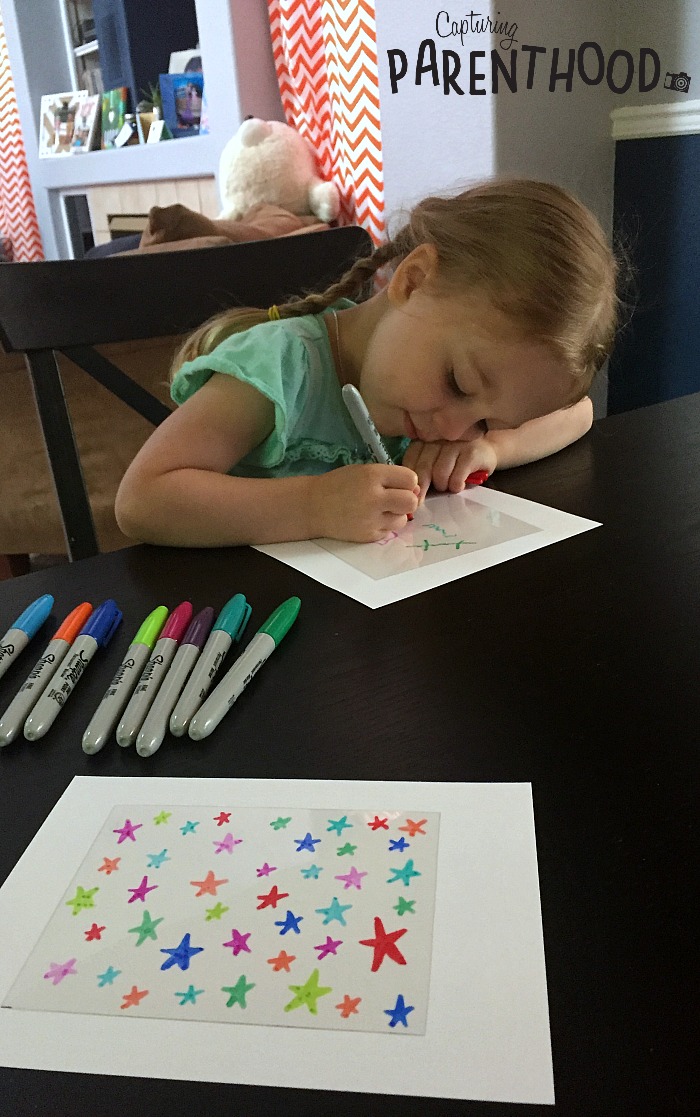
In the meantime, we will resort to star-gazing with our Starry Nights Sensory Bottle!

START SPREADING THE NEWS!

Related Posts

  • Finding The Right Child Care – The Struggle Is RealFinding The Right Child Care – The Struggle Is Real
  • Winter Books (2020) – Celebrating the SeasonWinter Books (2020) – Celebrating the Season
  • Easter Crafts for Kids (2018)Easter Crafts for Kids (2018)
  • Fun Activities for 7-12(+) MonthsFun Activities for 7-12(+) Months
« Simple Sunflower Cupcakes
Inspiring Books for Young Girls »

Hello! Nice to meet you!

Welcome to the Capturing Parenthood blog! I'm Stacey...wife and first-time parent, former full-time working mom, turned stay-at-home mom. Join me as I capture and share my thoughts and experiences on this crazy adventure we call parenthood! Click here to learn more about me!

Search Capturing Parenthood

Instagram

Ok...@artwithmrs.e Haunted House project is hands- Ok...@artwithmrs.e Haunted House project is hands-down the best Halloween-themed art project out there! πŸ™ŒπŸ™ŒπŸ™Œ
We had a blast creating haunted houses for homeschool art this month! 🧑
...
We followed Kaitlyn's extremely helpful Haunted House Drawing Guide (you can find it over on her Teachers Pay Teachers account) and completed the project over the course of 3 lessons.
...
During our first lesson, we sketched our houses in pencil, and added some eerie exterior landscaping. πŸͺ¦πŸ¦‡
We popped in a few spooky characters (ghosts, spiders, pumpkins, and a vampire). πŸ‘»πŸ•·πŸŽƒπŸ§›
And then we traced over our pencil lines with black Sharpie.
...
During our next lesson, we used a coloring technique that we learned from Kristian @friendsartlab ❀️ We colored our pictures with oil pastels...and then painted over the top of the oil pastels with baby oil...it causes the oil pastels to bleed and blend together! 🀩
...
During our final lesson...we added more spooky characters to the inside of our house...that can peek out behind the doors and windows. πŸ’€πŸ§™β€β™€οΈπŸ‘»
To do this...I used an X-acto knife and carefully cut around the outside edges of the doors/windows (leaving the hinge sides intact so that they could fold open and closed).
We placed yellow construction paper in the background...and added witches, ghosts, skeletons, a mummy, and a Frankenstein! 😍
This step made our haunted houses really come to life...and we just can't thank Kaitlyn @artwithmrs.e enough for sharing this awesome lesson and drawing guide! THE ABSOLUTE BEST! ❀️❀️❀️
...
It was very evident how much our daughter loved this project...as we worked through each step...but the thing that solidified just how much she enjoyed it was - one weekend morning I walked downstairs to find her and her dad sitting at the table - and she was very excitedly teaching him how to draw his own haunted house - while she drew a few more herself (scroll to the last picture in the carousel)! πŸ₯°
...
#hauntedhouse #hauntedhouses #hauntedhousedrawing #directeddrawing #spookyart #halloween #happyhalloween #halloweenart #halloweenfun #elementaryart #homeschoolart #homeschool #homeschoolfun #capturingparenthood
I decided that these six little pumpkins needed a I decided that these six little pumpkins needed a permanent place on our feed...because WE GREW THEM OURSELVES!!! πŸŽƒ
That's right...first-time pumpkin-growers over here...and it was all actually a bit of a surprise. πŸ˜ƒ
...
You see, when we went to prep our garden beds this spring, we noticed a plant that had already started growing. We assumed it was a cucumber plant, since it was in the same place we had cucumbers last year.
We left it alone and planted a couple of other cucumber plants nearby. πŸ₯’
At first, the leaves on our mystery plant looked very similar to the leaves on our other cucumber plants.
But a couple of weeks later the plant had grown A LOT bigger. It was now obvious that it was not a cucumber plant. But what was it? πŸ€·β€β™€οΈ
...
And that's when it suddenly dawned on these exhausted parents, that our daughter had spontaneously tossed seeds from her pumpkin (last Halloween), into the garden bed. πŸ€¦β€β™€οΈ The mystery was finally solved...and by the looks of the large golden flowers that were emerging all over the vines...we figured we might have a few pumpkins come fall! πŸ™ŒπŸŽƒπŸ™Œ
...
It was so much fun to watch the pumpkin plant grow! 🀩 We had to cut down the wire on one side of our garden bed to let the vines out...and they ended up growing 6-10 feet long in both directions! 😳 It was crazy!
They put out the most gorgeous flowers...that the bees absolutely loved! 🧑 And soon enough, we spotted a few round gourds growing at the base of some of the flowers. They grew quickly...and then turned a beautiful shade of orange! 😍
...
Needless to say, we are now officially pumpkin-growing people! πŸ˜‚ My husband can't wait to plant more next year...and he's already looking in to different varieties - hoping to grow some larger jack-o-lantern style ones next season! πŸŽƒ
…
#pumpkins #growingpumpkins #ourpumpkinpatch #homegrownpumpkins #homegrown #homegarden #pumpkingrowing #gardening #fallharvest #happyhalloween #timetocarvesomepumpkins #gardensurprises #gardenfun #capturingparenthood
Free the Frankensteins from the Frozen Rainbow Bra Free the Frankensteins from the Frozen Rainbow Brain! 😬🌈🧠
…
Yesterday, we shared how we made this colorful, frozen rainbow brain - full of Frankenstein mini erasers…and today we wanted to show you what became of our beautiful brain! πŸ˜ƒ
…
We popped it out onto a tray, grabbed a shaker of salt, a bottle of warm water (colored red for added effect), and some tongs.
And then it was time to Free the Frankensteins (our daughter coined the phrase)! πŸ˜‰
…
This spooky activity provides chilly sensory play, motor skills practice, and scientific exploration (salt and warm water speed-up the melting process)! πŸ™ŒπŸ™ŒπŸ™Œ
As an added bonus…you also get some color-mixing! And the addition of the salt makes it extra sparkly too! 😍🀩😍
…
Eventually, all you’re left with is some mini erasers floating in a pool of colorful water…and a happy kid! ❀️❀️❀️
…
#frozenbrain #rainbowbrain #frozenrainbowbrain #brains #freethefrankensteins #halloween #happyhalloween #halloweenactivities #halloweenactivitiesforkids #halloweensensoryplay #sensoryplay #sensoryexploration #motorskills #motorskillsdevelopment #scienceforkids #kidscience #funactivities #funactivitiesforkids #halloweenfun #capturingparenthood
We are definitely getting into the fall and Hallow We are definitely getting into the fall and Halloween spirit...so during a recent homeschool art session, we decided to make some air-dry clay pumpkins and jack-o-lanterns! πŸŽƒπŸŽƒπŸŽƒ
...
Back in 2019, Lauralee @2art.chambers shared several colorful, air-dry clay pumpkins that her students made...and after rediscovering the saved post, I decided that it would be a perfect October art lesson for us too! 🧑
...
We used various colors of air-dry clay, and rolled each color into whatever pumpkin shape we wanted...and then we added our lines/indentations using the side of a credit card. πŸ’³ The stems are just small, broken pieces of old crayons (another genius idea from Lauralee). πŸ– And we topped our stems with pieces of pipe cleaner, to create the little curly cues. 😍
...
Once we had our pumpkins...we decided to change things up a bit, and grabbed our stash of googly eyes. πŸ‘€ (Most of) our fall pumpkins then transformed into Halloween jack-o-lanterns! πŸŽƒ
We pressed the googly eyes into the clay, and we used a few small tools (that came with our box of air-dry clay) to add their mouths. πŸ˜ƒ
...
And now we have a cute and colorful crew of clay pumpkins adorning our mantle! πŸŽƒπŸ§‘πŸŽƒ
...
#pumpkins #jackolanterns #claypumpkins #airdryclay #airdryclaycreation #airdryclayart #airdryclaypumpkins #elementaryart #fallartprojects #fallartprojectsforkids #halloweenart #halloweenartprojects #halloweenartprojectsforkids #homeschool #homeschoolart #homeschoolfun #halloween #happyhalloween #capturingparenthood
Andrew from @elementaryarts shared a patterned, bl Andrew from @elementaryarts shared a patterned, block letter name project a couple of weeks ago (I'll share the post in stories today), and I immediately added it to our list of art projects to do this year! 😍
But we decided to switch things up a little bit! Instead of using our names, we each picked a color that we like...wrote the name of the color in block letters on our paper...and created our color patterns using at least two different shades of our chosen color. πŸ–
...
This colorful project ended up being a lot of fun, and also very relaxing...as we all quietly focused, and zoned in on adding the color patterns around all of our letters. It was actually a bit hypnotizing! 🀩
...
Needless to say, we are really happy with the way our block letter color project turned out! πŸ™Œ We even had a special guest who wanted to join in on this art project! ❀️
...
P.S. We also used Andrew’s free TPT handout on how to make block letters! The bundle includes bubble letters, cursive letters, graffiti letters, and more! πŸ‘
…
#blockletters #blocklettering #colors #color #colorful #artproject #artforkids #kidart #elementaryart #artactivity #artactivities #artactivitiesforkids #colorfun #homeschool #homeschoolart #homeschoolfun #capturingparenthood
We created self-portraits for our first art projec We created self-portraits for our first art project of our homeschool year...and we are pretty obsessed with them! 🀩✏️🀩
...
I love the idea of doing a self-portrait project at the beginning of the year, and then again at the end of the year...so that we can see how much we've grown and changed.
...
We used Kaitlyn's @artwithmrs.e Simple Self-Portrait Drawing Guide and it was so incredibly helpful (especially for this new homeschool teacher who wouldn't necessarily list drawing as one of her stronger suits). πŸ˜‰
We actually purchased her entire Guided Drawing Bundle (over on Teachers Pay Teachers) and we highly recommend it! πŸ™ŒπŸ™ŒπŸ™Œ
...
We looked through the self-portrait drawing guide to get different ideas for our eyes, nose, mouth, and hair. πŸ‘€πŸ‘ƒπŸ‘„
...
Now...if you caught our stories earlier this week, you know that our daughter recently made a pretty big change to her hair (that included a partial side-shave and bob-length cut - she also dyed it blue). πŸ’‡β€β™€οΈ
She was used to drawing pictures of herself with her long, blonde locks...and her new hairstyle proved rather difficult. But she persevered, and ended up with a self-portrait that she was truly proud of! πŸ₯°
...
When we were finished drawing our likenesses, we decided to cut them out and create a special background to glue them onto. I went with random black and white designs...and our nugget decided to draw various things that she loves (her family, winter, candy, books, dolphins...and more)! ❀️
...
It was such a fun project...and I can't wait to see what our self-portraits look like at the end of our school year! πŸ˜ƒ
...
#selfportrait #selfportraits #homeschool #homeschoolart #elementaryart #artactivities #artactivitiesforkids #artforkids #kidart #homeschoolfun #capturingparenthood
Follow on Instagram

Popular Posts

Virtual Spring Break: Day Five - New York City

Virtual Spring Break: Day Five – New York City

Virtual Spring Break: Day Four - Mexico

Virtual Spring Break: Day Four – Mexico

Virtual Spring Break: Day Three - India

Virtual Spring Break: Day Three – India

Join Us on Instagram

Ok...@artwithmrs.e Haunted House project is hands- Ok...@artwithmrs.e Haunted House project is hands-down the best Halloween-themed art project out there! πŸ™ŒπŸ™ŒπŸ™Œ
We had a blast creating haunted houses for homeschool art this month! 🧑
...
We followed Kaitlyn's extremely helpful Haunted House Drawing Guide (you can find it over on her Teachers Pay Teachers account) and completed the project over the course of 3 lessons.
...
During our first lesson, we sketched our houses in pencil, and added some eerie exterior landscaping. πŸͺ¦πŸ¦‡
We popped in a few spooky characters (ghosts, spiders, pumpkins, and a vampire). πŸ‘»πŸ•·πŸŽƒπŸ§›
And then we traced over our pencil lines with black Sharpie.
...
During our next lesson, we used a coloring technique that we learned from Kristian @friendsartlab ❀️ We colored our pictures with oil pastels...and then painted over the top of the oil pastels with baby oil...it causes the oil pastels to bleed and blend together! 🀩
...
During our final lesson...we added more spooky characters to the inside of our house...that can peek out behind the doors and windows. πŸ’€πŸ§™β€β™€οΈπŸ‘»
To do this...I used an X-acto knife and carefully cut around the outside edges of the doors/windows (leaving the hinge sides intact so that they could fold open and closed).
We placed yellow construction paper in the background...and added witches, ghosts, skeletons, a mummy, and a Frankenstein! 😍
This step made our haunted houses really come to life...and we just can't thank Kaitlyn @artwithmrs.e enough for sharing this awesome lesson and drawing guide! THE ABSOLUTE BEST! ❀️❀️❀️
...
It was very evident how much our daughter loved this project...as we worked through each step...but the thing that solidified just how much she enjoyed it was - one weekend morning I walked downstairs to find her and her dad sitting at the table - and she was very excitedly teaching him how to draw his own haunted house - while she drew a few more herself (scroll to the last picture in the carousel)! πŸ₯°
...
#hauntedhouse #hauntedhouses #hauntedhousedrawing #directeddrawing #spookyart #halloween #happyhalloween #halloweenart #halloweenfun #elementaryart #homeschoolart #homeschool #homeschoolfun #capturingparenthood
I decided that these six little pumpkins needed a I decided that these six little pumpkins needed a permanent place on our feed...because WE GREW THEM OURSELVES!!! πŸŽƒ
That's right...first-time pumpkin-growers over here...and it was all actually a bit of a surprise. πŸ˜ƒ
...
You see, when we went to prep our garden beds this spring, we noticed a plant that had already started growing. We assumed it was a cucumber plant, since it was in the same place we had cucumbers last year.
We left it alone and planted a couple of other cucumber plants nearby. πŸ₯’
At first, the leaves on our mystery plant looked very similar to the leaves on our other cucumber plants.
But a couple of weeks later the plant had grown A LOT bigger. It was now obvious that it was not a cucumber plant. But what was it? πŸ€·β€β™€οΈ
...
And that's when it suddenly dawned on these exhausted parents, that our daughter had spontaneously tossed seeds from her pumpkin (last Halloween), into the garden bed. πŸ€¦β€β™€οΈ The mystery was finally solved...and by the looks of the large golden flowers that were emerging all over the vines...we figured we might have a few pumpkins come fall! πŸ™ŒπŸŽƒπŸ™Œ
...
It was so much fun to watch the pumpkin plant grow! 🀩 We had to cut down the wire on one side of our garden bed to let the vines out...and they ended up growing 6-10 feet long in both directions! 😳 It was crazy!
They put out the most gorgeous flowers...that the bees absolutely loved! 🧑 And soon enough, we spotted a few round gourds growing at the base of some of the flowers. They grew quickly...and then turned a beautiful shade of orange! 😍
...
Needless to say, we are now officially pumpkin-growing people! πŸ˜‚ My husband can't wait to plant more next year...and he's already looking in to different varieties - hoping to grow some larger jack-o-lantern style ones next season! πŸŽƒ
…
#pumpkins #growingpumpkins #ourpumpkinpatch #homegrownpumpkins #homegrown #homegarden #pumpkingrowing #gardening #fallharvest #happyhalloween #timetocarvesomepumpkins #gardensurprises #gardenfun #capturingparenthood
Free the Frankensteins from the Frozen Rainbow Bra Free the Frankensteins from the Frozen Rainbow Brain! 😬🌈🧠
…
Yesterday, we shared how we made this colorful, frozen rainbow brain - full of Frankenstein mini erasers…and today we wanted to show you what became of our beautiful brain! πŸ˜ƒ
…
We popped it out onto a tray, grabbed a shaker of salt, a bottle of warm water (colored red for added effect), and some tongs.
And then it was time to Free the Frankensteins (our daughter coined the phrase)! πŸ˜‰
…
This spooky activity provides chilly sensory play, motor skills practice, and scientific exploration (salt and warm water speed-up the melting process)! πŸ™ŒπŸ™ŒπŸ™Œ
As an added bonus…you also get some color-mixing! And the addition of the salt makes it extra sparkly too! 😍🀩😍
…
Eventually, all you’re left with is some mini erasers floating in a pool of colorful water…and a happy kid! ❀️❀️❀️
…
#frozenbrain #rainbowbrain #frozenrainbowbrain #brains #freethefrankensteins #halloween #happyhalloween #halloweenactivities #halloweenactivitiesforkids #halloweensensoryplay #sensoryplay #sensoryexploration #motorskills #motorskillsdevelopment #scienceforkids #kidscience #funactivities #funactivitiesforkids #halloweenfun #capturingparenthood
We are definitely getting into the fall and Hallow We are definitely getting into the fall and Halloween spirit...so during a recent homeschool art session, we decided to make some air-dry clay pumpkins and jack-o-lanterns! πŸŽƒπŸŽƒπŸŽƒ
...
Back in 2019, Lauralee @2art.chambers shared several colorful, air-dry clay pumpkins that her students made...and after rediscovering the saved post, I decided that it would be a perfect October art lesson for us too! 🧑
...
We used various colors of air-dry clay, and rolled each color into whatever pumpkin shape we wanted...and then we added our lines/indentations using the side of a credit card. πŸ’³ The stems are just small, broken pieces of old crayons (another genius idea from Lauralee). πŸ– And we topped our stems with pieces of pipe cleaner, to create the little curly cues. 😍
...
Once we had our pumpkins...we decided to change things up a bit, and grabbed our stash of googly eyes. πŸ‘€ (Most of) our fall pumpkins then transformed into Halloween jack-o-lanterns! πŸŽƒ
We pressed the googly eyes into the clay, and we used a few small tools (that came with our box of air-dry clay) to add their mouths. πŸ˜ƒ
...
And now we have a cute and colorful crew of clay pumpkins adorning our mantle! πŸŽƒπŸ§‘πŸŽƒ
...
#pumpkins #jackolanterns #claypumpkins #airdryclay #airdryclaycreation #airdryclayart #airdryclaypumpkins #elementaryart #fallartprojects #fallartprojectsforkids #halloweenart #halloweenartprojects #halloweenartprojectsforkids #homeschool #homeschoolart #homeschoolfun #halloween #happyhalloween #capturingparenthood
Andrew from @elementaryarts shared a patterned, bl Andrew from @elementaryarts shared a patterned, block letter name project a couple of weeks ago (I'll share the post in stories today), and I immediately added it to our list of art projects to do this year! 😍
But we decided to switch things up a little bit! Instead of using our names, we each picked a color that we like...wrote the name of the color in block letters on our paper...and created our color patterns using at least two different shades of our chosen color. πŸ–
...
This colorful project ended up being a lot of fun, and also very relaxing...as we all quietly focused, and zoned in on adding the color patterns around all of our letters. It was actually a bit hypnotizing! 🀩
...
Needless to say, we are really happy with the way our block letter color project turned out! πŸ™Œ We even had a special guest who wanted to join in on this art project! ❀️
...
P.S. We also used Andrew’s free TPT handout on how to make block letters! The bundle includes bubble letters, cursive letters, graffiti letters, and more! πŸ‘
…
#blockletters #blocklettering #colors #color #colorful #artproject #artforkids #kidart #elementaryart #artactivity #artactivities #artactivitiesforkids #colorfun #homeschool #homeschoolart #homeschoolfun #capturingparenthood
We created self-portraits for our first art projec We created self-portraits for our first art project of our homeschool year...and we are pretty obsessed with them! 🀩✏️🀩
...
I love the idea of doing a self-portrait project at the beginning of the year, and then again at the end of the year...so that we can see how much we've grown and changed.
...
We used Kaitlyn's @artwithmrs.e Simple Self-Portrait Drawing Guide and it was so incredibly helpful (especially for this new homeschool teacher who wouldn't necessarily list drawing as one of her stronger suits). πŸ˜‰
We actually purchased her entire Guided Drawing Bundle (over on Teachers Pay Teachers) and we highly recommend it! πŸ™ŒπŸ™ŒπŸ™Œ
...
We looked through the self-portrait drawing guide to get different ideas for our eyes, nose, mouth, and hair. πŸ‘€πŸ‘ƒπŸ‘„
...
Now...if you caught our stories earlier this week, you know that our daughter recently made a pretty big change to her hair (that included a partial side-shave and bob-length cut - she also dyed it blue). πŸ’‡β€β™€οΈ
She was used to drawing pictures of herself with her long, blonde locks...and her new hairstyle proved rather difficult. But she persevered, and ended up with a self-portrait that she was truly proud of! πŸ₯°
...
When we were finished drawing our likenesses, we decided to cut them out and create a special background to glue them onto. I went with random black and white designs...and our nugget decided to draw various things that she loves (her family, winter, candy, books, dolphins...and more)! ❀️
...
It was such a fun project...and I can't wait to see what our self-portraits look like at the end of our school year! πŸ˜ƒ
...
#selfportrait #selfportraits #homeschool #homeschoolart #elementaryart #artactivities #artactivitiesforkids #artforkids #kidart #homeschoolfun #capturingparenthood
Follow on Instagram

Copyright © 2025 · glam theme by Restored 316

  • Policies + Disclosure
  • Contact