“I made myself a snowman, as perfect as can be. I thought I’d keep it as a pet, and let it sleep with me. But last night it ran away, but first – it wet my bed!”
In case you have yet to notice…we’ve been a bit snowman obsessed lately. 🙂 All we can think about is snowman stories, snowman snow globes, snowman snacks…and now we would like to introduce you to our Snowman Crafts!
It seemed only appropriate to stick with the snowman theme for our winter craft projects this year. And boy did we have a blast creating all of these colorful characters! They might just be our favorite set of seasonal crafts to date!
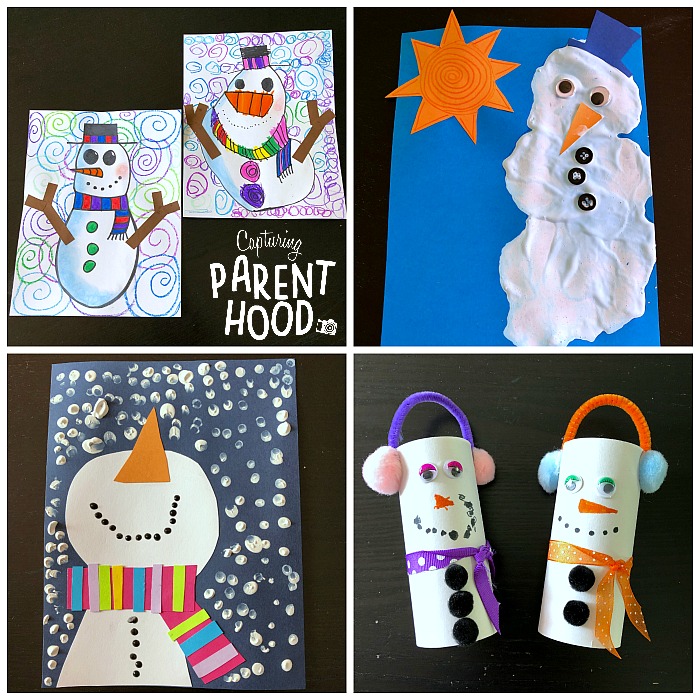
Spiral Snowman
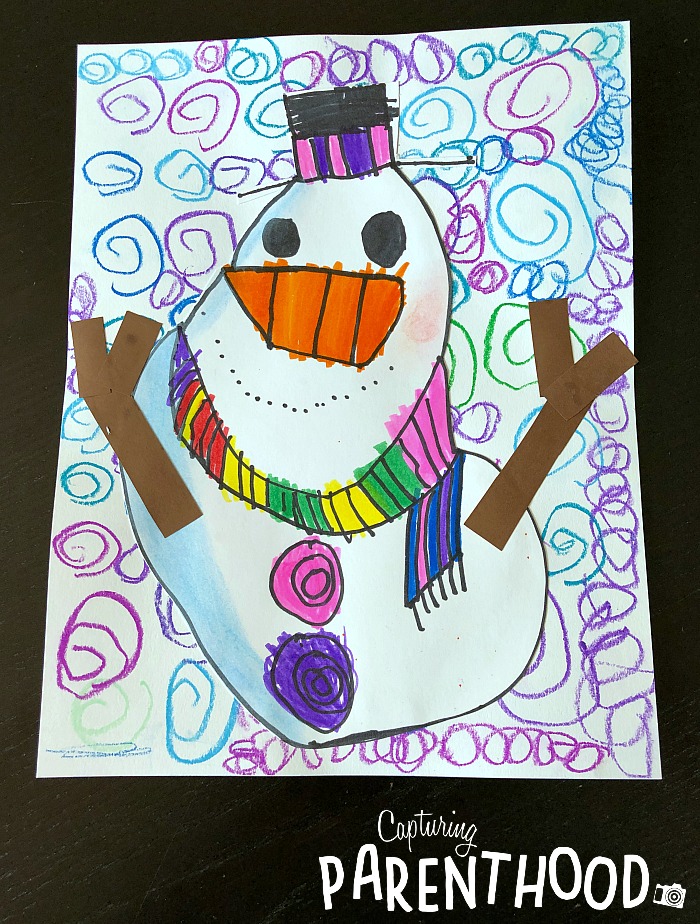
This adorable Spiral Snowman craft is actually from a lesson that the brilliant Cassie Stephens created for her kindergarten students. When I saw all of their colorful snowman creations on her Instagram feed, I immediately fell in love…and decided that my little nugget and I needed to make some spiral snowmen of our own. Cassie is an amazing art teacher, hailing from Nashville, Tennessee. And she makes the most fabulous and fun tutorial videos for a large majority of her lessons. Our little nugget loves watching her videos, and I love how Cassie makes each step so easy to follow. When we create one of Cassie’s amazing projects, we like to watch her full tutorial first (to grasp the entirety of the project) and then we go back and watch the video step-by-step, as we create our masterpieces in real time. Cassie’s snowman lesson can be found on her blog (along with the complete tutorial video).
Cassie’s students utilized watercolor paints to create the spiral backgrounds for their snowmen. In the instructional video, Cassie shares an amazing technique for teaching kiddos how to use a paintbrush properly (keeping it upright on it’s tippy-toes (as opposed to smushed down on the paper). I loved the look of the watercolor spirals, but we were running a bit short on time the day we decided to complete this craft, so I swapped the watercolor paints for our trusty oil pastels – and they worked perfectly!
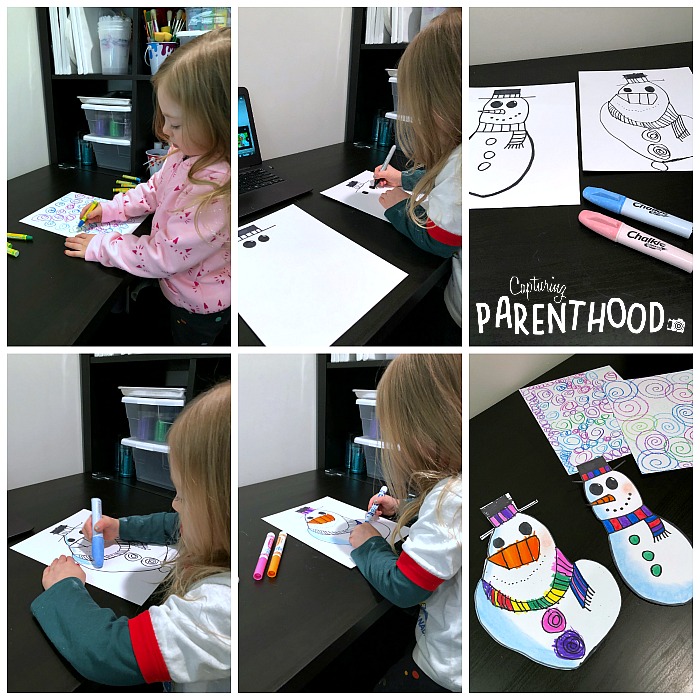
We began by creating our oil pastel spirals on a sheet of white paper. Once the paper was covered in colorful spirals, we moved on to our snowmen. We grabbed another sheet of white paper and a black Sharpie (since we did not have permanent ink bingo daubers, like Cassie). We drew our snowmen, per Cassie’s instructions. And then we colored in the left-side of our snowmen with a bit of blue chalk. Once the chalk was on the paper, we used one finger to gently rub it in. We used the same technique (with red chalk) to add a rosy cheek! I absolutely love the effect that the chalk creates! Next, Cassie suggests adding some color to the hat, nose, scarf, and buttons of your snowman. Her students, once again, used watercolors for this step…and we decided to bust out our favorite Crayola markers.
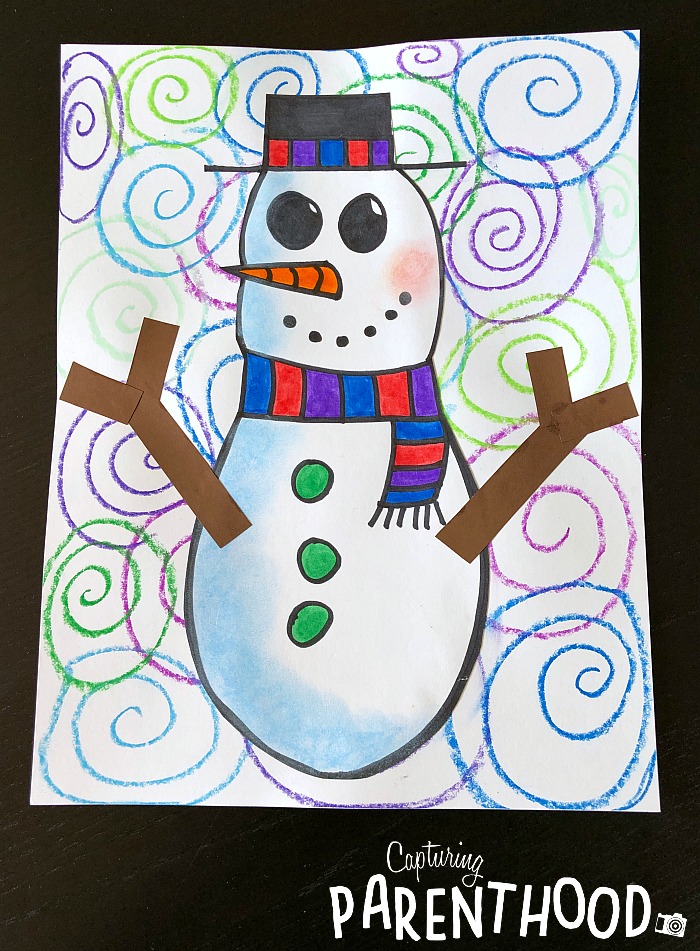
The final step for this crazy colorful Spiral Snowman craft, is to very carefully cut your snowman from the sheet of white paper, and glue it onto your spiral background. Once your snowman is adhered to the spiral background, feel free to add some arms. We cut a few rectangles from a piece of brown construction paper, and glued them on. Ta Da!
Melted Snowman Blow Painting
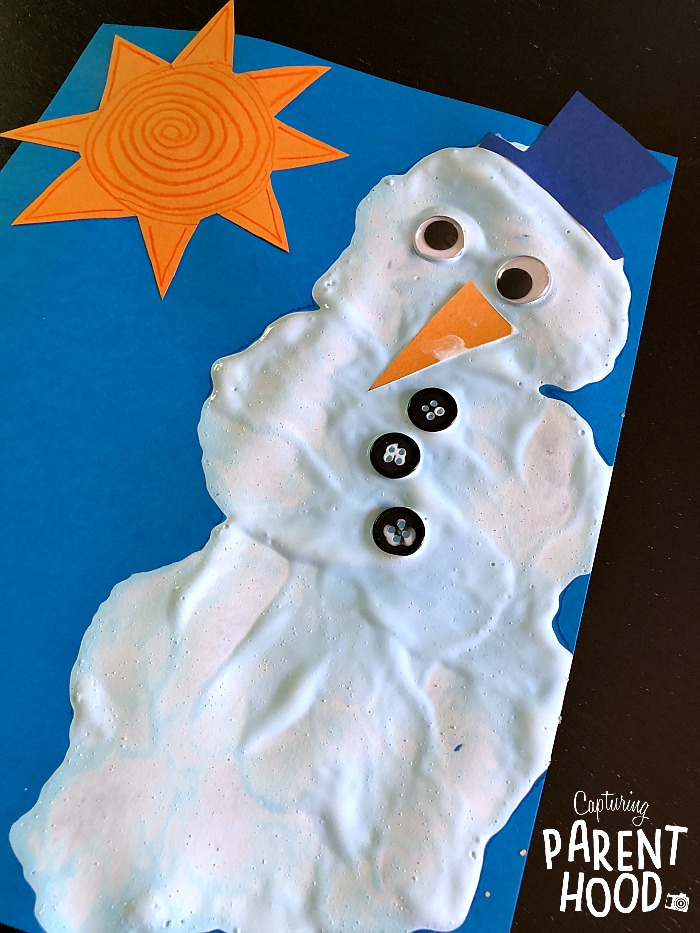
We had so much fun with our Fourth of July Blow Painting Process Art…I just knew that this Melting Snowman Blow Painting idea (from Kids Craft Room) would be a huge hit! We used Emma’s photos as inspiration, and set off to create our very own melted snowman craft.
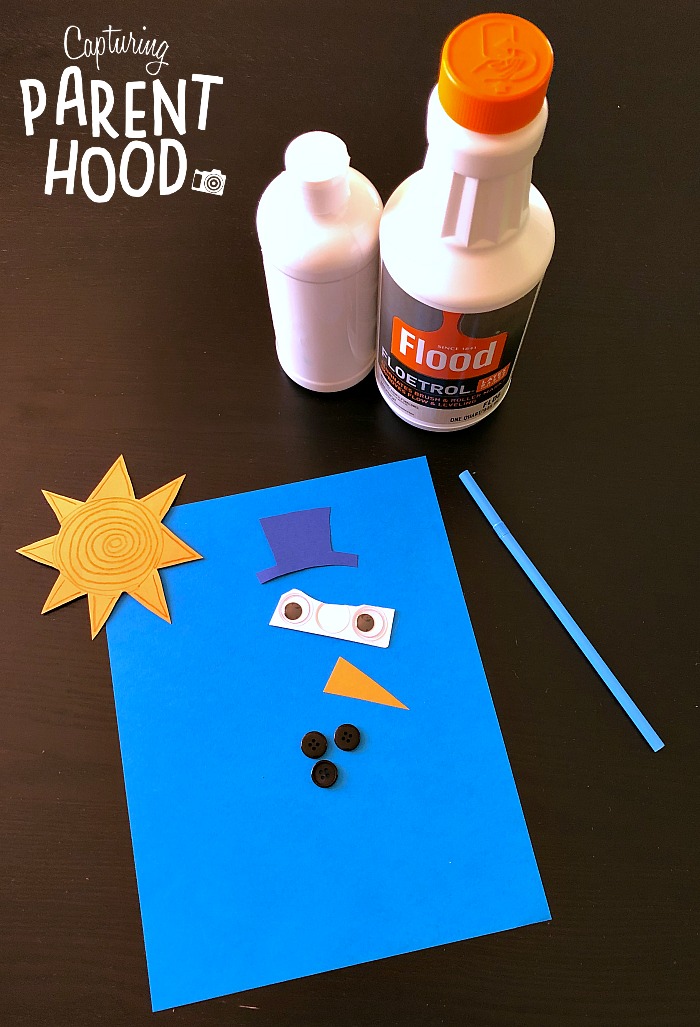
The supplies that we used are as follows: a sheet of light blue card stock, white acrylic paint, Flood Floetrol (to thin out the paint…in order for it to easily be blown around on the paper), a straw, orange construction paper or card stock, googly eyes, buttons, a piece of construction paper or card stock for the hat (in the color of your choosing), and a glue stick.
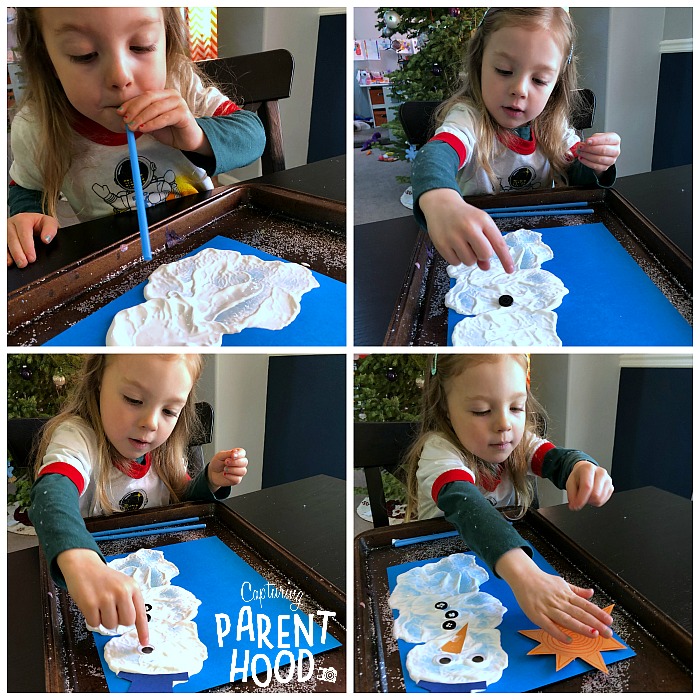
We started by getting all of our snowman’s accessories ready (i.e. gathering our googly eyes and buttons, cutting out a carrot nose and sunshine from the orange card stock, and a top hat from our dark blue card stock). In a small container, we mixed our white paint with the Floetrol additive. Using a spoon, we placed three blobs of white paint onto our blue background, with each blob of paint increasing in size. Our little nugget picked up her straw and started blowing the white paint around on the blue paper (spinning the paper as she went).
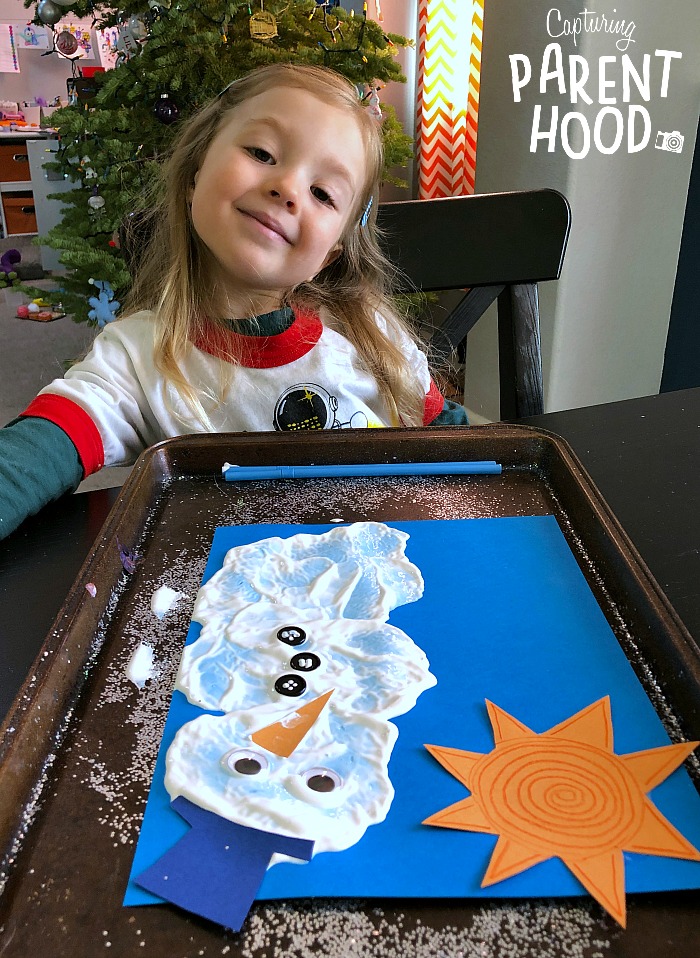
When she was completely satisfied with the shape of her melted snowman, she added the top hat, googly eyes, carrot nose, and buttons – while the paint was still wet. We decided to give our sunshine a bit more pizzazz, by adding some darker orange designs (with a colored pencil). And then we glued it to our blue background. A snowman wouldn’t stand a chance standing that close to the blazing hot sun. 🙂
Falling Snow Snowman
This Falling Snow Snowman craft was our little nugget’s absolute favorite! She loved it not only because the end result was an adorable snowman, but because it combined the art of collage and painting in one craft. She loves cutting paper, so the fact that she was able to cut out her snowman’s body, carrot nose, and scarf…all by herself…made her smile from ear to ear. And the finger-painting component was just the icing on the cake.
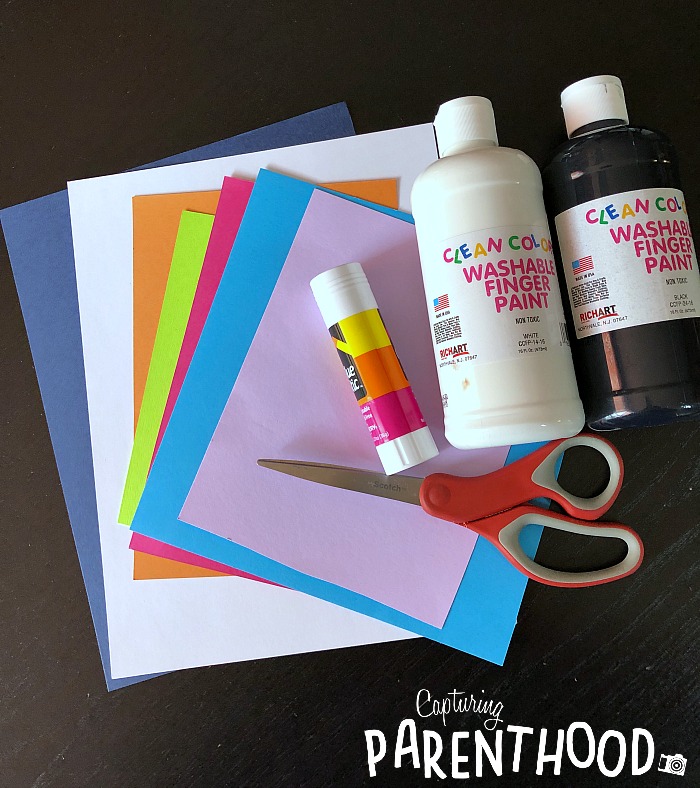
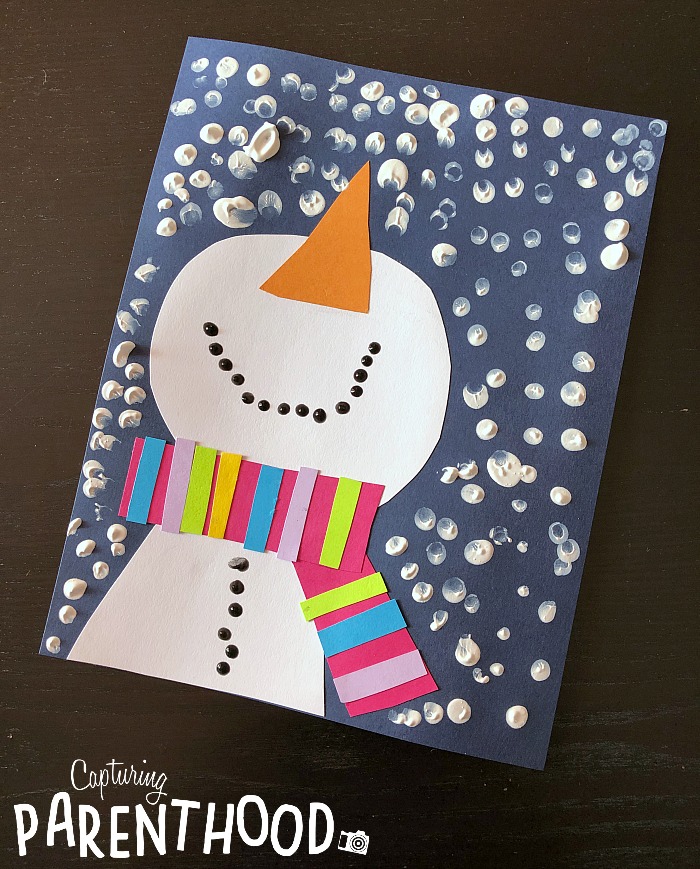
I’ve come across numerous pictures of this craft on Pinterest, but was unable to pin down the actual origin. Without instructions, we used the photos that we had as inspiration, and forged our own path. We created our snowy snowman using the following supplies: card stock (dark blue, white, orange, and a selection of vibrant colors for the scarf), a pencil, scissors, a glue stick, black paint, white paint, and a cotton swab.
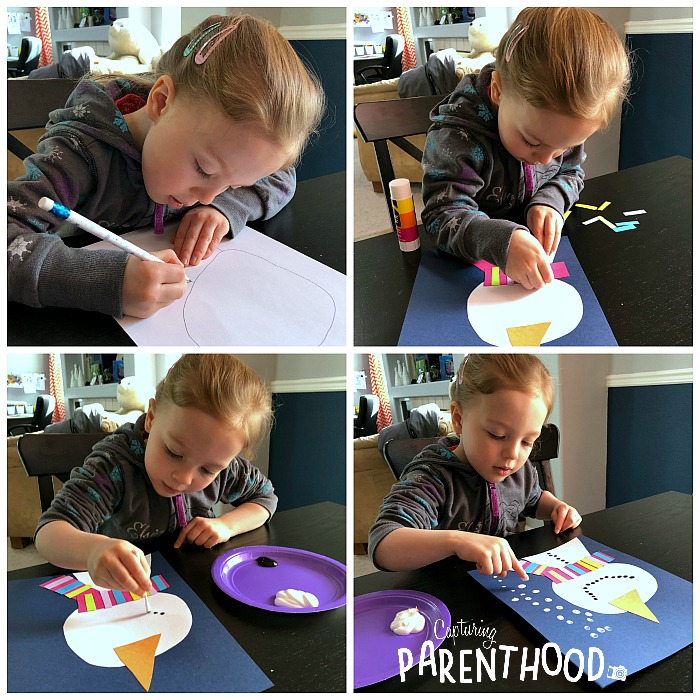
Our little nugget used a pencil to outline her snowman on the sheet of white card stock. When she was satisfied with the shape, she cut the snowman out, using a pair of scissors. She glued her snowman’s body onto the dark blue background. Next, it was time to cut out a carrot nose from the orange card stock, and glue it onto the snowman’s head (pointing up). She selected the main color of her snowman’s scarf, and cut two rectangles from the hot pink paper. One rectangle was glued horizontally across the snowman’s neck, while the other was glued at a diagonal on the side. Then it was time to add colorful stripes to the scarf, so she cut out smaller rectangles from various colors of card stock, and glued them all on.
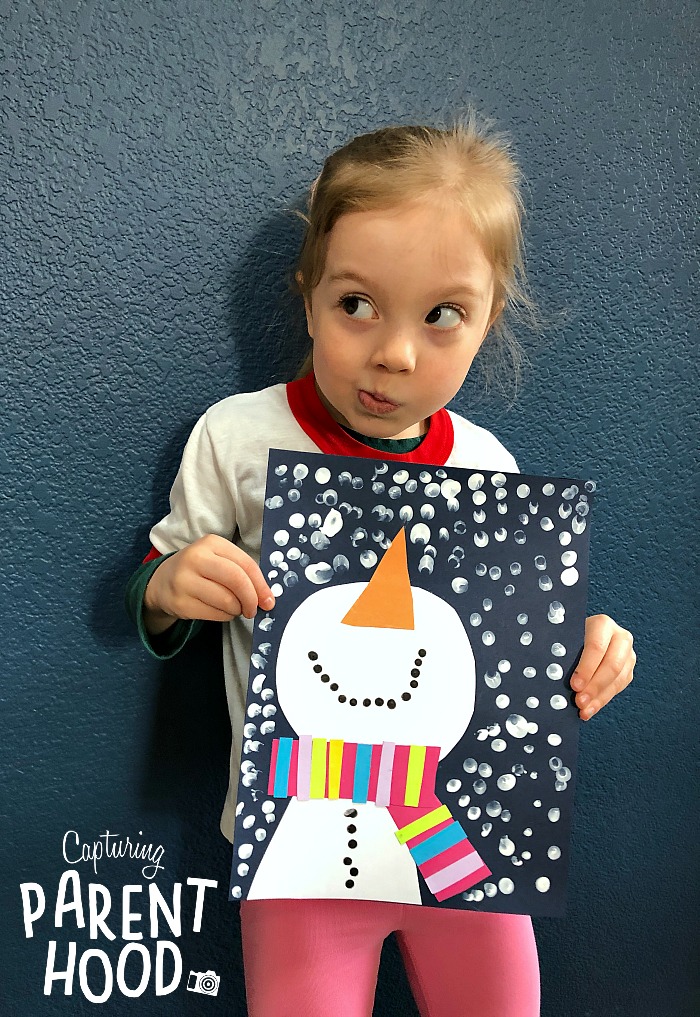
With the collage portion of the craft complete, it was time to paint! Our daughter chose to use a cotton swab to add little black dots of paint for the snowman’s mouth and buttons (her snowman loves buttons). 🙂 And then…the finishing touch…the falling snow! She dipped one finger into the white paint, and carefully placed white dots all around the snowman. When she was satisfied with her finger-painted snowfall, we set the entire piece of artwork aside to dry, before hanging it up on display in our dining room.
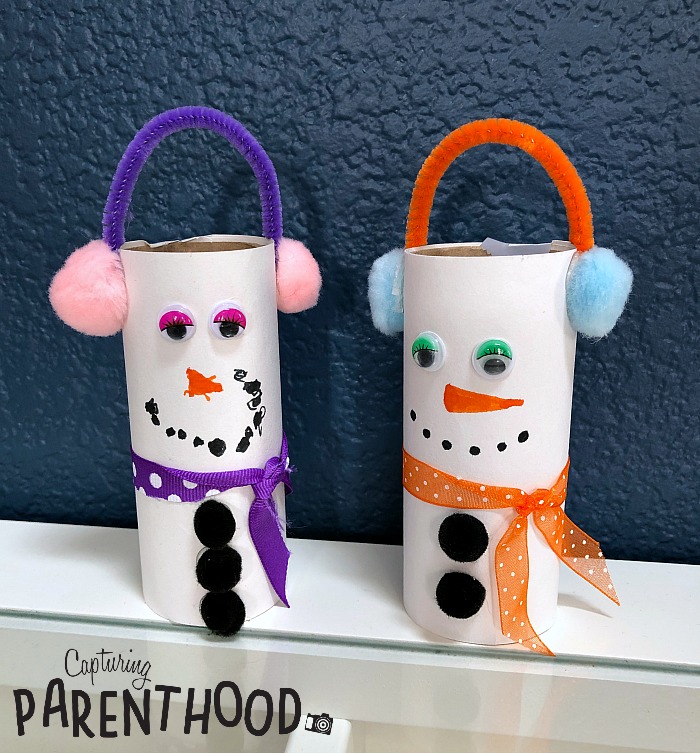
Toilet Paper Tube Snowmen with Earmuffs
Santa recently gifted me a pair of cute little monster earmuffs (in my stocking) and needless to say, they have become one of our little nugget’s favorite things to wear outside in chilly weather. Her new obsession with my earmuffs, was the main reason I stopped scrolling when I came across these cute Toilet Paper Roll Snowmen, over on Craftaholics Anonymous. In all honesty, I did not follow Linda’s tutorial…I just used her photos as a jumping off point.
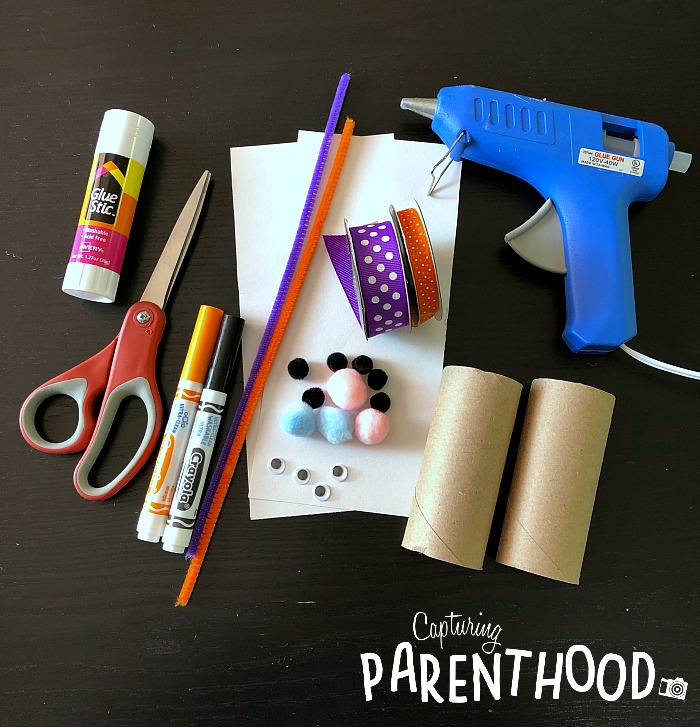
Our Toilet Paper Tube Snowmen were created using the following supplies: empty toilet paper tubes, white construction paper, tape, pipe cleaners, small and mini poms, googly eyes, ribbon, black and orange markers, glue stick (or regular glue), and a hot glue gun.
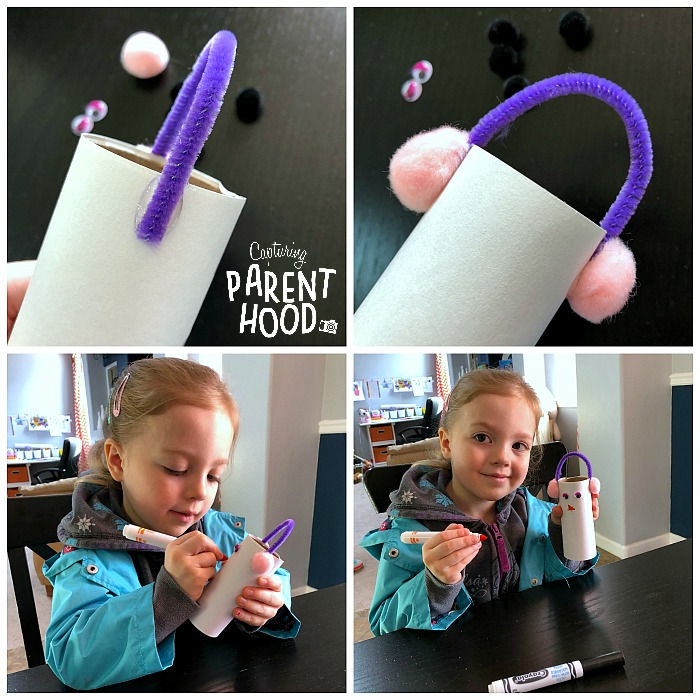
We began by cutting our white construction paper, to match the size of our toilet paper tubes. We rolled the tubes in the white paper and secured them with tape. Next, we cut our pipe cleaners down to the size that we desired for our earmuffs. I carefully hot-glued the pipe cleaners to the top-sides of our toilet paper tubes. Once the pipe cleaners were secure, I hot-glued a small pom on top of each end of the pipe cleaners. Then it was time to glue on our googly eyes, and draw on our carrot noses and mouths. We tied a piece of ribbon (scarf) below each mouth. Lastly, I hot-glued mini black poms below the scarves (for our snowmen’s buttons). And our Toilet Paper Tube Snowmen with Earmuffs were complete!
And there you have it – all of the fun snowman crafts that we’ve been busy making this year!
If you’re looking for some more snow-themed craft ideas (including a few more snowman crafts), make sure to check out our Winter-Themed Arts + Crafts for Kids post from last year, as well as our Winter Wonderland Arts + Crafts from 2017.