• Home
  • About
  • Kid Zone
    • Activities
    • Arts + Crafts
    • Books Books Books
  • Food
    • Family-Friendly
    • Kids
    • Sweets
    • Dog-Friendly
  • Life + Motherhood
    • Pregnancy
    • Parenting
    • House + Home
  • Let’s Party
    • Birthdays
    • Holidays
    • Instagram
    • Pinterest

Capturing Parenthood

Air-Dry Clay Bugs

in Arts + Crafts, Toddler Zone on May 23, 2019

In case you haven’t noticed, it’s getting a little buggy on Capturing Parenthood this week! πŸ™‚ On Tuesday, we shared a super fun Tissue Paper Bugs craft. And today, we are sharing an assortment of adorable Air-Dry Clay Bugs!

Air-Dry Clay Bugs

Spring always seems like the best time of year to learn all about bugs! In fact, our daughter’s preschool class just released their butterflies (that they watched transform from caterpillars) a few weeks ago. And we’ve started noticing an assortment of bees and butterflies flitting around our backyard. I think that they are just as excited for the warmer weather as we are. So…to celebrate the return of some of our favorite insects…we decided to make a few colorful bugs of our very own!


Air-Dry Clay Bugs
Supplies:

Air-Dry Clay Bugs

  • Air-Dry Clay
  • Pipe Cleaners
  • Googly Eyes
  • Toothpicks (for structural purposes)
  • Scissors
  • Sparkly Gems (optional)
Instructions:

Air-Dry Clay Bugs

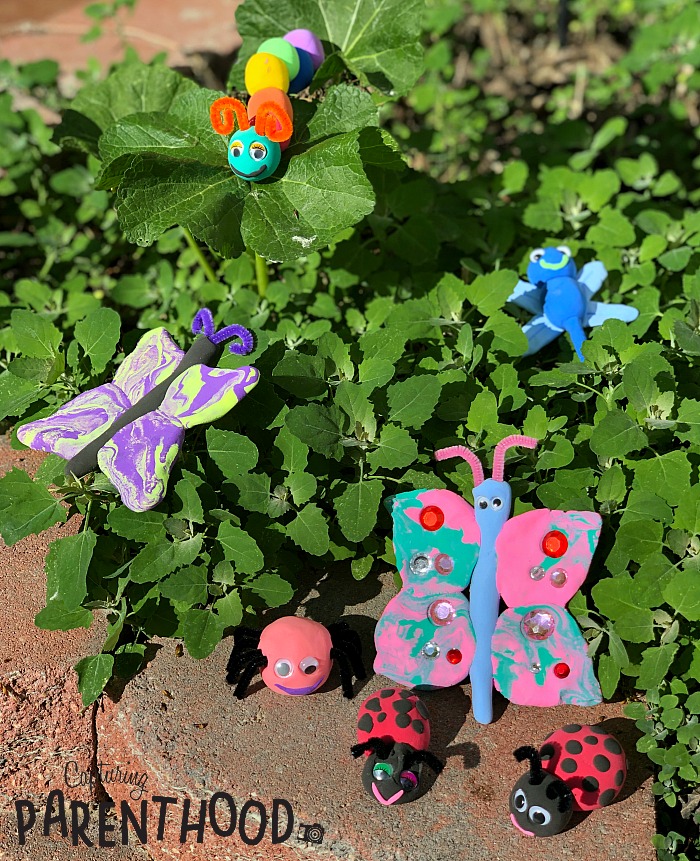
Making air-dry clay bugs is a very open-ended craft that involves lots of rolling and shaping of various colors of clay. You can create any type of bug that you wish…in whatever colors your heart desires. We chose to make butterflies, ladybugs, a caterpillar, a spider, and a dragonfly…but the possibilities are endless! And now, I will quickly take you through the creative process for each one of our clay bugs.

Rainbow Caterpillar

Air-Dry Clay Bugs

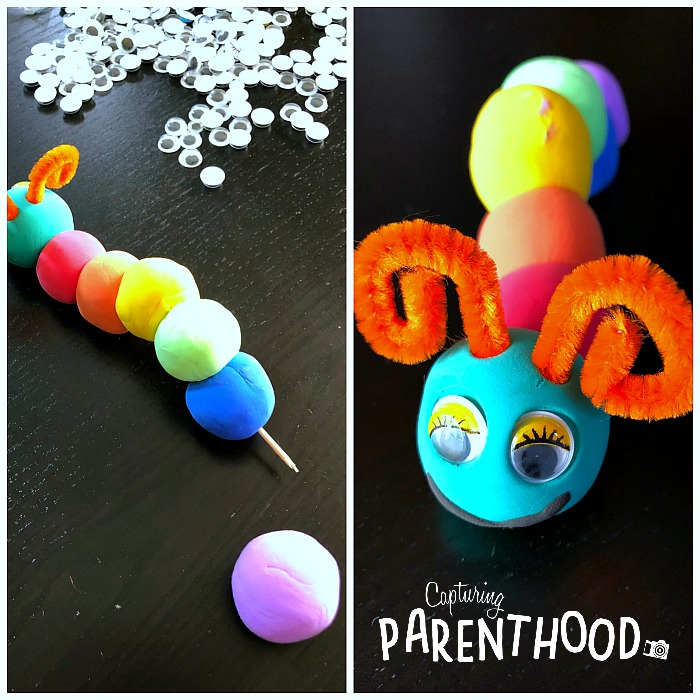
To make a rainbow caterpillar, you will need seven balls of clay (red, orange, yellow, green, blue, purple…and one more color for the head. You will also need a few toothpicks, two googly eyes, and a pipe cleaner (cut into two 2″-3″ pieces and twisted into antennae). Start by rolling a ball in the color that you’ve chosen for the caterpillar’s head. Push two googly eyes into the clay on one side of the ball. Stick the pipe cleaner antennae down into the clay on top of the head. Feel free to grab a very tiny piece of clay (in a different color) and roll it into a tiny snake. Gently press the tiny snake onto the clay ball (under the eyes) to create a smile.

Air-Dry Clay Bugs

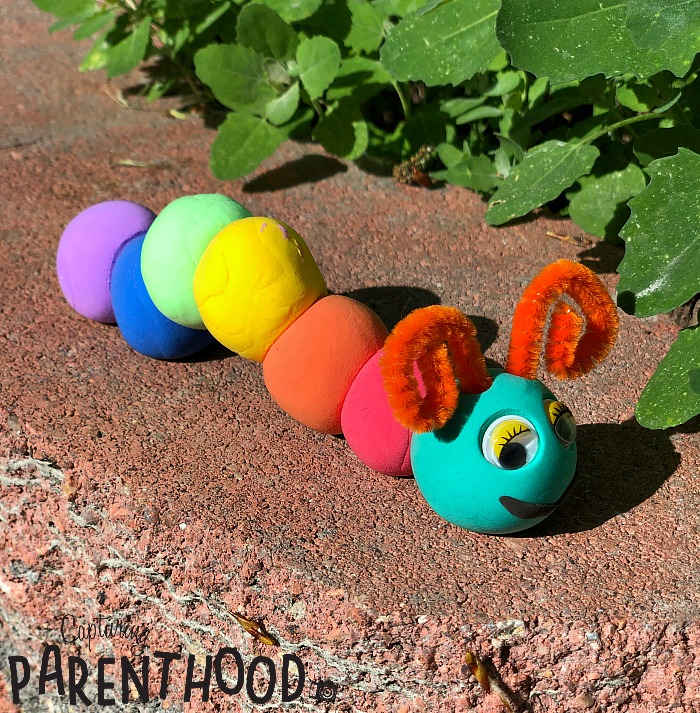
Working with one color at a time, roll a ball of red, orange, yellow, green, blue, and purple clay. We decided to make these particular balls of clay a tad smaller than the caterpillar’s head. Now, you’re ready to assemble your clay caterpillar. Carefully break a toothpick into two (or three) pieces. Slide one piece into the back of the caterpillar’s head (half-way). Slide the red ball of clay onto the other half of the toothpick, and press it down gently into the head of the caterpillar. Repeat this toothpick process, until the rest of the rainbow-colored clay balls have been adhered to the caterpillar. For a bit of fun…you can even elevate a couple of the clay balls – to give the appearance that the caterpillar is on the move! πŸ™‚

Marbled Butterflies

Air-Dry Clay Bugs

We all know that caterpillars transform into beautiful butterflies…so we obviously had to make a couple of butterflies to add to our clay bug collection. πŸ™‚ A few months ago, we stumbled upon the most gorgeous marbled clay butterflies, that Lauralee (from @2art.chambers) did with her elementary school students. So, when it came time to create our very own butterflies, we knew that we wanted to marble the colors too!

Air-Dry Clay Bugs

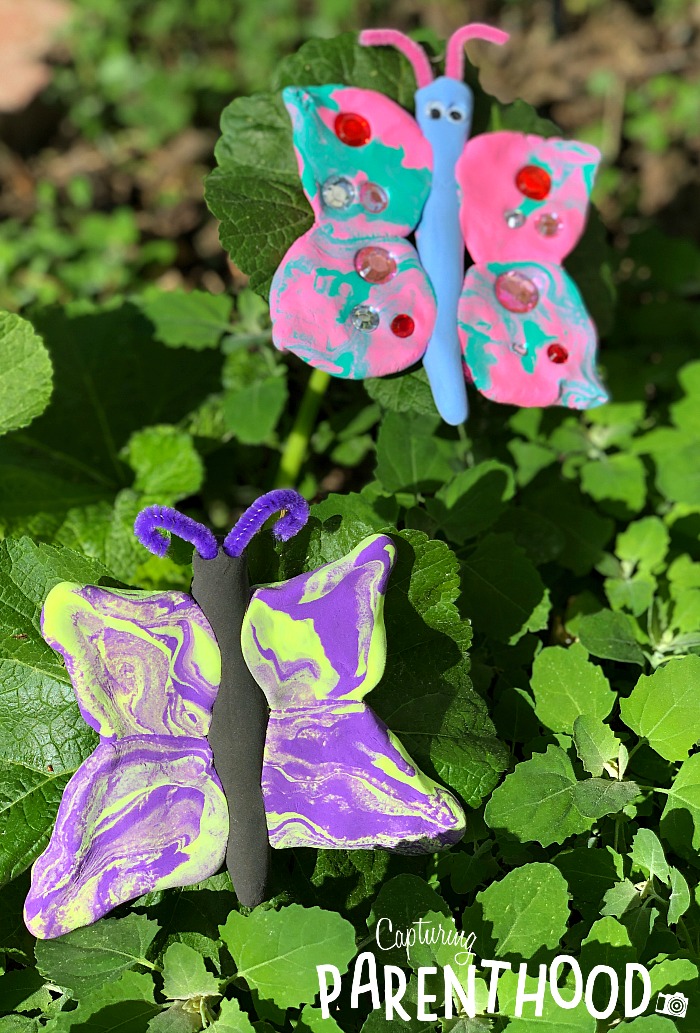
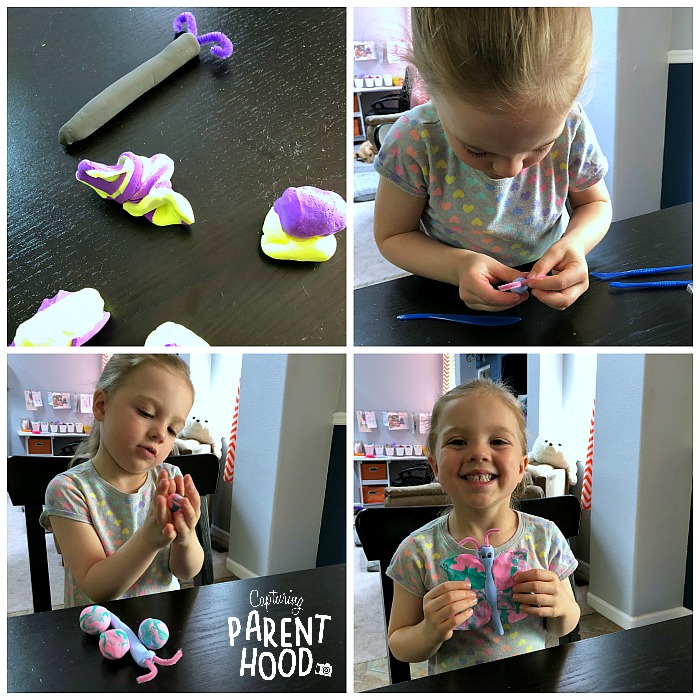
To start, chose three colors of clay that you would like to use (one for the butterfly’s body, and two more for the marbled wings). Roll the body color of clay between your hands to create a short, stubby snake. Cut a pipe cleaner into two 2″-3″ pieces and curl them into antennae. Stick the pipe cleaner antenna down into the top of the butterfly’s body. Feel free to poke a couple of small googly eyes into the clay, below the antennae (if so desired). Now, it’s time to marble the clay for the wings. Create four small(ish) balls of clay in each of the remaining two clay colors (giving you a total of eight balls of clay). Take one ball of each color and twist it, stretch it, and squish it back together…until you create the marbled effect that you’re looking for. Note: You don’t want to mix the two colors of clay too much, because they will start to make one integrated color.Β Repeat the marbling process with the remaining clay balls, until you have four marbled balls of clay. Place two balls of marbled clay on the left-side of the butterfly’s body, and two balls on the right. Squash each ball down gently, so that it attaches to the butterfly’s body. Shape the flattened clay into wing shapes. Feel free to add some extra sparkle to your butterfly, by pressing a few colorful gems into the wings. Ta Da!

Ladybugs

Air-Dry Clay Bugs

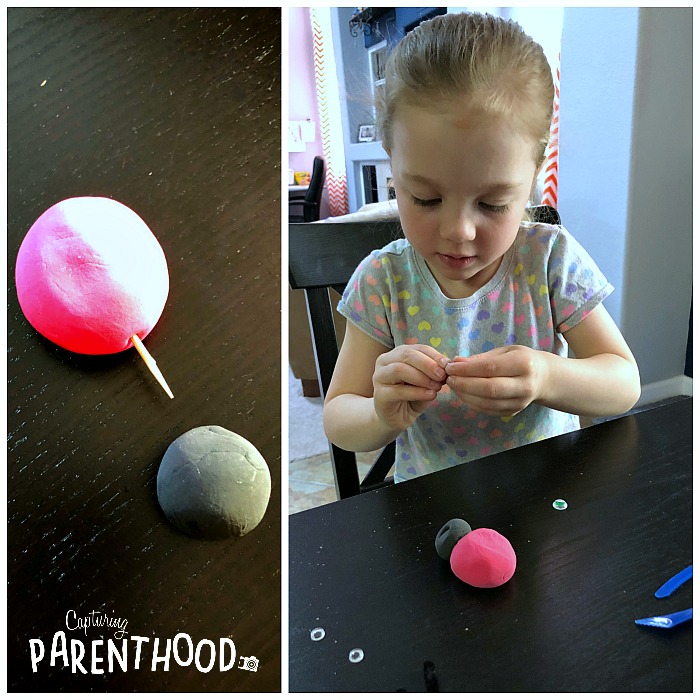
Ladybugs always put a smile on my face, and these clay ladybugs are no exception! If you would like to make a cute clay ladybug too, all you need is some red and black clay, a toothpick, a black pipe cleaner, and a pair of googly eyes. Start by rolling a small ball of black clay (for the ladybug’s head), and a larger ball of red clay (for the body). You will want to press the red ball down very gently, to turn it into more of an oval shape. Carefully break a toothpick into two pieces. Slide one piece halfway into the ladybug’s body. Slide the head onto the remaining (exposed) half of the toothpick, gently pressing the two pieces of clay together.

Air-Dry Clay Bugs

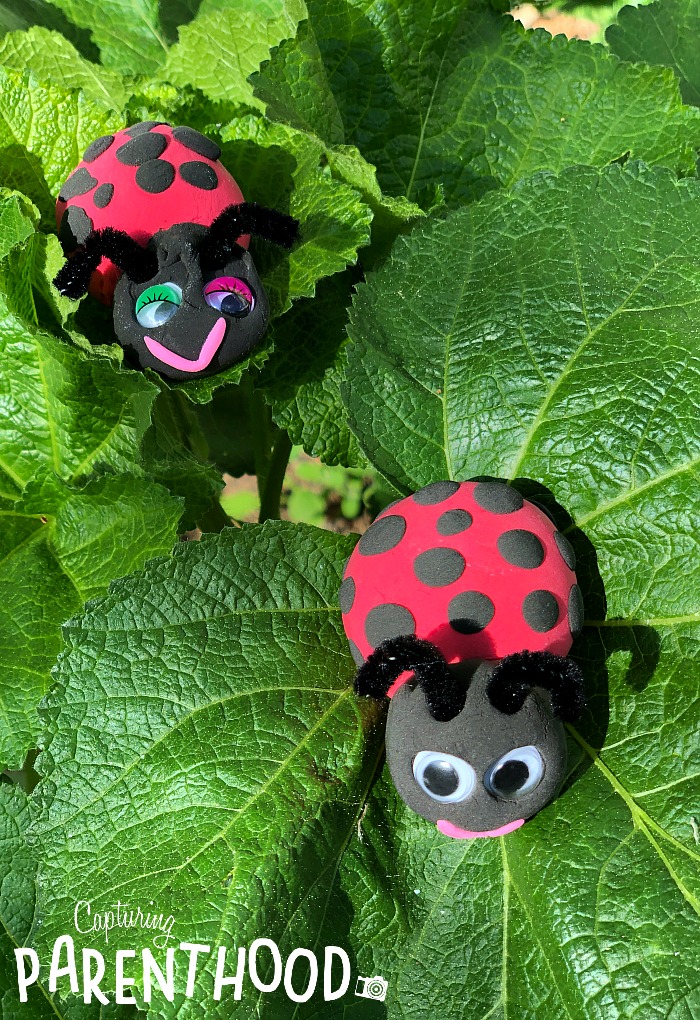
Now, it’s time to give your ladybug some character. Gently press two googly eyes into the front of the ladybug’s head. Cut a black pipe cleaner into two 2″ pieces and curl into antennae. Stick the pipe cleaner antennae down into the top of the ladybug’s head. If you want, you can grab a very tiny piece of clay (in a different color) and roll it into a tiny snake. Gently press the tiny snake onto the clay ball (under the eyes) to create a smile. The only thing left to do, is to give your ladybug its signature spots! We found that the easiest way to do this, was to roll very small balls of black clay, and then press each ball down gently, using a fingertip, onto the ladybug’s back. And that’s it…now you have your very own adorable little ladybug!

Spider

Air-Dry Clay Bugs

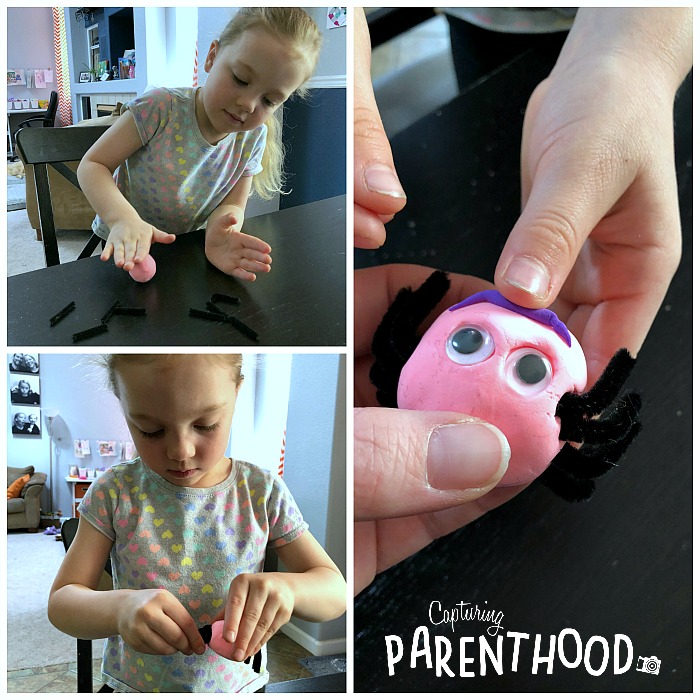
When I asked our little nugget what kind of bugs she would like to make, the very first thing out of her mouth was, “A spider!” So she chose one color of clay, and rolled it into a ball. She gently pressed two googly eyes into the ball of clay, and then she rolled a very tiny piece of clay (in a different color) into a snake shape, to create a goofy spider smile. πŸ™‚

Air-Dry Clay Bugs

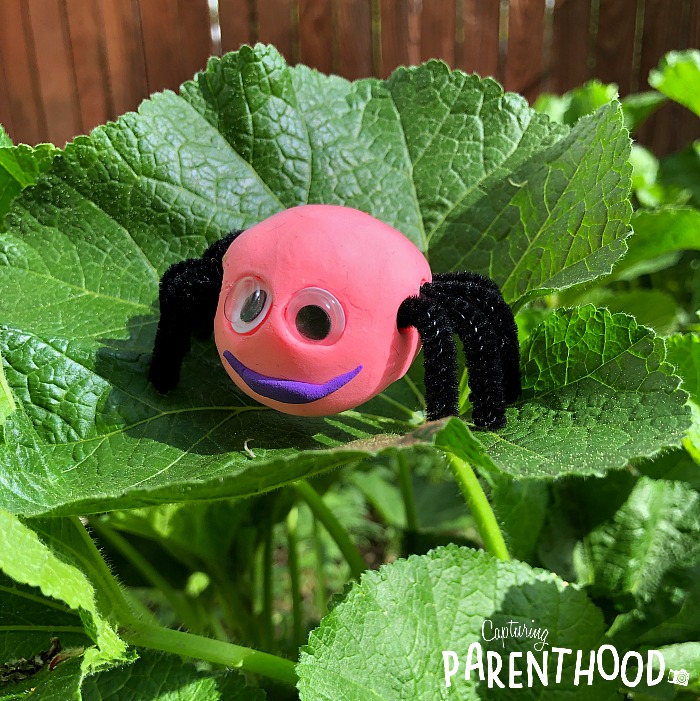
The only thing left to do was add the legs – all eight of them! We cut a black pipe cleaner into eight pieces, and created a slight bend toward the top of each piece. Our little nugget stuck four pipe cleaner legs on one side of the spider…and four more on the other side. Her charming little pink spider was complete!

Dragonfly

Air-Dry Clay Bugs

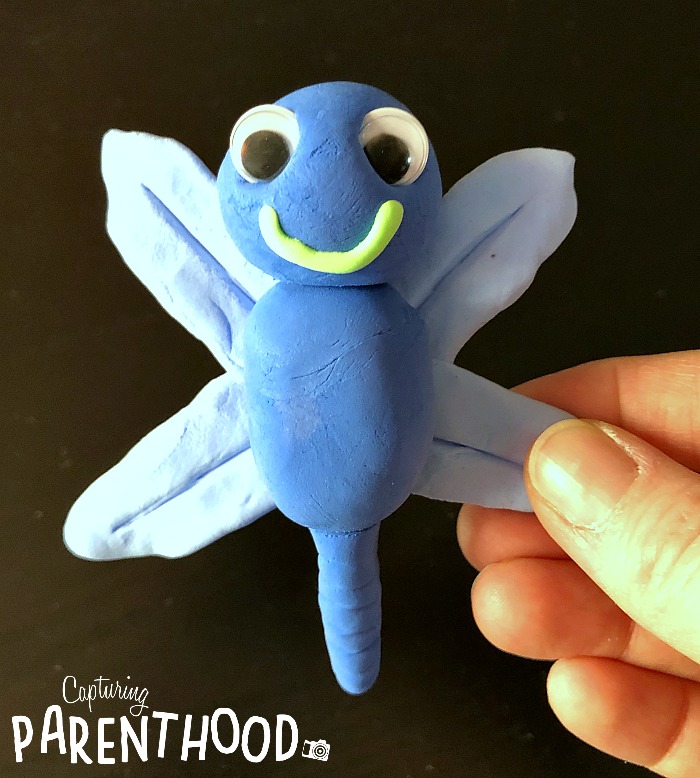
While our daughter worked on her spider, I created this cute little dragonfly! Isn’t he adorable?!? πŸ™‚ I used two different shades of blue air-dry clay, a tiny bit of green clay (for the mouth), two googly eyes, a toothpick, and a small plastic knife.

Air-Dry Clay Bugs

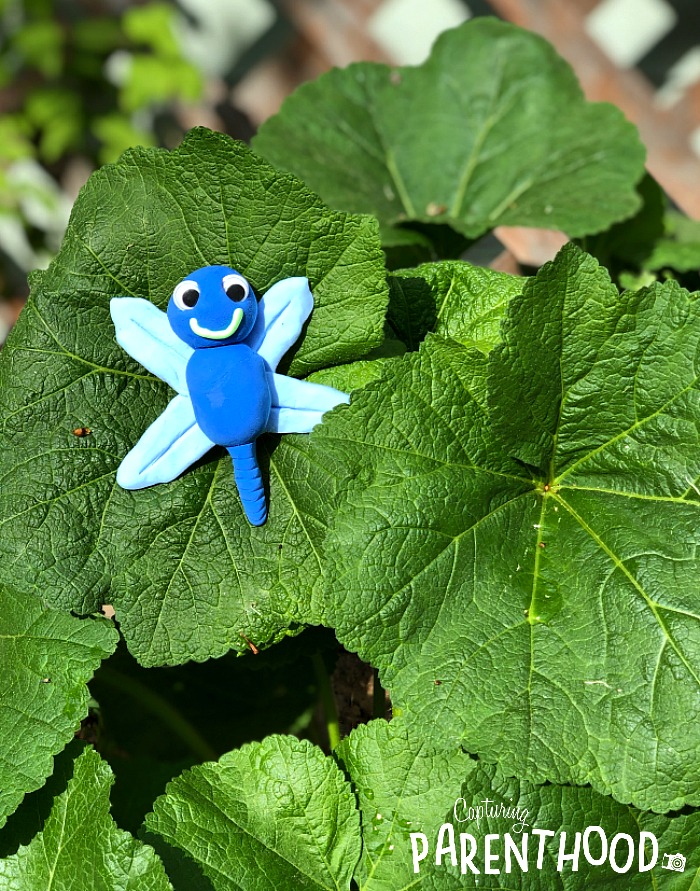
I started by creating four small balls of light blue clay, which I then flattened together and shaped into wings (much like the butterflies above). To add definition to the wings, I used a small plastic knife (a little tool that actually came in our air-dry clay box) and pressed a line down the center of each wing (stopping short of the wing tips). Next, I rolled some dark blue clay into a ball (for the dragonfly’s head), another piece of dark blue clay into an elongated ball (for the dragonfly’s body), and a very short snake-shape (for the tail). I gently pressed two googly eyes into the dragonfly’s head, and added a little green clay smile for some extra cuteness. Then I broke a toothpick into two pieces…and used one piece to connect the head of the dragonfly to the body…and the other piece to connect the dragonfly body to the tail. I took my small plastic knife and gently added several horizontal lines in the dragonfly’s tail. And then I pressed the dragonfly down onto the wings, until the clay stuck together, and my dragonfly was complete!


And there you have it – our cute little clay bug collection! We had so much fun playing and creating with this air-dry clay…and we’ve already started dreaming up all sorts of other fun clay projects!

Air-Dry Clay Bugs

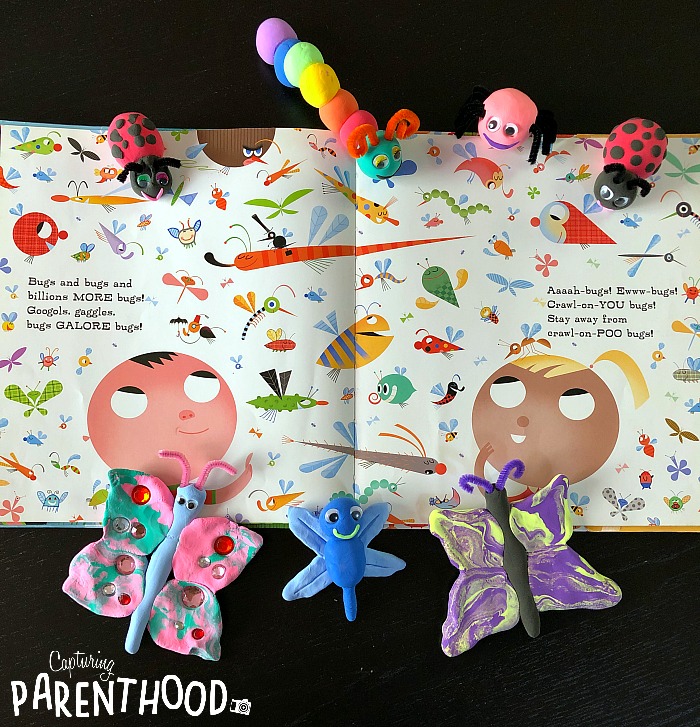
This clay bug project also paired perfectly with the fantastic Bugs Galore book, by Peter Stein – which we also happened to feature in our favorite Spring Books of 2019 post, a few weeks ago. In fact, this cute and colorful rhythmic story provides ample inspiration for all sorts of different clay bug creations!

START SPREADING THE NEWS!

Related Posts

  • Fun Fourth of July FruitsFun Fourth of July Fruits
  • Color-Mixing Water TransferColor-Mixing Water Transfer
  • Colorful Skittles ExperimentsColorful Skittles Experiments
  • Memories of My Pregnancy JourneyMemories of My Pregnancy Journey
« Tissue Paper Bugs
Preschool Math – Springtime Subtraction »

Hello! Nice to meet you!

Welcome to the Capturing Parenthood blog! I'm Stacey...wife and first-time parent, former full-time working mom, turned stay-at-home mom. Join me as I capture and share my thoughts and experiences on this crazy adventure we call parenthood! Click here to learn more about me!

Search Capturing Parenthood

Instagram

Ok...@artwithmrs.e Haunted House project is hands- Ok...@artwithmrs.e Haunted House project is hands-down the best Halloween-themed art project out there! πŸ™ŒπŸ™ŒπŸ™Œ
We had a blast creating haunted houses for homeschool art this month! 🧑
...
We followed Kaitlyn's extremely helpful Haunted House Drawing Guide (you can find it over on her Teachers Pay Teachers account) and completed the project over the course of 3 lessons.
...
During our first lesson, we sketched our houses in pencil, and added some eerie exterior landscaping. πŸͺ¦πŸ¦‡
We popped in a few spooky characters (ghosts, spiders, pumpkins, and a vampire). πŸ‘»πŸ•·πŸŽƒπŸ§›
And then we traced over our pencil lines with black Sharpie.
...
During our next lesson, we used a coloring technique that we learned from Kristian @friendsartlab ❀️ We colored our pictures with oil pastels...and then painted over the top of the oil pastels with baby oil...it causes the oil pastels to bleed and blend together! 🀩
...
During our final lesson...we added more spooky characters to the inside of our house...that can peek out behind the doors and windows. πŸ’€πŸ§™β€β™€οΈπŸ‘»
To do this...I used an X-acto knife and carefully cut around the outside edges of the doors/windows (leaving the hinge sides intact so that they could fold open and closed).
We placed yellow construction paper in the background...and added witches, ghosts, skeletons, a mummy, and a Frankenstein! 😍
This step made our haunted houses really come to life...and we just can't thank Kaitlyn @artwithmrs.e enough for sharing this awesome lesson and drawing guide! THE ABSOLUTE BEST! ❀️❀️❀️
...
It was very evident how much our daughter loved this project...as we worked through each step...but the thing that solidified just how much she enjoyed it was - one weekend morning I walked downstairs to find her and her dad sitting at the table - and she was very excitedly teaching him how to draw his own haunted house - while she drew a few more herself (scroll to the last picture in the carousel)! πŸ₯°
...
#hauntedhouse #hauntedhouses #hauntedhousedrawing #directeddrawing #spookyart #halloween #happyhalloween #halloweenart #halloweenfun #elementaryart #homeschoolart #homeschool #homeschoolfun #capturingparenthood
I decided that these six little pumpkins needed a I decided that these six little pumpkins needed a permanent place on our feed...because WE GREW THEM OURSELVES!!! πŸŽƒ
That's right...first-time pumpkin-growers over here...and it was all actually a bit of a surprise. πŸ˜ƒ
...
You see, when we went to prep our garden beds this spring, we noticed a plant that had already started growing. We assumed it was a cucumber plant, since it was in the same place we had cucumbers last year.
We left it alone and planted a couple of other cucumber plants nearby. πŸ₯’
At first, the leaves on our mystery plant looked very similar to the leaves on our other cucumber plants.
But a couple of weeks later the plant had grown A LOT bigger. It was now obvious that it was not a cucumber plant. But what was it? πŸ€·β€β™€οΈ
...
And that's when it suddenly dawned on these exhausted parents, that our daughter had spontaneously tossed seeds from her pumpkin (last Halloween), into the garden bed. πŸ€¦β€β™€οΈ The mystery was finally solved...and by the looks of the large golden flowers that were emerging all over the vines...we figured we might have a few pumpkins come fall! πŸ™ŒπŸŽƒπŸ™Œ
...
It was so much fun to watch the pumpkin plant grow! 🀩 We had to cut down the wire on one side of our garden bed to let the vines out...and they ended up growing 6-10 feet long in both directions! 😳 It was crazy!
They put out the most gorgeous flowers...that the bees absolutely loved! 🧑 And soon enough, we spotted a few round gourds growing at the base of some of the flowers. They grew quickly...and then turned a beautiful shade of orange! 😍
...
Needless to say, we are now officially pumpkin-growing people! πŸ˜‚ My husband can't wait to plant more next year...and he's already looking in to different varieties - hoping to grow some larger jack-o-lantern style ones next season! πŸŽƒ
…
#pumpkins #growingpumpkins #ourpumpkinpatch #homegrownpumpkins #homegrown #homegarden #pumpkingrowing #gardening #fallharvest #happyhalloween #timetocarvesomepumpkins #gardensurprises #gardenfun #capturingparenthood
Free the Frankensteins from the Frozen Rainbow Bra Free the Frankensteins from the Frozen Rainbow Brain! 😬🌈🧠
…
Yesterday, we shared how we made this colorful, frozen rainbow brain - full of Frankenstein mini erasers…and today we wanted to show you what became of our beautiful brain! πŸ˜ƒ
…
We popped it out onto a tray, grabbed a shaker of salt, a bottle of warm water (colored red for added effect), and some tongs.
And then it was time to Free the Frankensteins (our daughter coined the phrase)! πŸ˜‰
…
This spooky activity provides chilly sensory play, motor skills practice, and scientific exploration (salt and warm water speed-up the melting process)! πŸ™ŒπŸ™ŒπŸ™Œ
As an added bonus…you also get some color-mixing! And the addition of the salt makes it extra sparkly too! 😍🀩😍
…
Eventually, all you’re left with is some mini erasers floating in a pool of colorful water…and a happy kid! ❀️❀️❀️
…
#frozenbrain #rainbowbrain #frozenrainbowbrain #brains #freethefrankensteins #halloween #happyhalloween #halloweenactivities #halloweenactivitiesforkids #halloweensensoryplay #sensoryplay #sensoryexploration #motorskills #motorskillsdevelopment #scienceforkids #kidscience #funactivities #funactivitiesforkids #halloweenfun #capturingparenthood
We are definitely getting into the fall and Hallow We are definitely getting into the fall and Halloween spirit...so during a recent homeschool art session, we decided to make some air-dry clay pumpkins and jack-o-lanterns! πŸŽƒπŸŽƒπŸŽƒ
...
Back in 2019, Lauralee @2art.chambers shared several colorful, air-dry clay pumpkins that her students made...and after rediscovering the saved post, I decided that it would be a perfect October art lesson for us too! 🧑
...
We used various colors of air-dry clay, and rolled each color into whatever pumpkin shape we wanted...and then we added our lines/indentations using the side of a credit card. πŸ’³ The stems are just small, broken pieces of old crayons (another genius idea from Lauralee). πŸ– And we topped our stems with pieces of pipe cleaner, to create the little curly cues. 😍
...
Once we had our pumpkins...we decided to change things up a bit, and grabbed our stash of googly eyes. πŸ‘€ (Most of) our fall pumpkins then transformed into Halloween jack-o-lanterns! πŸŽƒ
We pressed the googly eyes into the clay, and we used a few small tools (that came with our box of air-dry clay) to add their mouths. πŸ˜ƒ
...
And now we have a cute and colorful crew of clay pumpkins adorning our mantle! πŸŽƒπŸ§‘πŸŽƒ
...
#pumpkins #jackolanterns #claypumpkins #airdryclay #airdryclaycreation #airdryclayart #airdryclaypumpkins #elementaryart #fallartprojects #fallartprojectsforkids #halloweenart #halloweenartprojects #halloweenartprojectsforkids #homeschool #homeschoolart #homeschoolfun #halloween #happyhalloween #capturingparenthood
Andrew from @elementaryarts shared a patterned, bl Andrew from @elementaryarts shared a patterned, block letter name project a couple of weeks ago (I'll share the post in stories today), and I immediately added it to our list of art projects to do this year! 😍
But we decided to switch things up a little bit! Instead of using our names, we each picked a color that we like...wrote the name of the color in block letters on our paper...and created our color patterns using at least two different shades of our chosen color. πŸ–
...
This colorful project ended up being a lot of fun, and also very relaxing...as we all quietly focused, and zoned in on adding the color patterns around all of our letters. It was actually a bit hypnotizing! 🀩
...
Needless to say, we are really happy with the way our block letter color project turned out! πŸ™Œ We even had a special guest who wanted to join in on this art project! ❀️
...
P.S. We also used Andrew’s free TPT handout on how to make block letters! The bundle includes bubble letters, cursive letters, graffiti letters, and more! πŸ‘
…
#blockletters #blocklettering #colors #color #colorful #artproject #artforkids #kidart #elementaryart #artactivity #artactivities #artactivitiesforkids #colorfun #homeschool #homeschoolart #homeschoolfun #capturingparenthood
We created self-portraits for our first art projec We created self-portraits for our first art project of our homeschool year...and we are pretty obsessed with them! 🀩✏️🀩
...
I love the idea of doing a self-portrait project at the beginning of the year, and then again at the end of the year...so that we can see how much we've grown and changed.
...
We used Kaitlyn's @artwithmrs.e Simple Self-Portrait Drawing Guide and it was so incredibly helpful (especially for this new homeschool teacher who wouldn't necessarily list drawing as one of her stronger suits). πŸ˜‰
We actually purchased her entire Guided Drawing Bundle (over on Teachers Pay Teachers) and we highly recommend it! πŸ™ŒπŸ™ŒπŸ™Œ
...
We looked through the self-portrait drawing guide to get different ideas for our eyes, nose, mouth, and hair. πŸ‘€πŸ‘ƒπŸ‘„
...
Now...if you caught our stories earlier this week, you know that our daughter recently made a pretty big change to her hair (that included a partial side-shave and bob-length cut - she also dyed it blue). πŸ’‡β€β™€οΈ
She was used to drawing pictures of herself with her long, blonde locks...and her new hairstyle proved rather difficult. But she persevered, and ended up with a self-portrait that she was truly proud of! πŸ₯°
...
When we were finished drawing our likenesses, we decided to cut them out and create a special background to glue them onto. I went with random black and white designs...and our nugget decided to draw various things that she loves (her family, winter, candy, books, dolphins...and more)! ❀️
...
It was such a fun project...and I can't wait to see what our self-portraits look like at the end of our school year! πŸ˜ƒ
...
#selfportrait #selfportraits #homeschool #homeschoolart #elementaryart #artactivities #artactivitiesforkids #artforkids #kidart #homeschoolfun #capturingparenthood
Follow on Instagram

Popular Posts

Virtual Spring Break: Day Five - New York City

Virtual Spring Break: Day Five – New York City

Virtual Spring Break: Day Four - Mexico

Virtual Spring Break: Day Four – Mexico

Virtual Spring Break: Day Three - India

Virtual Spring Break: Day Three – India

Join Us on Instagram

Ok...@artwithmrs.e Haunted House project is hands- Ok...@artwithmrs.e Haunted House project is hands-down the best Halloween-themed art project out there! πŸ™ŒπŸ™ŒπŸ™Œ
We had a blast creating haunted houses for homeschool art this month! 🧑
...
We followed Kaitlyn's extremely helpful Haunted House Drawing Guide (you can find it over on her Teachers Pay Teachers account) and completed the project over the course of 3 lessons.
...
During our first lesson, we sketched our houses in pencil, and added some eerie exterior landscaping. πŸͺ¦πŸ¦‡
We popped in a few spooky characters (ghosts, spiders, pumpkins, and a vampire). πŸ‘»πŸ•·πŸŽƒπŸ§›
And then we traced over our pencil lines with black Sharpie.
...
During our next lesson, we used a coloring technique that we learned from Kristian @friendsartlab ❀️ We colored our pictures with oil pastels...and then painted over the top of the oil pastels with baby oil...it causes the oil pastels to bleed and blend together! 🀩
...
During our final lesson...we added more spooky characters to the inside of our house...that can peek out behind the doors and windows. πŸ’€πŸ§™β€β™€οΈπŸ‘»
To do this...I used an X-acto knife and carefully cut around the outside edges of the doors/windows (leaving the hinge sides intact so that they could fold open and closed).
We placed yellow construction paper in the background...and added witches, ghosts, skeletons, a mummy, and a Frankenstein! 😍
This step made our haunted houses really come to life...and we just can't thank Kaitlyn @artwithmrs.e enough for sharing this awesome lesson and drawing guide! THE ABSOLUTE BEST! ❀️❀️❀️
...
It was very evident how much our daughter loved this project...as we worked through each step...but the thing that solidified just how much she enjoyed it was - one weekend morning I walked downstairs to find her and her dad sitting at the table - and she was very excitedly teaching him how to draw his own haunted house - while she drew a few more herself (scroll to the last picture in the carousel)! πŸ₯°
...
#hauntedhouse #hauntedhouses #hauntedhousedrawing #directeddrawing #spookyart #halloween #happyhalloween #halloweenart #halloweenfun #elementaryart #homeschoolart #homeschool #homeschoolfun #capturingparenthood
I decided that these six little pumpkins needed a I decided that these six little pumpkins needed a permanent place on our feed...because WE GREW THEM OURSELVES!!! πŸŽƒ
That's right...first-time pumpkin-growers over here...and it was all actually a bit of a surprise. πŸ˜ƒ
...
You see, when we went to prep our garden beds this spring, we noticed a plant that had already started growing. We assumed it was a cucumber plant, since it was in the same place we had cucumbers last year.
We left it alone and planted a couple of other cucumber plants nearby. πŸ₯’
At first, the leaves on our mystery plant looked very similar to the leaves on our other cucumber plants.
But a couple of weeks later the plant had grown A LOT bigger. It was now obvious that it was not a cucumber plant. But what was it? πŸ€·β€β™€οΈ
...
And that's when it suddenly dawned on these exhausted parents, that our daughter had spontaneously tossed seeds from her pumpkin (last Halloween), into the garden bed. πŸ€¦β€β™€οΈ The mystery was finally solved...and by the looks of the large golden flowers that were emerging all over the vines...we figured we might have a few pumpkins come fall! πŸ™ŒπŸŽƒπŸ™Œ
...
It was so much fun to watch the pumpkin plant grow! 🀩 We had to cut down the wire on one side of our garden bed to let the vines out...and they ended up growing 6-10 feet long in both directions! 😳 It was crazy!
They put out the most gorgeous flowers...that the bees absolutely loved! 🧑 And soon enough, we spotted a few round gourds growing at the base of some of the flowers. They grew quickly...and then turned a beautiful shade of orange! 😍
...
Needless to say, we are now officially pumpkin-growing people! πŸ˜‚ My husband can't wait to plant more next year...and he's already looking in to different varieties - hoping to grow some larger jack-o-lantern style ones next season! πŸŽƒ
…
#pumpkins #growingpumpkins #ourpumpkinpatch #homegrownpumpkins #homegrown #homegarden #pumpkingrowing #gardening #fallharvest #happyhalloween #timetocarvesomepumpkins #gardensurprises #gardenfun #capturingparenthood
Free the Frankensteins from the Frozen Rainbow Bra Free the Frankensteins from the Frozen Rainbow Brain! 😬🌈🧠
…
Yesterday, we shared how we made this colorful, frozen rainbow brain - full of Frankenstein mini erasers…and today we wanted to show you what became of our beautiful brain! πŸ˜ƒ
…
We popped it out onto a tray, grabbed a shaker of salt, a bottle of warm water (colored red for added effect), and some tongs.
And then it was time to Free the Frankensteins (our daughter coined the phrase)! πŸ˜‰
…
This spooky activity provides chilly sensory play, motor skills practice, and scientific exploration (salt and warm water speed-up the melting process)! πŸ™ŒπŸ™ŒπŸ™Œ
As an added bonus…you also get some color-mixing! And the addition of the salt makes it extra sparkly too! 😍🀩😍
…
Eventually, all you’re left with is some mini erasers floating in a pool of colorful water…and a happy kid! ❀️❀️❀️
…
#frozenbrain #rainbowbrain #frozenrainbowbrain #brains #freethefrankensteins #halloween #happyhalloween #halloweenactivities #halloweenactivitiesforkids #halloweensensoryplay #sensoryplay #sensoryexploration #motorskills #motorskillsdevelopment #scienceforkids #kidscience #funactivities #funactivitiesforkids #halloweenfun #capturingparenthood
We are definitely getting into the fall and Hallow We are definitely getting into the fall and Halloween spirit...so during a recent homeschool art session, we decided to make some air-dry clay pumpkins and jack-o-lanterns! πŸŽƒπŸŽƒπŸŽƒ
...
Back in 2019, Lauralee @2art.chambers shared several colorful, air-dry clay pumpkins that her students made...and after rediscovering the saved post, I decided that it would be a perfect October art lesson for us too! 🧑
...
We used various colors of air-dry clay, and rolled each color into whatever pumpkin shape we wanted...and then we added our lines/indentations using the side of a credit card. πŸ’³ The stems are just small, broken pieces of old crayons (another genius idea from Lauralee). πŸ– And we topped our stems with pieces of pipe cleaner, to create the little curly cues. 😍
...
Once we had our pumpkins...we decided to change things up a bit, and grabbed our stash of googly eyes. πŸ‘€ (Most of) our fall pumpkins then transformed into Halloween jack-o-lanterns! πŸŽƒ
We pressed the googly eyes into the clay, and we used a few small tools (that came with our box of air-dry clay) to add their mouths. πŸ˜ƒ
...
And now we have a cute and colorful crew of clay pumpkins adorning our mantle! πŸŽƒπŸ§‘πŸŽƒ
...
#pumpkins #jackolanterns #claypumpkins #airdryclay #airdryclaycreation #airdryclayart #airdryclaypumpkins #elementaryart #fallartprojects #fallartprojectsforkids #halloweenart #halloweenartprojects #halloweenartprojectsforkids #homeschool #homeschoolart #homeschoolfun #halloween #happyhalloween #capturingparenthood
Andrew from @elementaryarts shared a patterned, bl Andrew from @elementaryarts shared a patterned, block letter name project a couple of weeks ago (I'll share the post in stories today), and I immediately added it to our list of art projects to do this year! 😍
But we decided to switch things up a little bit! Instead of using our names, we each picked a color that we like...wrote the name of the color in block letters on our paper...and created our color patterns using at least two different shades of our chosen color. πŸ–
...
This colorful project ended up being a lot of fun, and also very relaxing...as we all quietly focused, and zoned in on adding the color patterns around all of our letters. It was actually a bit hypnotizing! 🀩
...
Needless to say, we are really happy with the way our block letter color project turned out! πŸ™Œ We even had a special guest who wanted to join in on this art project! ❀️
...
P.S. We also used Andrew’s free TPT handout on how to make block letters! The bundle includes bubble letters, cursive letters, graffiti letters, and more! πŸ‘
…
#blockletters #blocklettering #colors #color #colorful #artproject #artforkids #kidart #elementaryart #artactivity #artactivities #artactivitiesforkids #colorfun #homeschool #homeschoolart #homeschoolfun #capturingparenthood
We created self-portraits for our first art projec We created self-portraits for our first art project of our homeschool year...and we are pretty obsessed with them! 🀩✏️🀩
...
I love the idea of doing a self-portrait project at the beginning of the year, and then again at the end of the year...so that we can see how much we've grown and changed.
...
We used Kaitlyn's @artwithmrs.e Simple Self-Portrait Drawing Guide and it was so incredibly helpful (especially for this new homeschool teacher who wouldn't necessarily list drawing as one of her stronger suits). πŸ˜‰
We actually purchased her entire Guided Drawing Bundle (over on Teachers Pay Teachers) and we highly recommend it! πŸ™ŒπŸ™ŒπŸ™Œ
...
We looked through the self-portrait drawing guide to get different ideas for our eyes, nose, mouth, and hair. πŸ‘€πŸ‘ƒπŸ‘„
...
Now...if you caught our stories earlier this week, you know that our daughter recently made a pretty big change to her hair (that included a partial side-shave and bob-length cut - she also dyed it blue). πŸ’‡β€β™€οΈ
She was used to drawing pictures of herself with her long, blonde locks...and her new hairstyle proved rather difficult. But she persevered, and ended up with a self-portrait that she was truly proud of! πŸ₯°
...
When we were finished drawing our likenesses, we decided to cut them out and create a special background to glue them onto. I went with random black and white designs...and our nugget decided to draw various things that she loves (her family, winter, candy, books, dolphins...and more)! ❀️
...
It was such a fun project...and I can't wait to see what our self-portraits look like at the end of our school year! πŸ˜ƒ
...
#selfportrait #selfportraits #homeschool #homeschoolart #elementaryart #artactivities #artactivitiesforkids #artforkids #kidart #homeschoolfun #capturingparenthood
Follow on Instagram

Copyright © 2025 · glam theme by Restored 316

  • Policies + Disclosure
  • Contact