• Home
  • About
  • Kid Zone
    • Activities
    • Arts + Crafts
    • Books Books Books
  • Food
    • Family-Friendly
    • Kids
    • Sweets
    • Dog-Friendly
  • Life + Motherhood
    • Pregnancy
    • Parenting
    • House + Home
  • Let’s Party
    • Birthdays
    • Holidays
    • Instagram
    • Pinterest

Capturing Parenthood

A Frozen Fourth Birthday Party

in Birthdays, Let's Party on January 17, 2019

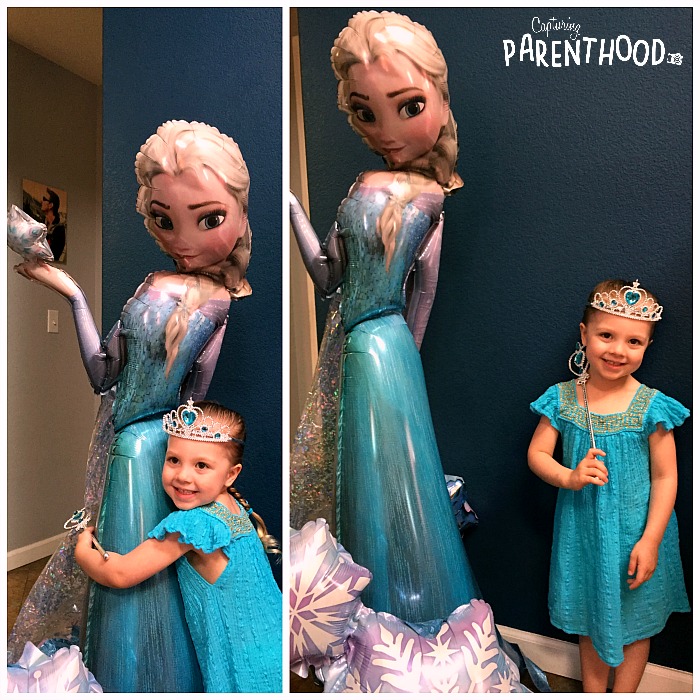
Our daughter became obsessed with all things Elsa, Anna, and Olaf last year. I can’t even tell you how many times “Let It Go” has been performed in our house (and car) – and always at the highest volume. She had the entire movie soundtrack memorized in a matter of days. Needless to say, it was no surprise when our little nugget declared that her fourth birthday celebration would be Frozen-themed. And while I was glad that she stuck with her chosen theme, I was also slightly intimidated – how on earth was I going to host a Frozen party in the middle of the summer?

A Frozen Fourth Birthday Party Β© Capturing Parenthood

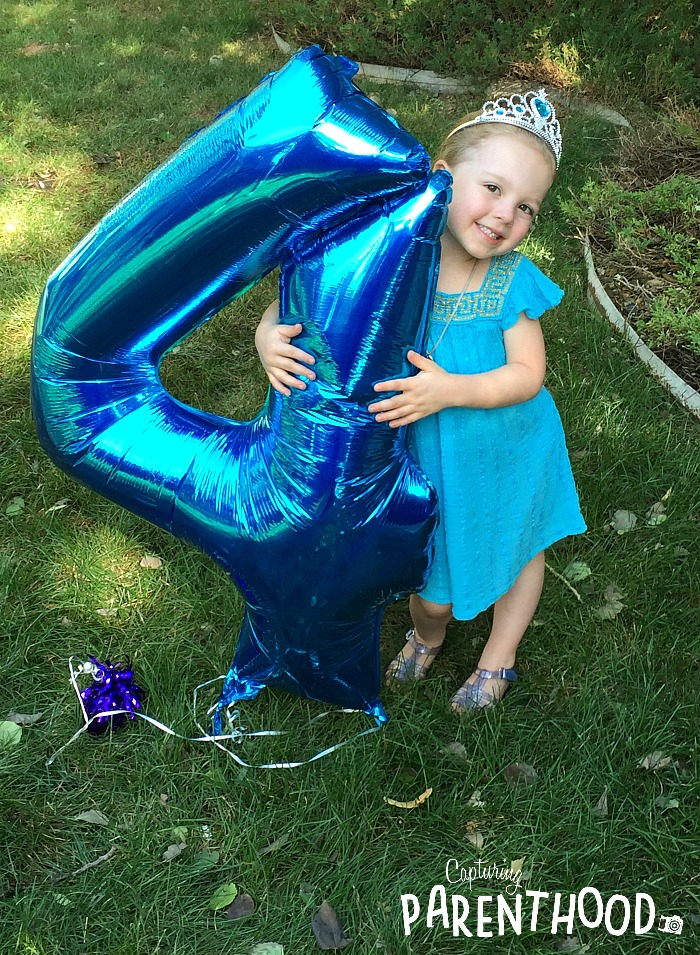
You only turn 4 once! And I love making our daughter feel super special on her big day. So, despite it being one of the hottest months of the year, I was determined to turn our home into a winter wonderland. I dove head first into Pinterest, scouring around for Frozen/winter crafts, decorations, food, and fun activities. There was a wealth of great ideas! I chose my favorites, devised a few of my own ideas, and began the party preparations!

A Frozen Fourth Birthday Party Β© Capturing Parenthood

With a little help from my husband…the birthday girl…and a whole lot of help from my mom…the party went off without a hitch! The kids had a great time, and our little nugget was smiling from ear to ear the entire day! I’d call that a success!


Frozen Party Decorations

As I mention below…party food is typically where I go a bit overboard. But for this Frozen party, I made a conscious effort to reign in the food options that we offered. That being said, I think all of that extra party planning energy ended up going into the decorations…as I may have gone a bit overboard in that area this time around. I know this, because I actually forgot to put out a couple of the decorations that I had made in advance and stored in our basement. They were obviously the decorations that took the most time and effort to create – ugh! Lesson learned. πŸ™‚ Which decorations you ask? Oh, how about a set of nine coffee filter trees?

A Frozen Fourth Birthday Party Β© Capturing Parenthood

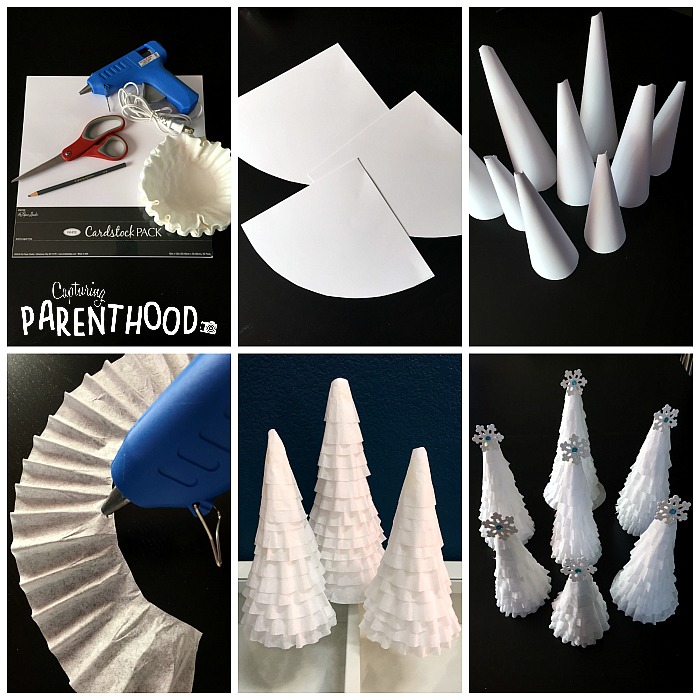
I spent the good portion of an afternoon crafting these wintry trees. I started by forming square card stock into cone shapes (or something resembling a cone shape). Next, I cut the center out of a giant stack of coffee filters, and then proceeded to hot glue the ruffled edges to the white cones (one layer at a time – working my way up from the bottom). We hot-glued snowflakes to the top of each tree for some extra Frozen flair. While these trees took more effort than I had anticipated or hoped…I still love how they turned out. If only I had remembered to display them on the day of the party. Oh well…they are now providing the perfect touch to our winter decor!

A Frozen Fourth Birthday Party Β© Capturing Parenthood

Our little nugget likes to help out with the party decorations, so I always make sure to setup a few different craft projects that we can hang on display. Sticking with our Frozen theme, she painted salt snowflakes with liquid watercolors, glittered a couple of craft stick snowflakes, and turned a handful of other craft sticks into an Olaf face (using white paint, a black marker, brown pipe cleaners, and a small orange pom). We made a few pipe cleaner snowflakes (so that we had some examples on-hand for our snowflake station at the party) and we cut out giant paper snowflakes to tape to the walls of our dining room. Since we enjoyed making Puffy Paint Window Clings earlier in the summer, we also decided to create some snowflake window clings to adorn our living room windows.

A Frozen Fourth Birthday Party Β© Capturing Parenthood

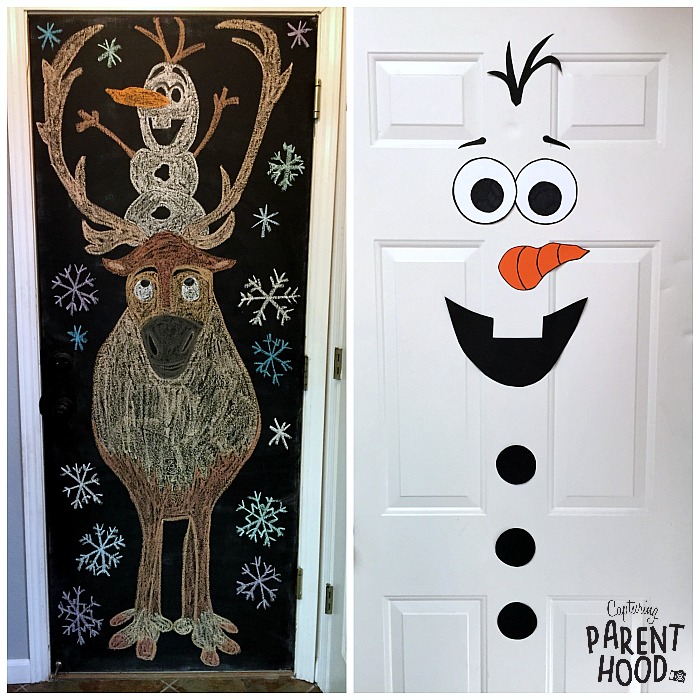
The inside of our front door and garage door were both transformed. The front door turned into a giant Olaf (using construction paper, tape, and a black marker). And our chalkboard garage door was adorned with Olaf and Sven (as well as a few more snowflakes). Even our sliding glass door got in on the action!

A Frozen Fourth Birthday Party Β© Capturing Parenthood

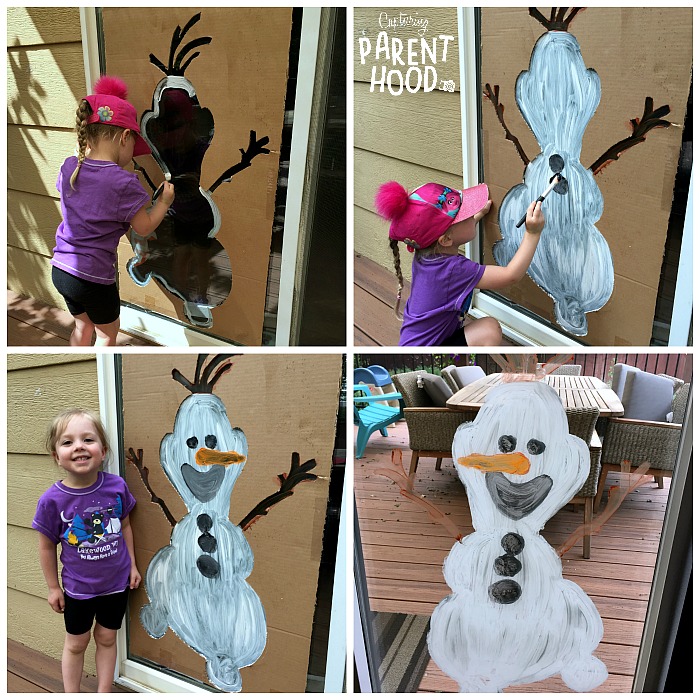
The birthday girl loved painting on our sliding glass door for our Giant Painting & Coloring (2-in-1 Activity), so we decided to tape up the cardboard cutout of Olaf, that we had leftover from our Pin the Nose on Olaf game (see below), and paint another snowman right where our guests would be going in and out from the backyard. You can never have too many Olaf’s at a Frozen party, right?!?

A Frozen Fourth Birthday Party Β© Capturing Parenthood

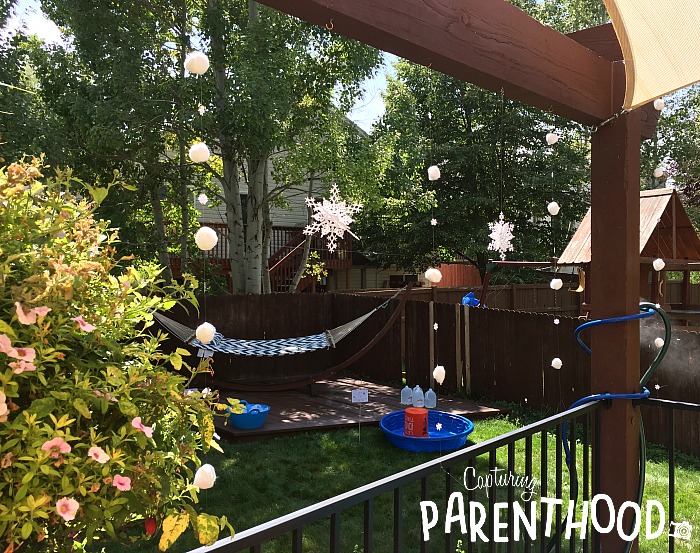
The real decorating challenge was bringing winter to our backyard. I wanted to create an illusion of falling snow around our back deck. To accomplish this, we hot glued cotton balls and snowflake confetti to strands of fishing line, that we then hung between our pergola frame and deck railing. In between each strand of falling snow, we hung large 3D snowflakes, that I picked up at Hobby Lobby.

Frozen Party Food

I always tend to go overboard when it comes to food for our parties, and as a result, we end up with an entire refrigerator full of leftovers. So this time around, I really tried to pare things down a bit in the food department. We stuck with the basics for the kiddos – snowflake-shaped peanut butter and jelly sandwiches (gotta love those cookie cutters), baby carrots (Olaf noses) with ranch dressing, and Olaf string cheese sticks.

A Frozen Fourth Birthday Party Β© Capturing Parenthood

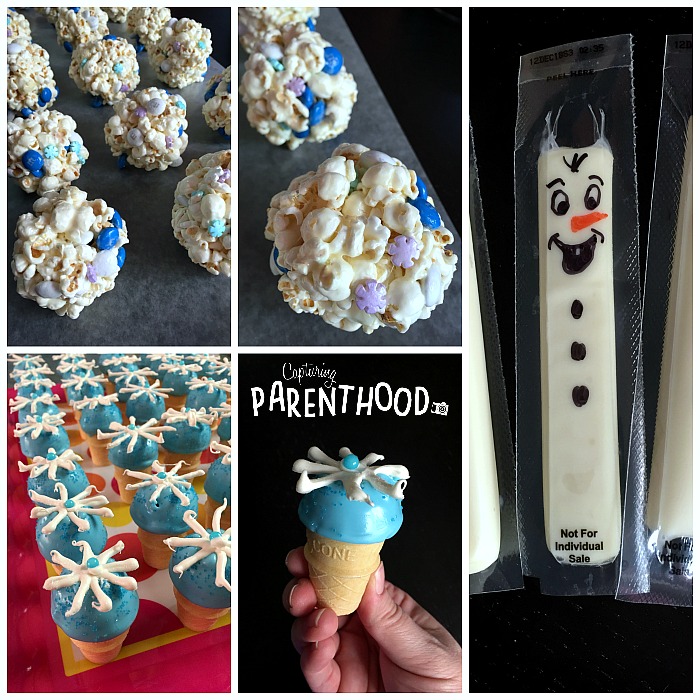
In the sweets department, we provided popcorn snowballs (made with blue and white M&Ms and snowflake sprinkles). I also made a batch of mini ice cream cone cake pops (topped with white chocolate snowflakes). While the white chocolate snowflakes were a lot harder to make than I anticipated, the ice cream cone cake pops were super easy (and delicious)! I just followed Jenny’s (from Jenny Cookies) tutorial, over on YouTube. Easy peasy! I will definitely be making these again.

A Frozen Fourth Birthday Party Β© Capturing Parenthood

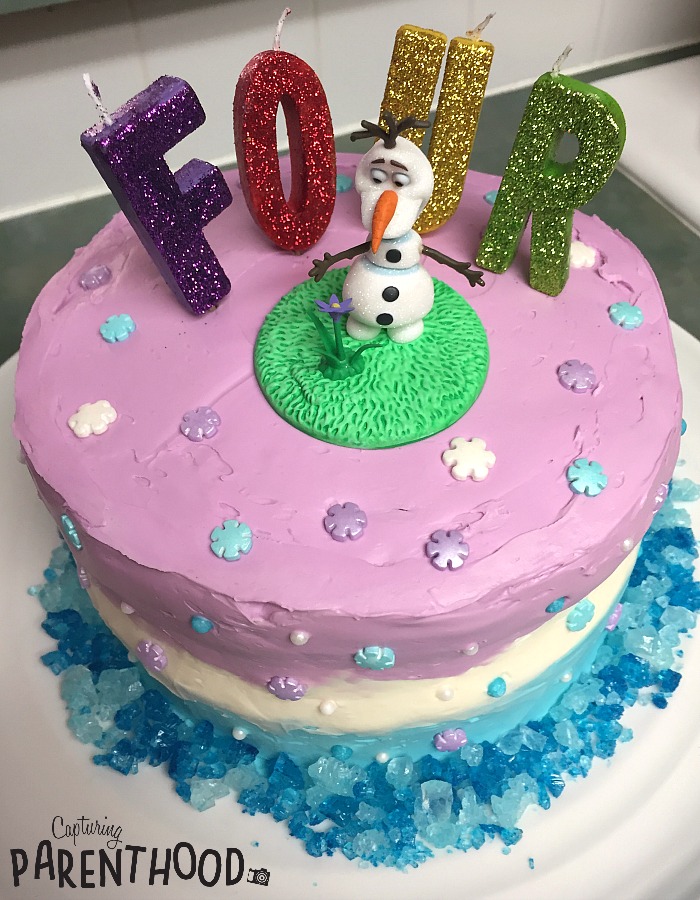
But let’s not forget about the most important part – the cake! The birthday girl requested a Frozen ice cream cake…very appropriate and on-point. πŸ™‚ I decided to go with this incredible Cake Batter Fudge Brownie Ice Cream Cake that I found over on Life, Love and Sugar. But instead of drizzling chocolate all over the top and sides, I frosted the entire cake and decorated it with the same snowflake sprinkles that were used in the popcorn snowballs, and a handful of white pearl sprinkles – with a smattering of crumbled blue rock candy around the bottom. The “FOUR” candles and an adorable Olaf cake topper (it’s actually an ornament…shhh) provided the finishing touches!

Frozen Party Favors

Putting together party favors is one of my all-time favorite party preparation tasks. I love creating fun little gifts for all of our daughter’s friends to enjoy. Our Frozen favors kicked off with cute Olaf gift bags.

A Frozen Fourth Birthday Party Β© Capturing Parenthood

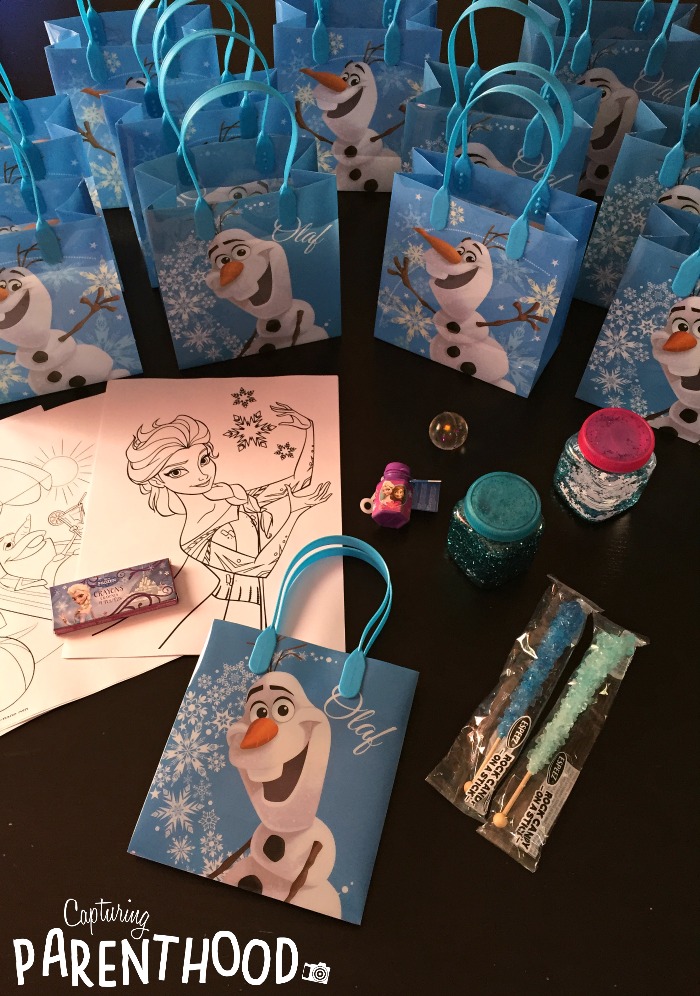
I printed out several different Frozen coloring sheets depicting everyone’s favorite characters (Elsa, Anna, Sven, Kristoff, Olaf, Oaken, and Marshmallow) and paired them with a 4-pack of Frozen-themed crayons that I picked up at Party City. I grabbed some Frozen-themed bubbles, and some glittery bouncy balls, while I was there. I always like to add a special sweet treat to each gift bag, so we tossed in blue-hued rock candy. Last but not least, we wanted to add a personal touch, by gifting each guest a homemade mini Frozen sensory bottle!

A Frozen Fourth Birthday Party Β© Capturing Parenthood

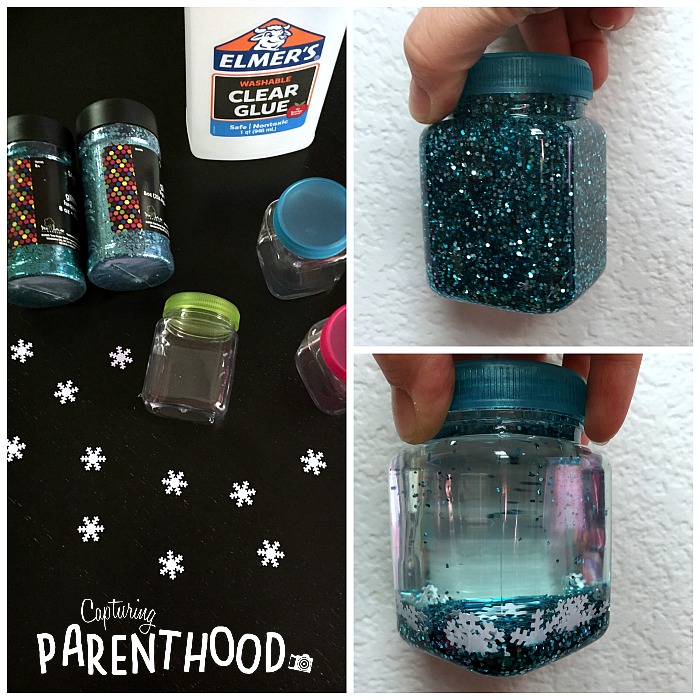
Our Blue Glitter Glue Sensory Bottle has always reminded me of Elsa’s frozen palace – the colors…the sparkle. So naturally, sensory bottles were the very first thing that popped into my head when I started dreaming up Frozen party favors. That being said, since I needed to make several little sensory bottles at once, I decided to forgo the glitter glue recipe (as it tends to be a bit trickier to work with) and went with our favorite clear glue, glitter/confetti, and water method. I found the little plastic bottles/jars at Michael’s. I filled each jar approximately 20% full with Elmer’s clear glue. Then I sprinkled in two different shades of blue glitter, and a pinch of snowflake confetti. I filled the remainder of each bottle with the hottest water from our tap, screwed on the lids and gave them all a good shake, to incorporate all of the ingredients. Once everything was mixed, I removed the lids again, to return the bottles to room temperature. When the bottles had cooled, I hot-glued each lid back on, to prevent any leaks. Ta Da! A frozen flurry in a jar!

Frozen Party Fun & Activities

We always like to provide an assortment of activities for the kids – to keep them busy and engaged. And our Frozen-themed activities did not disappoint – even though it was the middle of summer. πŸ™‚ We set up six different activities, and the very first one that the kids gravitated toward was the “Snowball” water balloons – obviously. We filled hundreds of blue and white water balloons that were all gone (amidst lots of laughter and giggles) in a matter of minutes. Thank goodness for Bunch O’ Balloons!

A Frozen Fourth Birthday Party Β© Capturing Parenthood

At the snowflake station, the kids could create their very own snowflakes, using pipe cleaners and craft beads. When they were not making snowflakes, you could find most of the kiddos building their very own snowman out of marshmallows, pretzel sticks, candy corn, frosting, and chocolate chips. This snowman station was another huge success!

Since our little nugget loved our Watercolor Ice Painting activity so much, she specifically requested that we repeat the activity at her party. So we mixed up a batch of watercolor ice cubes, and rolled out a large sheet of white craft paper, so that the kiddos could create a collaborative masterpiece. A quick note on this activity: make sure the kiddos know that the ice cubes at the end of the Popsicle sticks are made with watercolor paint – they are not Popsicles and they are not for eating.

A Frozen Fourth Birthday Party Β© Capturing Parenthood

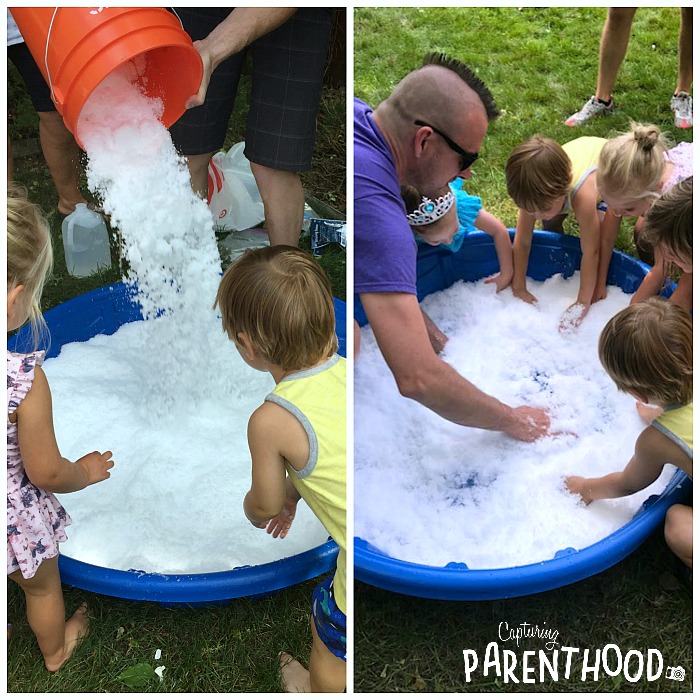
I think the highlight of the entire party was the snow! Yep – we had snow in our backyard during the height of summer! SnoWonder Instant Artificial SnowΒ that is. πŸ™‚ When we asked the kids to gather around the kiddie pool to help us make snow, they gave us looks of confusion and disbelief. The other party guests (parents included) were just as stumped. In mere seconds, we created a winter wonderland right before their eyes.Β We ended up making somewhere between 15-20 gallons of snow!

The instant snow was a fan favorite – I think it helped that it’s cold to the touch. This simple sensory experience had everyone smiling. The kiddos were squishing it, stepping in it, sitting in it, sliding in it, filling their socks with it, and tossing it up into the air. It truly brought out the best of their creativity and imagination, and it was so much fun to sit back and watch them play and create together. I’m not sure where the idea originated, but it didn’t take long before the watercolor ice paints made their way into the snow. I thought we would surely end up with a giant pile of icky brown snow, but it turned a beautiful shade of purple (which is our daughter’s favorite color)!

A Frozen Fourth Birthday Party Β© Capturing Parenthood

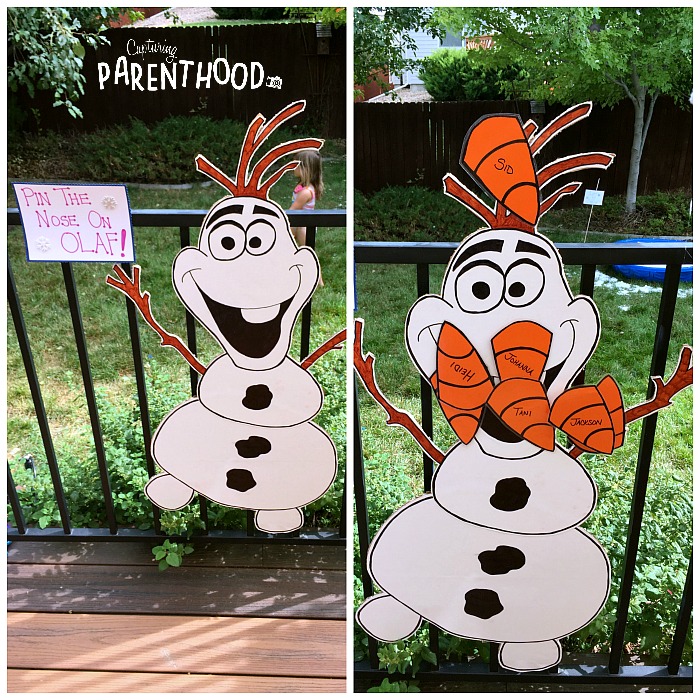
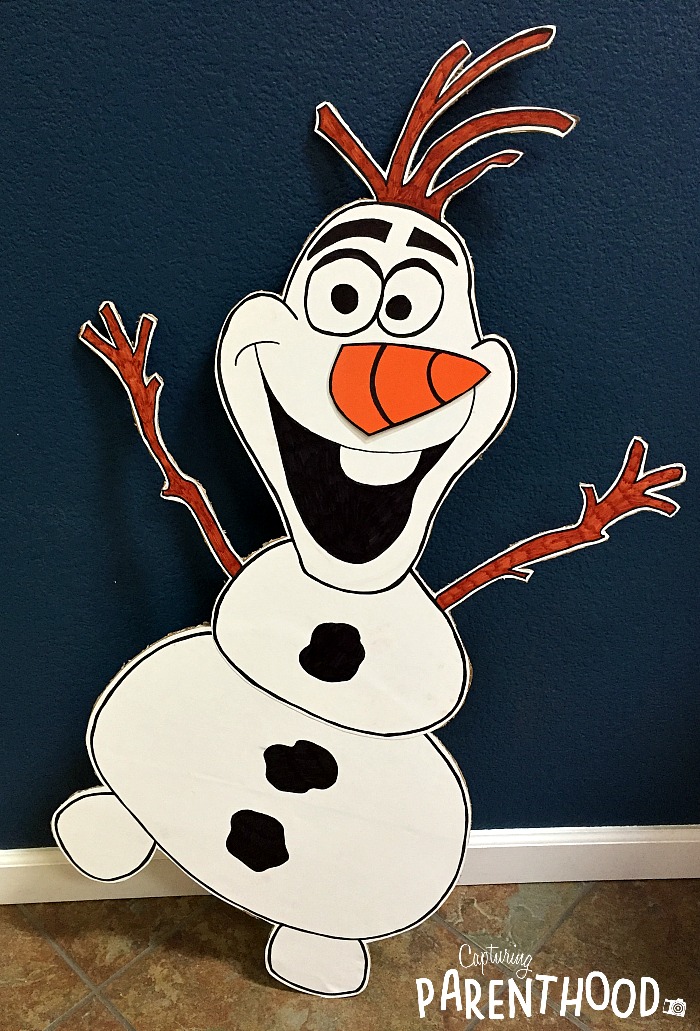
Our final activity of the day – and another party highlight – was our Pin the Nose on Olaf game! I drew our Olaf onto a large sheet of white craft paper, and then glued him to a large piece of cardboard. We carefully cut him out using a sharp X-ACTO knife. I cut the carrot noses out of orange construction paper, and laminated them, prior to writing each of the kid’s names on top. We stuck a piece of tape to the back of each carrot nose, blindfolded the kiddos (one at a time), spun them around, and had them attempt to attach Olaf’s nose in the appropriate spot. Most of them were remarkably close – and the closest contestants scored large Frozen-themed bubble wands (also from Party City).


I can say, without a doubt, that more effort and energy went into this Frozen party than our little girl’s three previous celebrations. At the end of the day, I sat down on the couch next to my husband and declared that we were all going to Disneyland for our daughter’s fifth birthday – that way I would get a much-needed year off from hosting an elaborate birthday party.

A Frozen Fourth Birthday Party Β© Capturing Parenthood

Our little nugget was elated to hear this news – though two weeks later she began telling me about her dinosaur-themed fifth birthday party. πŸ™‚ So, I guess she figures she can go to Disneyland AND have a big party. We shall see what the future holds.

A Frozen Fourth Birthday Party Β© Capturing Parenthood

Our little firecracker of a four-year-old already has her next five birthday celebrations completely planned out (along with the next five years worth of Halloween costumes). She must like to plan ahead, like her mommy. I can’t fault her for that. And at least I know what the next five years entail.

If you would like to check out the parties of birthdays past, feel free to click on the following links: It’s An Art Party – Third Birthday, A Beach-Themed Second Birthday, and First Birthday Fun!

START SPREADING THE NEWS!

Related Posts

  • Our Favorite Space BooksOur Favorite Space Books
  • Shape ShamrocksShape Shamrocks
  • Oil & Water ExplorationOil & Water Exploration
  • 3D Paper Fruits for Summer3D Paper Fruits for Summer
« Snowman Crafts for Kids
Pom Rescue – Fine Motor Skills Activity »

Hello! Nice to meet you!

Welcome to the Capturing Parenthood blog! I'm Stacey...wife and first-time parent, former full-time working mom, turned stay-at-home mom. Join me as I capture and share my thoughts and experiences on this crazy adventure we call parenthood! Click here to learn more about me!

Search Capturing Parenthood

Instagram

Ok...@artwithmrs.e Haunted House project is hands- Ok...@artwithmrs.e Haunted House project is hands-down the best Halloween-themed art project out there! πŸ™ŒπŸ™ŒπŸ™Œ
We had a blast creating haunted houses for homeschool art this month! 🧑
...
We followed Kaitlyn's extremely helpful Haunted House Drawing Guide (you can find it over on her Teachers Pay Teachers account) and completed the project over the course of 3 lessons.
...
During our first lesson, we sketched our houses in pencil, and added some eerie exterior landscaping. πŸͺ¦πŸ¦‡
We popped in a few spooky characters (ghosts, spiders, pumpkins, and a vampire). πŸ‘»πŸ•·πŸŽƒπŸ§›
And then we traced over our pencil lines with black Sharpie.
...
During our next lesson, we used a coloring technique that we learned from Kristian @friendsartlab ❀️ We colored our pictures with oil pastels...and then painted over the top of the oil pastels with baby oil...it causes the oil pastels to bleed and blend together! 🀩
...
During our final lesson...we added more spooky characters to the inside of our house...that can peek out behind the doors and windows. πŸ’€πŸ§™β€β™€οΈπŸ‘»
To do this...I used an X-acto knife and carefully cut around the outside edges of the doors/windows (leaving the hinge sides intact so that they could fold open and closed).
We placed yellow construction paper in the background...and added witches, ghosts, skeletons, a mummy, and a Frankenstein! 😍
This step made our haunted houses really come to life...and we just can't thank Kaitlyn @artwithmrs.e enough for sharing this awesome lesson and drawing guide! THE ABSOLUTE BEST! ❀️❀️❀️
...
It was very evident how much our daughter loved this project...as we worked through each step...but the thing that solidified just how much she enjoyed it was - one weekend morning I walked downstairs to find her and her dad sitting at the table - and she was very excitedly teaching him how to draw his own haunted house - while she drew a few more herself (scroll to the last picture in the carousel)! πŸ₯°
...
#hauntedhouse #hauntedhouses #hauntedhousedrawing #directeddrawing #spookyart #halloween #happyhalloween #halloweenart #halloweenfun #elementaryart #homeschoolart #homeschool #homeschoolfun #capturingparenthood
I decided that these six little pumpkins needed a I decided that these six little pumpkins needed a permanent place on our feed...because WE GREW THEM OURSELVES!!! πŸŽƒ
That's right...first-time pumpkin-growers over here...and it was all actually a bit of a surprise. πŸ˜ƒ
...
You see, when we went to prep our garden beds this spring, we noticed a plant that had already started growing. We assumed it was a cucumber plant, since it was in the same place we had cucumbers last year.
We left it alone and planted a couple of other cucumber plants nearby. πŸ₯’
At first, the leaves on our mystery plant looked very similar to the leaves on our other cucumber plants.
But a couple of weeks later the plant had grown A LOT bigger. It was now obvious that it was not a cucumber plant. But what was it? πŸ€·β€β™€οΈ
...
And that's when it suddenly dawned on these exhausted parents, that our daughter had spontaneously tossed seeds from her pumpkin (last Halloween), into the garden bed. πŸ€¦β€β™€οΈ The mystery was finally solved...and by the looks of the large golden flowers that were emerging all over the vines...we figured we might have a few pumpkins come fall! πŸ™ŒπŸŽƒπŸ™Œ
...
It was so much fun to watch the pumpkin plant grow! 🀩 We had to cut down the wire on one side of our garden bed to let the vines out...and they ended up growing 6-10 feet long in both directions! 😳 It was crazy!
They put out the most gorgeous flowers...that the bees absolutely loved! 🧑 And soon enough, we spotted a few round gourds growing at the base of some of the flowers. They grew quickly...and then turned a beautiful shade of orange! 😍
...
Needless to say, we are now officially pumpkin-growing people! πŸ˜‚ My husband can't wait to plant more next year...and he's already looking in to different varieties - hoping to grow some larger jack-o-lantern style ones next season! πŸŽƒ
…
#pumpkins #growingpumpkins #ourpumpkinpatch #homegrownpumpkins #homegrown #homegarden #pumpkingrowing #gardening #fallharvest #happyhalloween #timetocarvesomepumpkins #gardensurprises #gardenfun #capturingparenthood
Free the Frankensteins from the Frozen Rainbow Bra Free the Frankensteins from the Frozen Rainbow Brain! 😬🌈🧠
…
Yesterday, we shared how we made this colorful, frozen rainbow brain - full of Frankenstein mini erasers…and today we wanted to show you what became of our beautiful brain! πŸ˜ƒ
…
We popped it out onto a tray, grabbed a shaker of salt, a bottle of warm water (colored red for added effect), and some tongs.
And then it was time to Free the Frankensteins (our daughter coined the phrase)! πŸ˜‰
…
This spooky activity provides chilly sensory play, motor skills practice, and scientific exploration (salt and warm water speed-up the melting process)! πŸ™ŒπŸ™ŒπŸ™Œ
As an added bonus…you also get some color-mixing! And the addition of the salt makes it extra sparkly too! 😍🀩😍
…
Eventually, all you’re left with is some mini erasers floating in a pool of colorful water…and a happy kid! ❀️❀️❀️
…
#frozenbrain #rainbowbrain #frozenrainbowbrain #brains #freethefrankensteins #halloween #happyhalloween #halloweenactivities #halloweenactivitiesforkids #halloweensensoryplay #sensoryplay #sensoryexploration #motorskills #motorskillsdevelopment #scienceforkids #kidscience #funactivities #funactivitiesforkids #halloweenfun #capturingparenthood
We are definitely getting into the fall and Hallow We are definitely getting into the fall and Halloween spirit...so during a recent homeschool art session, we decided to make some air-dry clay pumpkins and jack-o-lanterns! πŸŽƒπŸŽƒπŸŽƒ
...
Back in 2019, Lauralee @2art.chambers shared several colorful, air-dry clay pumpkins that her students made...and after rediscovering the saved post, I decided that it would be a perfect October art lesson for us too! 🧑
...
We used various colors of air-dry clay, and rolled each color into whatever pumpkin shape we wanted...and then we added our lines/indentations using the side of a credit card. πŸ’³ The stems are just small, broken pieces of old crayons (another genius idea from Lauralee). πŸ– And we topped our stems with pieces of pipe cleaner, to create the little curly cues. 😍
...
Once we had our pumpkins...we decided to change things up a bit, and grabbed our stash of googly eyes. πŸ‘€ (Most of) our fall pumpkins then transformed into Halloween jack-o-lanterns! πŸŽƒ
We pressed the googly eyes into the clay, and we used a few small tools (that came with our box of air-dry clay) to add their mouths. πŸ˜ƒ
...
And now we have a cute and colorful crew of clay pumpkins adorning our mantle! πŸŽƒπŸ§‘πŸŽƒ
...
#pumpkins #jackolanterns #claypumpkins #airdryclay #airdryclaycreation #airdryclayart #airdryclaypumpkins #elementaryart #fallartprojects #fallartprojectsforkids #halloweenart #halloweenartprojects #halloweenartprojectsforkids #homeschool #homeschoolart #homeschoolfun #halloween #happyhalloween #capturingparenthood
Andrew from @elementaryarts shared a patterned, bl Andrew from @elementaryarts shared a patterned, block letter name project a couple of weeks ago (I'll share the post in stories today), and I immediately added it to our list of art projects to do this year! 😍
But we decided to switch things up a little bit! Instead of using our names, we each picked a color that we like...wrote the name of the color in block letters on our paper...and created our color patterns using at least two different shades of our chosen color. πŸ–
...
This colorful project ended up being a lot of fun, and also very relaxing...as we all quietly focused, and zoned in on adding the color patterns around all of our letters. It was actually a bit hypnotizing! 🀩
...
Needless to say, we are really happy with the way our block letter color project turned out! πŸ™Œ We even had a special guest who wanted to join in on this art project! ❀️
...
P.S. We also used Andrew’s free TPT handout on how to make block letters! The bundle includes bubble letters, cursive letters, graffiti letters, and more! πŸ‘
…
#blockletters #blocklettering #colors #color #colorful #artproject #artforkids #kidart #elementaryart #artactivity #artactivities #artactivitiesforkids #colorfun #homeschool #homeschoolart #homeschoolfun #capturingparenthood
We created self-portraits for our first art projec We created self-portraits for our first art project of our homeschool year...and we are pretty obsessed with them! 🀩✏️🀩
...
I love the idea of doing a self-portrait project at the beginning of the year, and then again at the end of the year...so that we can see how much we've grown and changed.
...
We used Kaitlyn's @artwithmrs.e Simple Self-Portrait Drawing Guide and it was so incredibly helpful (especially for this new homeschool teacher who wouldn't necessarily list drawing as one of her stronger suits). πŸ˜‰
We actually purchased her entire Guided Drawing Bundle (over on Teachers Pay Teachers) and we highly recommend it! πŸ™ŒπŸ™ŒπŸ™Œ
...
We looked through the self-portrait drawing guide to get different ideas for our eyes, nose, mouth, and hair. πŸ‘€πŸ‘ƒπŸ‘„
...
Now...if you caught our stories earlier this week, you know that our daughter recently made a pretty big change to her hair (that included a partial side-shave and bob-length cut - she also dyed it blue). πŸ’‡β€β™€οΈ
She was used to drawing pictures of herself with her long, blonde locks...and her new hairstyle proved rather difficult. But she persevered, and ended up with a self-portrait that she was truly proud of! πŸ₯°
...
When we were finished drawing our likenesses, we decided to cut them out and create a special background to glue them onto. I went with random black and white designs...and our nugget decided to draw various things that she loves (her family, winter, candy, books, dolphins...and more)! ❀️
...
It was such a fun project...and I can't wait to see what our self-portraits look like at the end of our school year! πŸ˜ƒ
...
#selfportrait #selfportraits #homeschool #homeschoolart #elementaryart #artactivities #artactivitiesforkids #artforkids #kidart #homeschoolfun #capturingparenthood
Follow on Instagram

Popular Posts

Virtual Spring Break: Day Five - New York City

Virtual Spring Break: Day Five – New York City

Virtual Spring Break: Day Four - Mexico

Virtual Spring Break: Day Four – Mexico

Virtual Spring Break: Day Three - India

Virtual Spring Break: Day Three – India

Join Us on Instagram

Ok...@artwithmrs.e Haunted House project is hands- Ok...@artwithmrs.e Haunted House project is hands-down the best Halloween-themed art project out there! πŸ™ŒπŸ™ŒπŸ™Œ
We had a blast creating haunted houses for homeschool art this month! 🧑
...
We followed Kaitlyn's extremely helpful Haunted House Drawing Guide (you can find it over on her Teachers Pay Teachers account) and completed the project over the course of 3 lessons.
...
During our first lesson, we sketched our houses in pencil, and added some eerie exterior landscaping. πŸͺ¦πŸ¦‡
We popped in a few spooky characters (ghosts, spiders, pumpkins, and a vampire). πŸ‘»πŸ•·πŸŽƒπŸ§›
And then we traced over our pencil lines with black Sharpie.
...
During our next lesson, we used a coloring technique that we learned from Kristian @friendsartlab ❀️ We colored our pictures with oil pastels...and then painted over the top of the oil pastels with baby oil...it causes the oil pastels to bleed and blend together! 🀩
...
During our final lesson...we added more spooky characters to the inside of our house...that can peek out behind the doors and windows. πŸ’€πŸ§™β€β™€οΈπŸ‘»
To do this...I used an X-acto knife and carefully cut around the outside edges of the doors/windows (leaving the hinge sides intact so that they could fold open and closed).
We placed yellow construction paper in the background...and added witches, ghosts, skeletons, a mummy, and a Frankenstein! 😍
This step made our haunted houses really come to life...and we just can't thank Kaitlyn @artwithmrs.e enough for sharing this awesome lesson and drawing guide! THE ABSOLUTE BEST! ❀️❀️❀️
...
It was very evident how much our daughter loved this project...as we worked through each step...but the thing that solidified just how much she enjoyed it was - one weekend morning I walked downstairs to find her and her dad sitting at the table - and she was very excitedly teaching him how to draw his own haunted house - while she drew a few more herself (scroll to the last picture in the carousel)! πŸ₯°
...
#hauntedhouse #hauntedhouses #hauntedhousedrawing #directeddrawing #spookyart #halloween #happyhalloween #halloweenart #halloweenfun #elementaryart #homeschoolart #homeschool #homeschoolfun #capturingparenthood
I decided that these six little pumpkins needed a I decided that these six little pumpkins needed a permanent place on our feed...because WE GREW THEM OURSELVES!!! πŸŽƒ
That's right...first-time pumpkin-growers over here...and it was all actually a bit of a surprise. πŸ˜ƒ
...
You see, when we went to prep our garden beds this spring, we noticed a plant that had already started growing. We assumed it was a cucumber plant, since it was in the same place we had cucumbers last year.
We left it alone and planted a couple of other cucumber plants nearby. πŸ₯’
At first, the leaves on our mystery plant looked very similar to the leaves on our other cucumber plants.
But a couple of weeks later the plant had grown A LOT bigger. It was now obvious that it was not a cucumber plant. But what was it? πŸ€·β€β™€οΈ
...
And that's when it suddenly dawned on these exhausted parents, that our daughter had spontaneously tossed seeds from her pumpkin (last Halloween), into the garden bed. πŸ€¦β€β™€οΈ The mystery was finally solved...and by the looks of the large golden flowers that were emerging all over the vines...we figured we might have a few pumpkins come fall! πŸ™ŒπŸŽƒπŸ™Œ
...
It was so much fun to watch the pumpkin plant grow! 🀩 We had to cut down the wire on one side of our garden bed to let the vines out...and they ended up growing 6-10 feet long in both directions! 😳 It was crazy!
They put out the most gorgeous flowers...that the bees absolutely loved! 🧑 And soon enough, we spotted a few round gourds growing at the base of some of the flowers. They grew quickly...and then turned a beautiful shade of orange! 😍
...
Needless to say, we are now officially pumpkin-growing people! πŸ˜‚ My husband can't wait to plant more next year...and he's already looking in to different varieties - hoping to grow some larger jack-o-lantern style ones next season! πŸŽƒ
…
#pumpkins #growingpumpkins #ourpumpkinpatch #homegrownpumpkins #homegrown #homegarden #pumpkingrowing #gardening #fallharvest #happyhalloween #timetocarvesomepumpkins #gardensurprises #gardenfun #capturingparenthood
Free the Frankensteins from the Frozen Rainbow Bra Free the Frankensteins from the Frozen Rainbow Brain! 😬🌈🧠
…
Yesterday, we shared how we made this colorful, frozen rainbow brain - full of Frankenstein mini erasers…and today we wanted to show you what became of our beautiful brain! πŸ˜ƒ
…
We popped it out onto a tray, grabbed a shaker of salt, a bottle of warm water (colored red for added effect), and some tongs.
And then it was time to Free the Frankensteins (our daughter coined the phrase)! πŸ˜‰
…
This spooky activity provides chilly sensory play, motor skills practice, and scientific exploration (salt and warm water speed-up the melting process)! πŸ™ŒπŸ™ŒπŸ™Œ
As an added bonus…you also get some color-mixing! And the addition of the salt makes it extra sparkly too! 😍🀩😍
…
Eventually, all you’re left with is some mini erasers floating in a pool of colorful water…and a happy kid! ❀️❀️❀️
…
#frozenbrain #rainbowbrain #frozenrainbowbrain #brains #freethefrankensteins #halloween #happyhalloween #halloweenactivities #halloweenactivitiesforkids #halloweensensoryplay #sensoryplay #sensoryexploration #motorskills #motorskillsdevelopment #scienceforkids #kidscience #funactivities #funactivitiesforkids #halloweenfun #capturingparenthood
We are definitely getting into the fall and Hallow We are definitely getting into the fall and Halloween spirit...so during a recent homeschool art session, we decided to make some air-dry clay pumpkins and jack-o-lanterns! πŸŽƒπŸŽƒπŸŽƒ
...
Back in 2019, Lauralee @2art.chambers shared several colorful, air-dry clay pumpkins that her students made...and after rediscovering the saved post, I decided that it would be a perfect October art lesson for us too! 🧑
...
We used various colors of air-dry clay, and rolled each color into whatever pumpkin shape we wanted...and then we added our lines/indentations using the side of a credit card. πŸ’³ The stems are just small, broken pieces of old crayons (another genius idea from Lauralee). πŸ– And we topped our stems with pieces of pipe cleaner, to create the little curly cues. 😍
...
Once we had our pumpkins...we decided to change things up a bit, and grabbed our stash of googly eyes. πŸ‘€ (Most of) our fall pumpkins then transformed into Halloween jack-o-lanterns! πŸŽƒ
We pressed the googly eyes into the clay, and we used a few small tools (that came with our box of air-dry clay) to add their mouths. πŸ˜ƒ
...
And now we have a cute and colorful crew of clay pumpkins adorning our mantle! πŸŽƒπŸ§‘πŸŽƒ
...
#pumpkins #jackolanterns #claypumpkins #airdryclay #airdryclaycreation #airdryclayart #airdryclaypumpkins #elementaryart #fallartprojects #fallartprojectsforkids #halloweenart #halloweenartprojects #halloweenartprojectsforkids #homeschool #homeschoolart #homeschoolfun #halloween #happyhalloween #capturingparenthood
Andrew from @elementaryarts shared a patterned, bl Andrew from @elementaryarts shared a patterned, block letter name project a couple of weeks ago (I'll share the post in stories today), and I immediately added it to our list of art projects to do this year! 😍
But we decided to switch things up a little bit! Instead of using our names, we each picked a color that we like...wrote the name of the color in block letters on our paper...and created our color patterns using at least two different shades of our chosen color. πŸ–
...
This colorful project ended up being a lot of fun, and also very relaxing...as we all quietly focused, and zoned in on adding the color patterns around all of our letters. It was actually a bit hypnotizing! 🀩
...
Needless to say, we are really happy with the way our block letter color project turned out! πŸ™Œ We even had a special guest who wanted to join in on this art project! ❀️
...
P.S. We also used Andrew’s free TPT handout on how to make block letters! The bundle includes bubble letters, cursive letters, graffiti letters, and more! πŸ‘
…
#blockletters #blocklettering #colors #color #colorful #artproject #artforkids #kidart #elementaryart #artactivity #artactivities #artactivitiesforkids #colorfun #homeschool #homeschoolart #homeschoolfun #capturingparenthood
We created self-portraits for our first art projec We created self-portraits for our first art project of our homeschool year...and we are pretty obsessed with them! 🀩✏️🀩
...
I love the idea of doing a self-portrait project at the beginning of the year, and then again at the end of the year...so that we can see how much we've grown and changed.
...
We used Kaitlyn's @artwithmrs.e Simple Self-Portrait Drawing Guide and it was so incredibly helpful (especially for this new homeschool teacher who wouldn't necessarily list drawing as one of her stronger suits). πŸ˜‰
We actually purchased her entire Guided Drawing Bundle (over on Teachers Pay Teachers) and we highly recommend it! πŸ™ŒπŸ™ŒπŸ™Œ
...
We looked through the self-portrait drawing guide to get different ideas for our eyes, nose, mouth, and hair. πŸ‘€πŸ‘ƒπŸ‘„
...
Now...if you caught our stories earlier this week, you know that our daughter recently made a pretty big change to her hair (that included a partial side-shave and bob-length cut - she also dyed it blue). πŸ’‡β€β™€οΈ
She was used to drawing pictures of herself with her long, blonde locks...and her new hairstyle proved rather difficult. But she persevered, and ended up with a self-portrait that she was truly proud of! πŸ₯°
...
When we were finished drawing our likenesses, we decided to cut them out and create a special background to glue them onto. I went with random black and white designs...and our nugget decided to draw various things that she loves (her family, winter, candy, books, dolphins...and more)! ❀️
...
It was such a fun project...and I can't wait to see what our self-portraits look like at the end of our school year! πŸ˜ƒ
...
#selfportrait #selfportraits #homeschool #homeschoolart #elementaryart #artactivities #artactivitiesforkids #artforkids #kidart #homeschoolfun #capturingparenthood
Follow on Instagram

Copyright © 2025 · glam theme by Restored 316

  • Policies + Disclosure
  • Contact