5…4…3…2…1…BLAST-OFF!!! This month, we’ve decided to journey to outer space! Our mission is to explore the many wonders that exist beyond our beautiful planet. We wish to venture out into the cosmos…shoot past stars…visit neighboring planets…study asteroids…marvel at nebula…and so much more! But in order to see all of the incredible things that orbit outside the Earth’s atmosphere, we need a sturdy vessel. And space ships are pretty hard to come by these days, so we decided to take matters into our own hands, and craft this fabulous DIY Cardboard Rocket Ship!
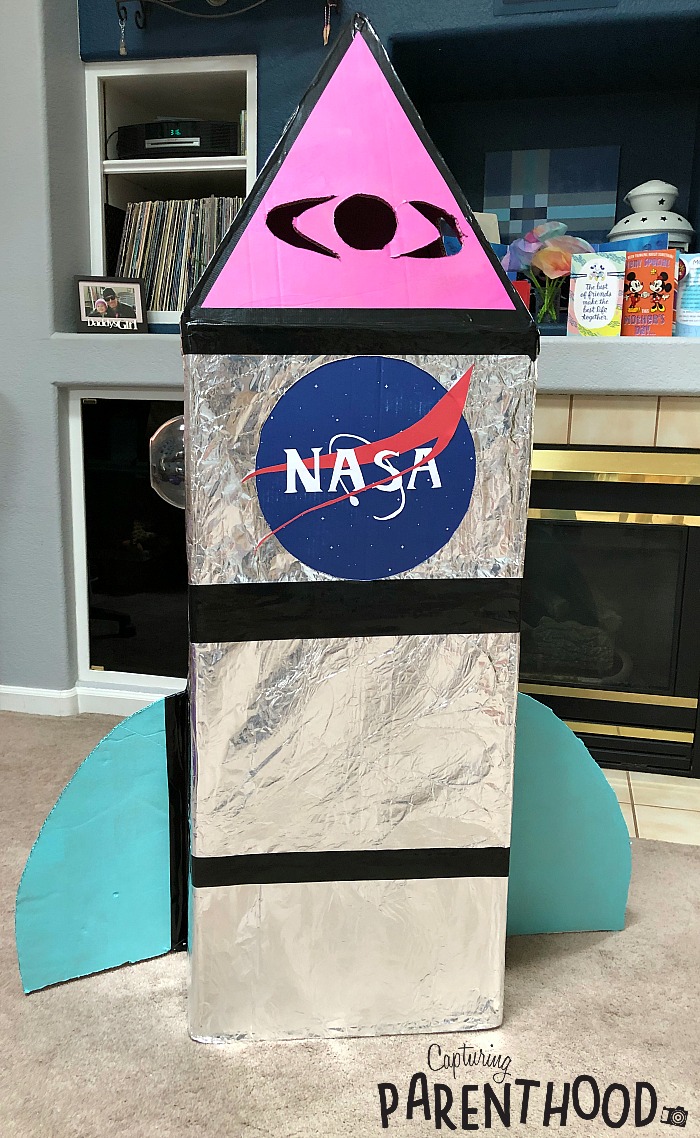
We recently re-designed our daughter’s bedroom and surprised her with a brand new “big girl” bed (don’t worry, I plan to do a room reveal post sometime soon). With the new “big girl” bed (and accompanying mattress) came some rather sizable cardboard boxes. I’ve been wanting to do a space theme with our little nugget for some time, but you can’t just venture into outer space without the appropriate vehicle. The brand new giant pile of cardboard in our garage provided the perfect opportunity for us to blast-off into parts unknown.
This is the first time that we’ve made a cardboard creation on this large of a scale…but we had an absolute blast creating the various elements, and decorating the interior!
DIY Cardboard Rocket Ship
Exterior Construction
Supplies:
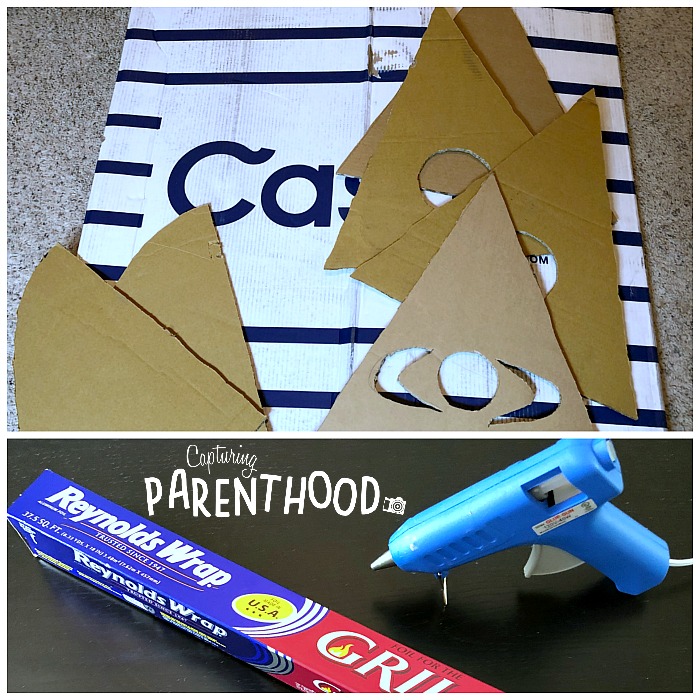
- Large Cardboard Boxes (we used a Casper mattress box as the base, and cut the top triangles and side wings from a Pottery Barn Kids box)
- Corrugated Cardboard Cutter
- Reynolds Wrap Heavy Duty (Grill) Aluminum Foil
- Hot Glue Gun (and lots of glue sticks)
- Acrylic Paint (in whatever colors you choose)
- Mini Paint Roller and Tray
- Duct Tape (we used black Gorilla Tape)
- Construction Paper or Card Stock (red and white)
- Glue Stick
- Recycled Plastic Bowls (optional)
- Plastic Tablecloth (optional)
Construction Instructions:
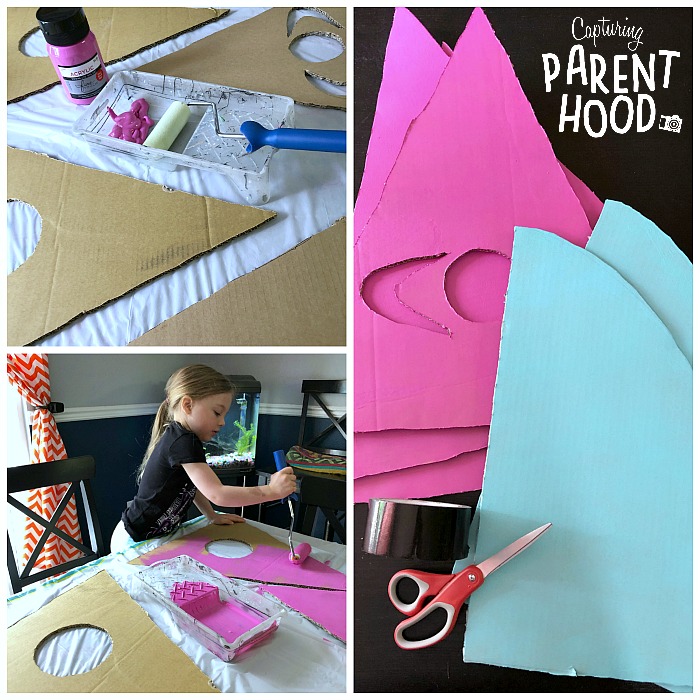
- Using the corrugated cardboard cutter, remove the top and bottom flaps from your cardboard box.
- Feel free to cut out a couple of windows. I cut a circular hole on each side of our box…for two clear, recycled plastic bowls to fit through.
- Cut an arched doorway in the back of your cardboard box (make sure that it is big enough for your child to get through).
- Next, measure and cut out four cardboard triangles – these will become the top of your rocket ship.
- Feel free to cut some window holes or fun designs in the triangles (these holes will help light filter into the rocket ship, once constructed).
- Before you set down the cardboard cutter, go ahead and cut out two wings. Now that you have all of your rocket ship components, it’s time to add some color!
- Grab some acrylic paint and a mini roller brush and tray. Our little nugget wanted her rocket ship to be pink and blue, but you can use whatever color(s) your heart desires. Let your kiddos paint the triangles and wings. I highly recommend laying down a plastic tablecloth for this task. 🙂 Once one side of each component has been painted, set it aside to dry completely, before flipping over to paint the opposite side. Set aside once more, to dry completely.
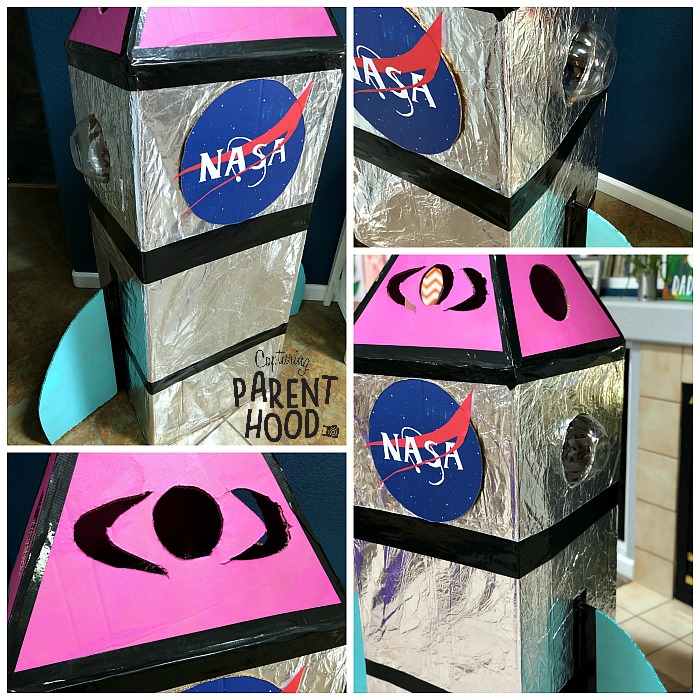
- You could also go ahead and paint your entire space vessel, if you really wanted to. We decided that the main part of our rocket ship should be silver and shiny, so we covered it with heavy duty aluminum foil. To do so, you will need to work in batches with your hot glue gun. I recommend that this step be completed by an adult, as hot glue guns can cause serious burns…and because you will need to work rather quickly, to get the aluminum foil to stick before the glue hardens. Note: Your box will likely be a bit flimsy (until you attach the triangles at the top). To keep our box open and stable during the aluminum foil application, I placed an inflated exercise ball inside.
- Once your entire cardboard box is covered in aluminum foil, you can hide the places where the different sheets of foil come together, with some duct tape.
- Keep that duct tape handy…it’s now time to attach the top triangles and wings. Attach the bottom of each triangle to one side of the box, before taping the adjoining sides of the triangles together to form a point.
- Next, use a couple strips of duct tape to attach the wings to the lower section, on the sides of the rocket ship.
- If you are using plastic bowls for your windows, gently slide them into place from the interior of the rocket ship. Adhere with hot glue.
- The exterior of your vessel is now complete…minus one important detail…a logo!
NASA Logo Instructions:
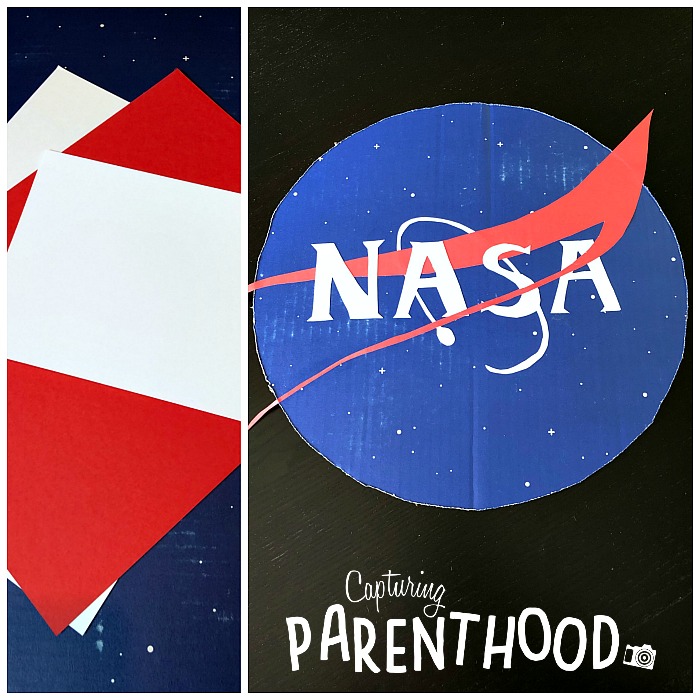
- We got incredibly lucky when we discovered that our Casper mattress box included an extra piece of cardboard, that just so happened to be decorated like the night sky on one side (dark blue with white speckles). It was the perfect background for our NASA logo! That being said, you could also paint a circular piece of cardboard dark blue and add some white speckles. Or you could skip the cardboard altogether, and utilize a sheet of dark blue card stock. Either way, you will need a dark blue circle (with white speckles) as the base for your logo.
- Next, you will need to cut some components from construction paper, or card stock. Cut a thin outline of an (almost) oval, as well as the NASA letters, from some white paper. And cut the red logo element from the red paper.
- Using a glue stick, glue the (almost) oval outline down in the center of the blue circular background. Next, glue down (only) the upper section of the red logo element – the lower strip of red paper gets glued down on top of the letters.
- Glue down the NASA letters. And then glue down the remaining section of red paper.
- We used our black duct tape to attach our completed NASA logo to the front of our cardboard rocket ship!
Interior Decorating
Supplies:
- Construction Paper (white)
- Black Marker
- Kwik Stix Tempera Paint Sticks (green, blue, and black)
- Star Stickers
- Small Recycled Items (lids, cups, etc.)
- Cardboard
- Dot Stickers (various sizes)
- Hot Glue Gun
- Duct Tape (we used black Gorilla Tape)
Instructions:
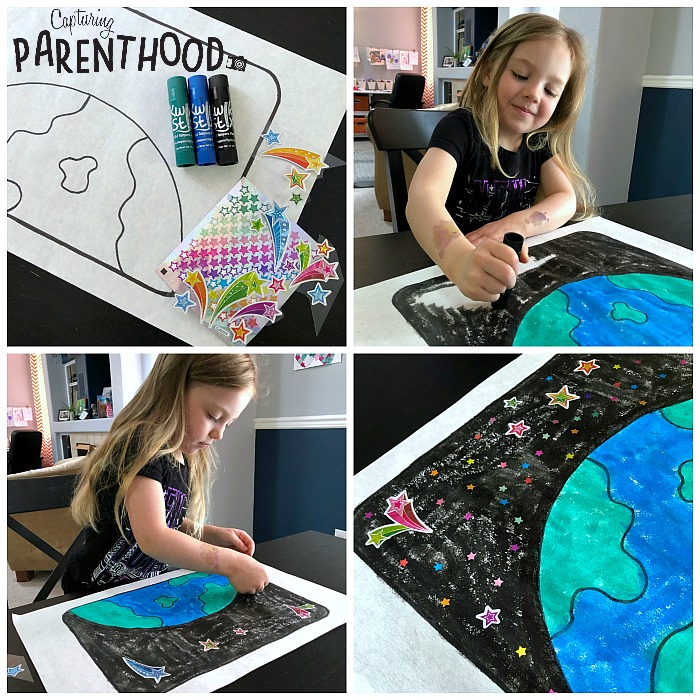
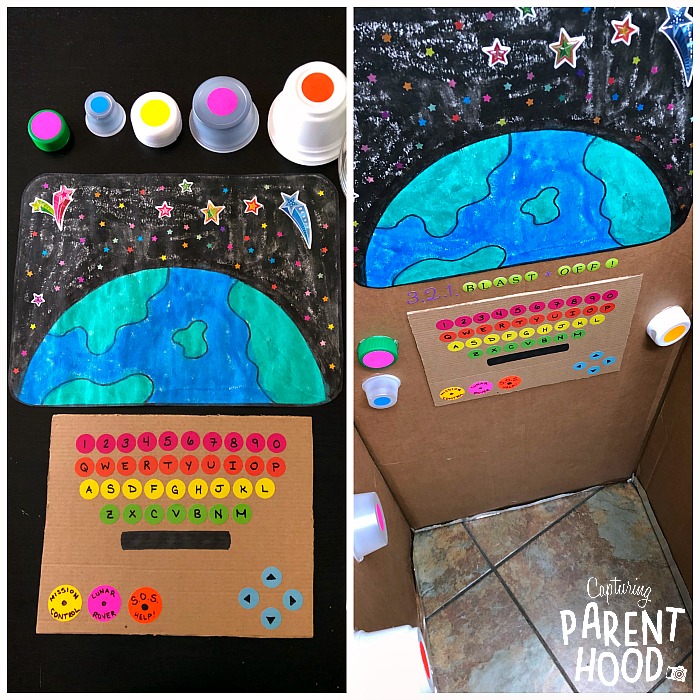
- It wouldn’t be very fun to ride around in your very own rocket ship, if you couldn’t ever catch a glimpse of space, right?!? So, we decided to create a little space scene window craft, to glue to the interior of our rocket ship. Start by choosing your favorite planet. Our little nugget chose Earth.
- We used a black marker to draw the outline of a window onto a piece of white construction paper. Within the outline of the window, we drew a section of planet Earth.
- Our daughter then grabbed her green, blue, and black Kwik Stix paint sticks, and started filling in the window scene, with the appropriate colors. Once she was finished, she decorated the black (outer space) area with colorful star stickers! And then we cut it out and glued it to the inside of our rocket ship!
- We wanted to incorporate a few other fun and colorful elements…so we stuck some bright dot stickers on a variety of recycled items. We also created a small cardboard keyboard, using a black marker and various sizes of colorful dot stickers.
- We used a hot glue gun to attach all of our small recycled elements, and we used duct tape to attach the cardboard keyboard.
- Mission Control…we are now ready for lift-off! 🙂
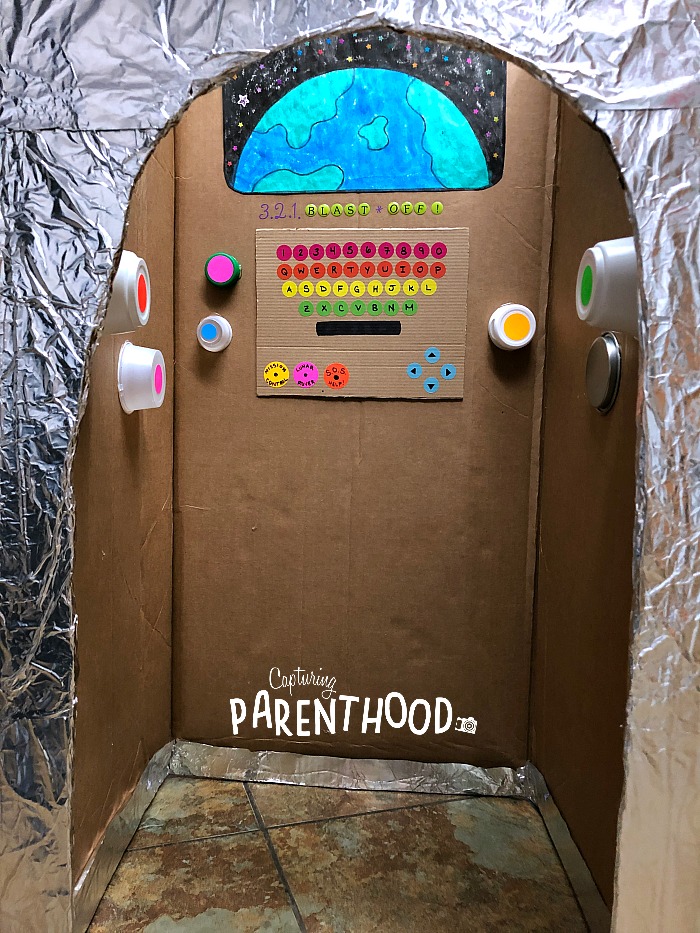
Our little nugget loves climbing aboard her rocket ship and going on all sorts of outer space adventures! As of right now, her favorite place to visit is Saturn!
I love seeing her smiling face occasionally pop up in one of the windows, as she soars up into the cosmos! And I’m pretty sure that our two pups are just itching to to accompany her on a special space mission…since I always find them crowding around the rocket ship, when our daughter is inside manning the vessel. 🙂
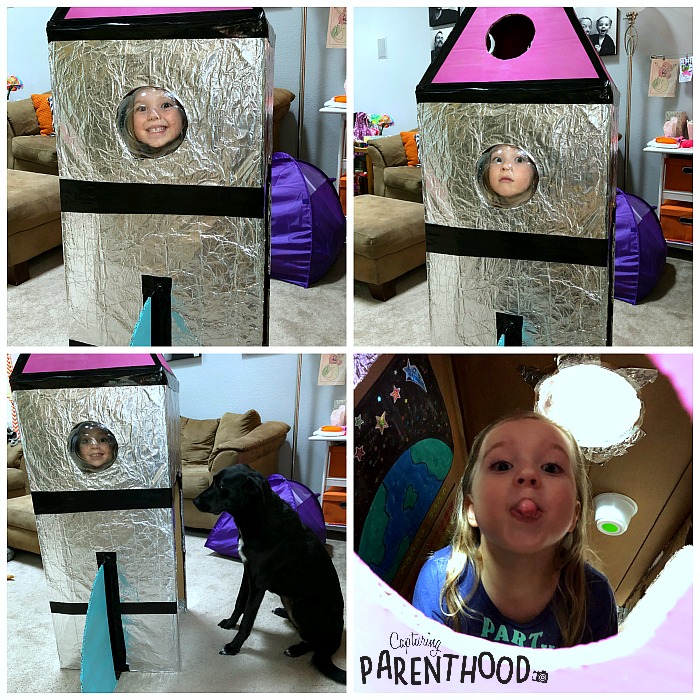
Needless to say, we are now suited up and ready to blast-off! We sincerely hope that you’ll join us on our incredible adventures through outer space this month. With our human spacecraft complete…alien spacecrafts are next on our list…so make sure to check back in this Thursday!

