• Home
  • About
  • Kid Zone
    • Activities
    • Arts + Crafts
    • Books Books Books
  • Food
    • Family-Friendly
    • Kids
    • Sweets
    • Dog-Friendly
  • Life + Motherhood
    • Pregnancy
    • Parenting
    • House + Home
  • Let’s Party
    • Birthdays
    • Holidays
    • Instagram
    • Pinterest

Capturing Parenthood

DIY Tinted Mason Jars – Two Ways

in Arts + Crafts, Toddler Zone on July 9, 2019

The Fourth of July holiday is officially behind us, and the second half of summer vacation lies ahead. Finding ways to keep kiddos happy, engaged, and entertained, during the long summer days, can sometimes be a daunting task. Have no fear – we’re here to help! For the remainder of July and August (excluding two weeks for a much-needed family vacation) we will be sharing various summertime crafts and activities that you and your little ones are sure to love. And today, we are starting out with a bang – with this colorful DIY Tinted Mason Jars craft!

DIY Tinted Mason Jars - Two Ways

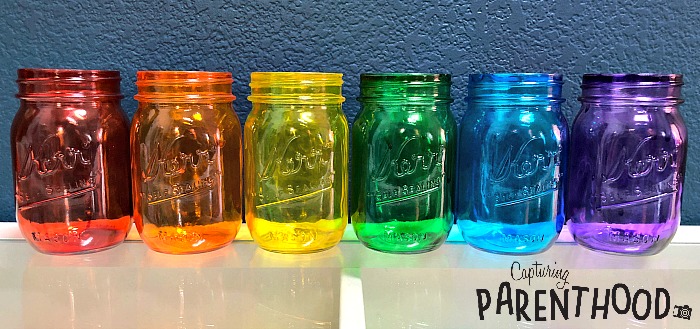
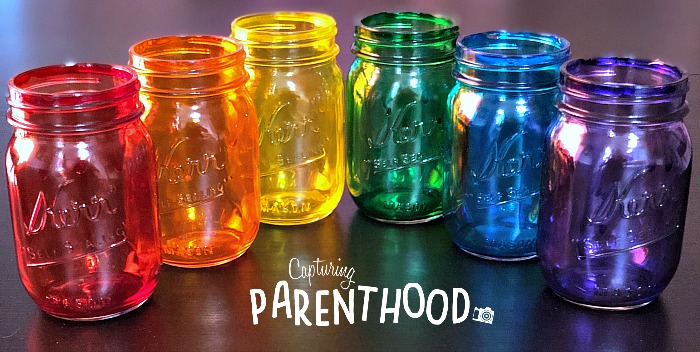
If you’ve been following Capturing Parenthood for awhile, then you already know that we LOVE rainbows! Needless to say, when it came time to create our very own tinted mason jars…a rainbow set was on the top of our list. πŸ™‚ But we couldn’t stop there. So, we decided to conduct some color-mixing experiments…to bring you yet another fun and engaging way to tint mason jars!

While we’ve had an obsession with mason jars for quite some time, this was the first time that we’ve ever tried to color our own jars…and I’m happy to report that the process was super easy! We just followed Shutterfly’s DIY tutorial – How to Tint Mason Jars in 8 Simple Steps! What I love about the Shutterfly tutorial is how simple it is to follow. Who knew that coloring and customizing your own mason jars could be such a breeze? The tutorial includes helpful step-by-step instructions, as well as easy-to-follow images.

DIY Tinted Mason Jars - Two Ways

But the best part about this craft? It’s something that your kiddos can create on their own – and it’s a craft that provides several learning opportunities along the way! Your kiddos will practice their math skills as they measure out ingredients. They will build dexterity as they stir their colorful glue-mixtures together…and swirl the mixtures around in the mason jars. And if you go with the color-mixing jars, your kiddos will have the opportunity to create a hypothesis…to predict what their final jar color will be. Lastly, your little ones will have to practice patience, as they wait for their jars to dry, bake, and cool!

Feel free to pop on over to Shutterfly, to follow their tutorial…or keep scrolling to discover the steps that we took to create our Rainbow Tinted Mason Jars, as well as our Color-Mixing Tinted Mason Jars.


DIY Tinted Mason Jars
Supplies:

DIY Tinted Mason Jars - Two Ways

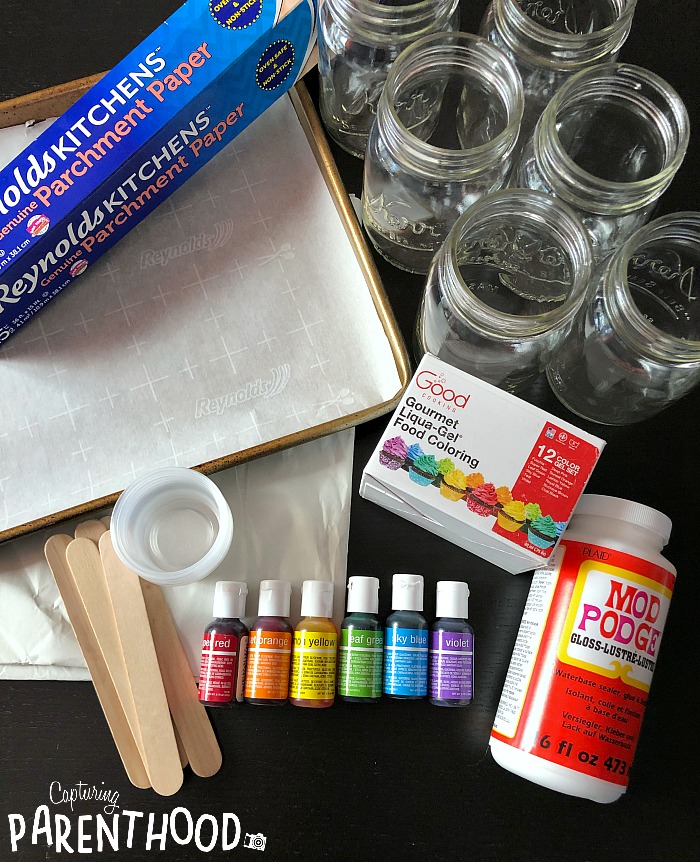
  • Glass Mason Jars (we used the 16 oz. size)
  • “Gloss” Mod Podge (if you use “matte” you will not achieve the same vibrant results)
  • Food Coloring (we used our Good Cooking Gourmet Liqua-Gel Food Coloring set)
  • Small Plastic Cups (one for each color)
  • Wooden Craft/Popsicle Sticks (one for each color)
  • Newspaper (we used the packing paper that the mason jars came wrapped in from Michael’s)
  • Baking Sheet
  • Parchment Paper
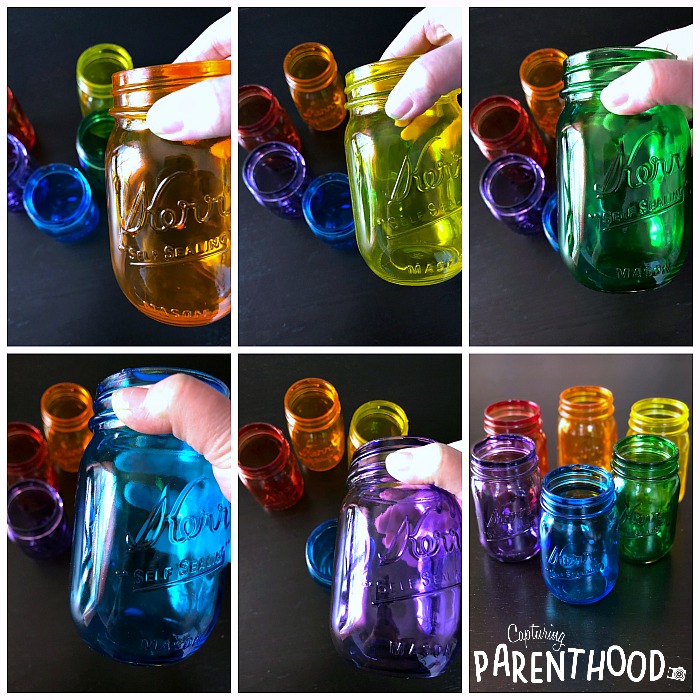
How To Make Rainbow Tinted Mason Jars:

DIY Tinted Mason Jars - Two Ways

  1. Set aside six glass mason jars. Place a few layers of newspaper (or packing paper) on a flat surface or tray.
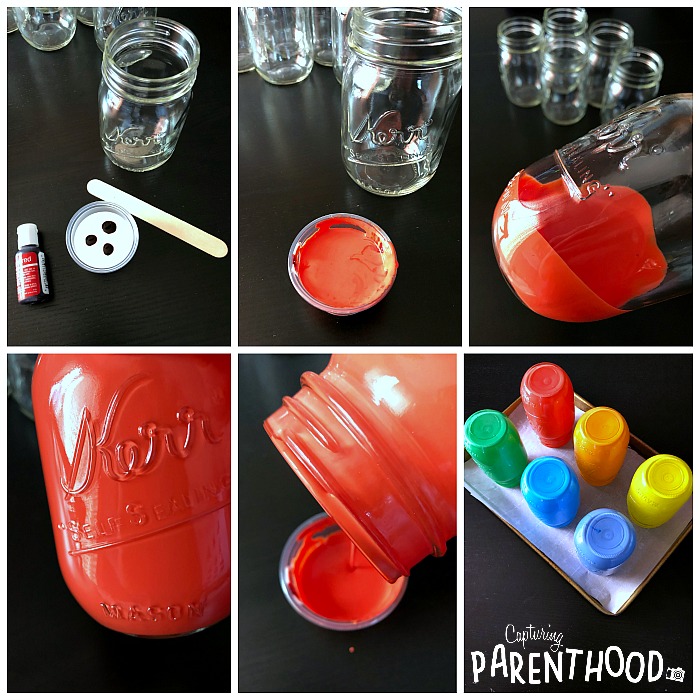
  2. Grab a small plastic cup and add approximately 2 Tablespoons of the Gloss Mod Podge.
  3. Carefully add 2-3 drops of red food coloring, along with roughly 1 Tablespoon of water. Note: The less water you add, the richer the color. If you add more water, you will achieve a lighter, more subtle tint.Β 
  4. Stir the mixture with a wooden craft stick, until the ingredients are fully combined…creating a consistent red color.
  5. Pour the red glue mixture into a glass mason jar (making sure to keep your plastic cup nearby). Swirl the glue mixture around inside the mason jar…spinning the jar in every direction to thoroughly coat the inside. Slowly pour the excess red glue back into the same plastic cup that you used to mix the glue mixture together. As you pour, make sure to spin the jar around…completely coating the top (interior) portion of the jar.
  6. Place the jar upside down on the stack of newspaper/packing paper. Let dry for approximately 30 minutes. Lift the jar up periodically, as it dries, and wipe off any excess glue that may be collecting along the top lip.
  7. Repeat the above steps to create an orange, yellow, green, blue, and purple jar. Make sure that your last jar still gets at least 30 minutes of upside-down dry time (it’s completely fine to let the other jars dry for longer).
  8. Preheat the oven to 175Β° F. Line a baking sheet with parchment paper.
  9. Once the rainbow-colored jars have dried the appropriate amount of time, place them upside down on the parchment-lined baking sheet.
  10. Place in the preheated oven for 10 minutes.
  11. Remove the jars from the oven, and flip them over onto a cooling rack (so that they are right-side up). Let cool for 20 minutes.
  12. If the jars still have streaks, place them back in the oven for 10 minute increments…until the streaks disappear. Make sure to cool the jars for at least 20 minutes, between each 10-minute stint in the oven. Note: We ended up doing 3-4 cycles in the oven to eliminate as many drips and streaks as possible. We still ended up with a few drips in each jar…but they are not very noticeable.Β 

DIY Tinted Mason Jars - Two Ways

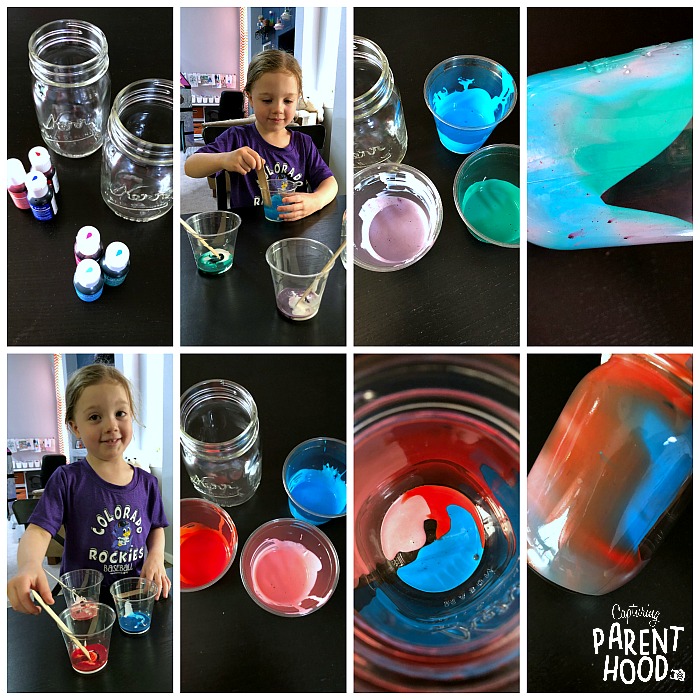
How To Make Color-Mixing Tinted Mason Jars:

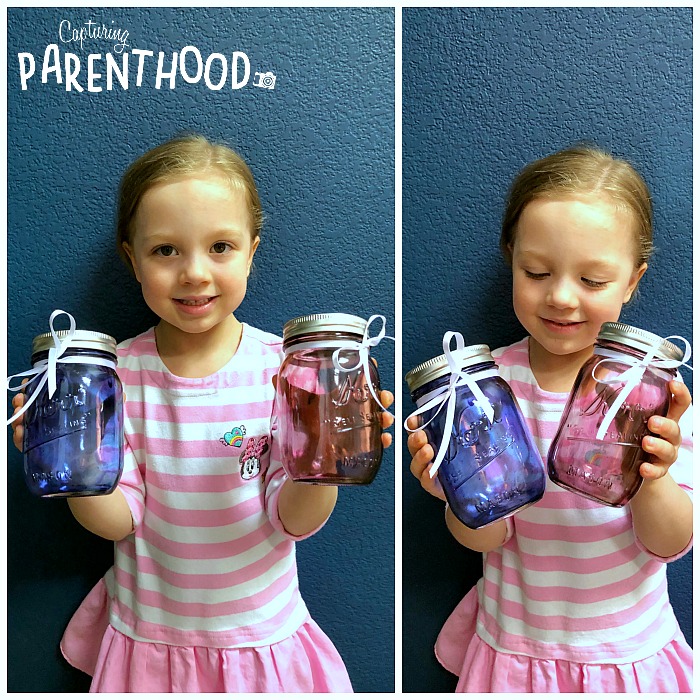
We were intrigued when the Shutterfly tutorial mentioned the possibility of using more than one color of glue per jar…to create marbled jars. We obviously had to give it a shot! However, we discovered that it is extremely difficult to achieve a marbled effect…with all of the spinning and swirling that is required to coat the entire jar with colored glue. When you initially start swirling the multiple colors around, you will see a beautiful marbled effect…but by the time you’ve coated the entire interior of the jar, it will most likely end up being one dominant color. We also found that any marbling effect that survived the drying stage…inevitably didn’t survive the oven. Once our jars were baked and cooled, they turned one main color – although the process did create some fantastic little speckles inside the jars!

DIY Tinted Mason Jars - Two Ways

And even though we failed at marbling…the multi-colored technique was still a success…because it turned into a fabulous color-mixing experiment! Who doesn’t enjoy adding different colors together, to see what kind of magical creation will result? Kids love color-mixing…so these multi-colored jars were a huge hit with our little nugget!

DIY Tinted Mason Jars - Two Ways

  1. Set aside a mason jar. Place a few layers of newspaper (or packing paper) on a flat surface or tray.
  2. Start by selecting 2-3 different colors of food coloring. You don’t want to use too many colors…or you will end up with a beautiful brown jar. πŸ™‚
  3. Grab a plastic cup for each color you plan to make, and add approximately 1 Tablespoon of Gloss Mod Podge to each cup. Note: I decided to use larger plastic cups this time, to make it easier for our little nugget to stir them all by herself!Β 
  4. Carefully add 2 drops of food coloring, along with roughly 1 teaspoon of water, to each cup – making sure to keep the different colors separate (for now). Note: The less water you add, the richer the color. If you add more water, you will achieve a lighter, more subtle tint.Β 
  5. Stir each cup, with their own wooden craft sticks, until the ingredients are fully combined…creating one consistent color in each cup.
  6. Pour the various colors of glue mixture into a glass mason jar. Swirl the colors around inside the mason jar…spinning the jar in every direction to thoroughly coat the inside. Slowly pour the excess glue back into one of the used plastic cups. As you pour, make sure to spin the jar around…completely coating the top (interior) portion of the jar.
  7. Place the jar upside down on the stack of newspaper/packing paper. Let dry for approximately 30 minutes. Lift the jar up periodically, as it dries, and wipe off any excess glue that may be collecting along the top lip.
  8. Repeat the above steps for any additional color-mixing tinted mason jars that you wish to create. Just make sure that your last jar still gets at least 30 minutes of upside-down dry time (it’s completely fine to let the other jars dry for longer).
  9. Preheat the oven to 175Β° F. Line a baking sheet with parchment paper.
  10. Once the jars have dried the appropriate amount of time, place them upside down on the parchment-lined baking sheet.
  11. Place in the preheated oven for 10 minutes.
  12. Remove the jars from the oven, and flip them over onto a cooling rack (so that they are right-side up). Let cool for 20 minutes.
  13. If the jars still have streaks, place them back in the oven for 10 minute increments…until the streaks disappear. Make sure to cool the jars for at least 20 minutes, between each 10-minute stint in the oven. Note: We ended up doing 3-4 cycles in the oven to eliminate as many drips and streaks as possible. We still ended up with a few drips in each jar…but they are not very noticeable.Β 


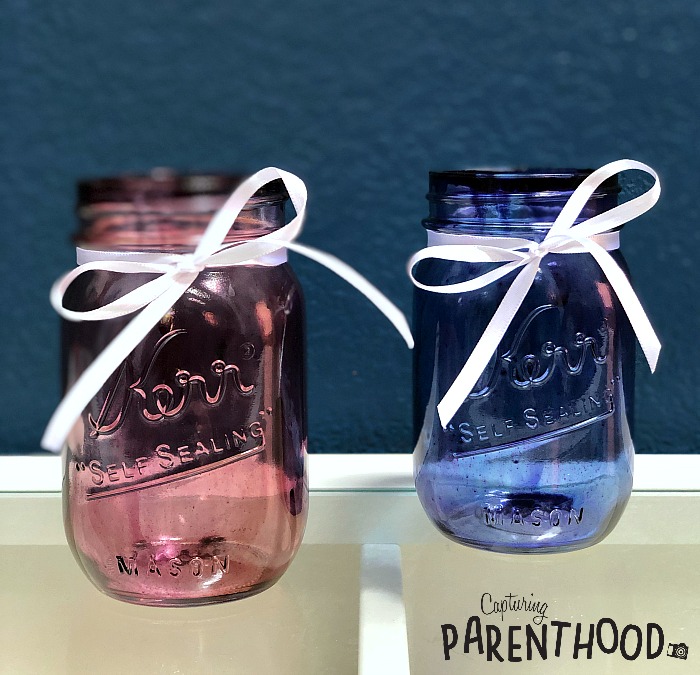
We loved creating our very own tinted mason jars, and we are thrilled with how they all turned out! I guess you could sat that we’re officially hooked! And if you’re anything like us…once you try this technique…you might find yourself surrounded by a bunch of colorful glass jars. πŸ™‚ And you might start to wonder…what on earth am I going to do with all of these beautiful, tinted mason jars? Don’t worry – we’ve got you covered!

DIY Tinted Mason Jars - Two Ways

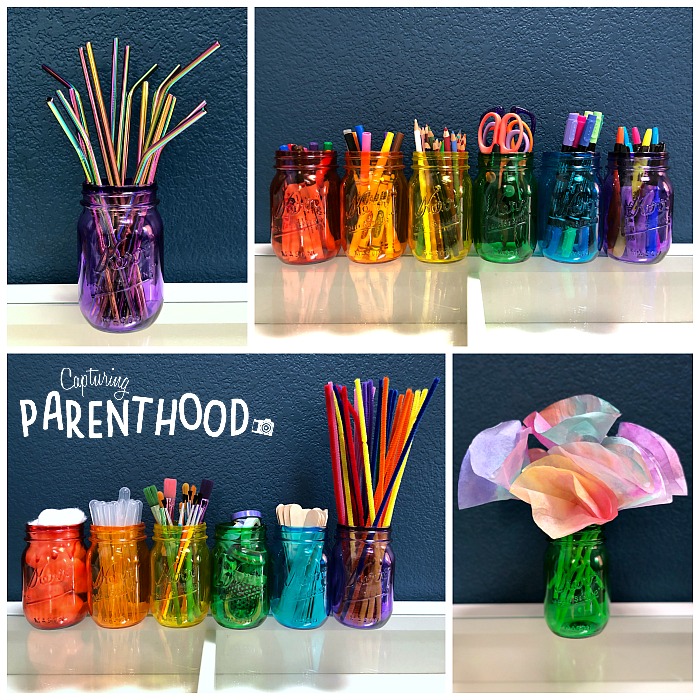
Tinted mason jars can be used around the house in numerous ways. You can use them individually as flower vases – we love using them with our Kwik Stix Coffee Filter Flowers! You can use them to brighten up a backyard BBQ – filling them with straws, dining utensils, napkins, etc. If you made an array of rainbow-colored jars like us…use them all together to house various craft and/or art supplies. Our gorgeous rainbow jars now reside in our craft room – where they keep all of our paintbrushes, Washi tape, pipe cleaners, Popsicle sticks, cotton balls, pipettes, and markers nice and organized!

DIY Tinted Mason Jars - Two Ways

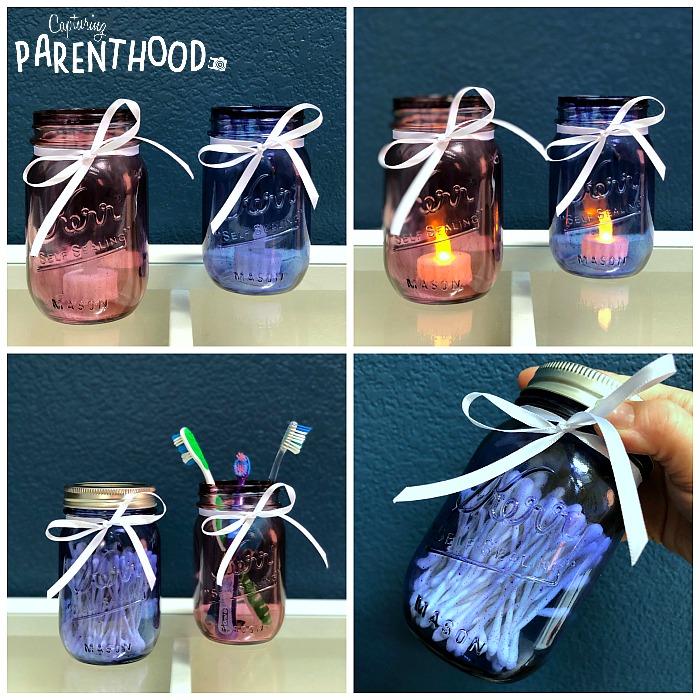
We also love using mason jars for bathroom organization! Tie a cute ribbon around the neck of the jars and use them as toothbrush holders, cotton swab holders, and more! They also make beautiful candle holders – just drop in a tealight candle (wax or LED). The possibilities are truly endless! The only important thing to remember is that once you tint a mason jar, it should never be used as drinkware – it should only be used for decorative purposes.

DIY Tinted Mason Jars - Two Ways

So…what are you waiting for?!? Grab some mason jars and some Mod Podge, and let the colorful creations begin!

I would like to point out that we were approached by a content marketing specialist, for Shutterfly, who asked if we would be interested in trying the tutorial for tinted mason jars, and sharing our experience on Capturing Parenthood. We were not compensated in any way for this post. The only reason that we decided to do it, was because the craft looked right up our alley…and because we love using mason jars for decorative purposes around our home! The opinions and photographs that appear in this blog post are purely our own.

START SPREADING THE NEWS!

Related Posts

  • Celebrating Holidays Through Literature – Valentine’s Day 2019Celebrating Holidays Through Literature – Valentine’s Day 2019
  • Camping Crafts for KidsCamping Crafts for Kids
  • Baking Sheet & Muffin Tin Prints – Process ArtBaking Sheet & Muffin Tin Prints – Process Art
  • When My Husband Travels and We Stay HomeWhen My Husband Travels and We Stay Home
« Summer Books (2019) – Celebrating the Season
Summertime Citrus Potions »

Comments

  1. Janey Velasco says

    July 10, 2019 at 3:44 PM

    OMG! These came out SO CUTE!! <3

    • Stacey says

      July 10, 2019 at 4:26 PM

      Thank you so much, Janey! We are in love with them! They were so easy to make…and now we are looking forward to making even more. πŸ™‚ I think we will be busy making our family and friends some cute and colorful mason jars for Christmas this year!

Hello! Nice to meet you!

Welcome to the Capturing Parenthood blog! I'm Stacey...wife and first-time parent, former full-time working mom, turned stay-at-home mom. Join me as I capture and share my thoughts and experiences on this crazy adventure we call parenthood! Click here to learn more about me!

Search Capturing Parenthood

Instagram

Ok...@artwithmrs.e Haunted House project is hands- Ok...@artwithmrs.e Haunted House project is hands-down the best Halloween-themed art project out there! πŸ™ŒπŸ™ŒπŸ™Œ
We had a blast creating haunted houses for homeschool art this month! 🧑
...
We followed Kaitlyn's extremely helpful Haunted House Drawing Guide (you can find it over on her Teachers Pay Teachers account) and completed the project over the course of 3 lessons.
...
During our first lesson, we sketched our houses in pencil, and added some eerie exterior landscaping. πŸͺ¦πŸ¦‡
We popped in a few spooky characters (ghosts, spiders, pumpkins, and a vampire). πŸ‘»πŸ•·πŸŽƒπŸ§›
And then we traced over our pencil lines with black Sharpie.
...
During our next lesson, we used a coloring technique that we learned from Kristian @friendsartlab ❀️ We colored our pictures with oil pastels...and then painted over the top of the oil pastels with baby oil...it causes the oil pastels to bleed and blend together! 🀩
...
During our final lesson...we added more spooky characters to the inside of our house...that can peek out behind the doors and windows. πŸ’€πŸ§™β€β™€οΈπŸ‘»
To do this...I used an X-acto knife and carefully cut around the outside edges of the doors/windows (leaving the hinge sides intact so that they could fold open and closed).
We placed yellow construction paper in the background...and added witches, ghosts, skeletons, a mummy, and a Frankenstein! 😍
This step made our haunted houses really come to life...and we just can't thank Kaitlyn @artwithmrs.e enough for sharing this awesome lesson and drawing guide! THE ABSOLUTE BEST! ❀️❀️❀️
...
It was very evident how much our daughter loved this project...as we worked through each step...but the thing that solidified just how much she enjoyed it was - one weekend morning I walked downstairs to find her and her dad sitting at the table - and she was very excitedly teaching him how to draw his own haunted house - while she drew a few more herself (scroll to the last picture in the carousel)! πŸ₯°
...
#hauntedhouse #hauntedhouses #hauntedhousedrawing #directeddrawing #spookyart #halloween #happyhalloween #halloweenart #halloweenfun #elementaryart #homeschoolart #homeschool #homeschoolfun #capturingparenthood
I decided that these six little pumpkins needed a I decided that these six little pumpkins needed a permanent place on our feed...because WE GREW THEM OURSELVES!!! πŸŽƒ
That's right...first-time pumpkin-growers over here...and it was all actually a bit of a surprise. πŸ˜ƒ
...
You see, when we went to prep our garden beds this spring, we noticed a plant that had already started growing. We assumed it was a cucumber plant, since it was in the same place we had cucumbers last year.
We left it alone and planted a couple of other cucumber plants nearby. πŸ₯’
At first, the leaves on our mystery plant looked very similar to the leaves on our other cucumber plants.
But a couple of weeks later the plant had grown A LOT bigger. It was now obvious that it was not a cucumber plant. But what was it? πŸ€·β€β™€οΈ
...
And that's when it suddenly dawned on these exhausted parents, that our daughter had spontaneously tossed seeds from her pumpkin (last Halloween), into the garden bed. πŸ€¦β€β™€οΈ The mystery was finally solved...and by the looks of the large golden flowers that were emerging all over the vines...we figured we might have a few pumpkins come fall! πŸ™ŒπŸŽƒπŸ™Œ
...
It was so much fun to watch the pumpkin plant grow! 🀩 We had to cut down the wire on one side of our garden bed to let the vines out...and they ended up growing 6-10 feet long in both directions! 😳 It was crazy!
They put out the most gorgeous flowers...that the bees absolutely loved! 🧑 And soon enough, we spotted a few round gourds growing at the base of some of the flowers. They grew quickly...and then turned a beautiful shade of orange! 😍
...
Needless to say, we are now officially pumpkin-growing people! πŸ˜‚ My husband can't wait to plant more next year...and he's already looking in to different varieties - hoping to grow some larger jack-o-lantern style ones next season! πŸŽƒ
…
#pumpkins #growingpumpkins #ourpumpkinpatch #homegrownpumpkins #homegrown #homegarden #pumpkingrowing #gardening #fallharvest #happyhalloween #timetocarvesomepumpkins #gardensurprises #gardenfun #capturingparenthood
Free the Frankensteins from the Frozen Rainbow Bra Free the Frankensteins from the Frozen Rainbow Brain! 😬🌈🧠
…
Yesterday, we shared how we made this colorful, frozen rainbow brain - full of Frankenstein mini erasers…and today we wanted to show you what became of our beautiful brain! πŸ˜ƒ
…
We popped it out onto a tray, grabbed a shaker of salt, a bottle of warm water (colored red for added effect), and some tongs.
And then it was time to Free the Frankensteins (our daughter coined the phrase)! πŸ˜‰
…
This spooky activity provides chilly sensory play, motor skills practice, and scientific exploration (salt and warm water speed-up the melting process)! πŸ™ŒπŸ™ŒπŸ™Œ
As an added bonus…you also get some color-mixing! And the addition of the salt makes it extra sparkly too! 😍🀩😍
…
Eventually, all you’re left with is some mini erasers floating in a pool of colorful water…and a happy kid! ❀️❀️❀️
…
#frozenbrain #rainbowbrain #frozenrainbowbrain #brains #freethefrankensteins #halloween #happyhalloween #halloweenactivities #halloweenactivitiesforkids #halloweensensoryplay #sensoryplay #sensoryexploration #motorskills #motorskillsdevelopment #scienceforkids #kidscience #funactivities #funactivitiesforkids #halloweenfun #capturingparenthood
We are definitely getting into the fall and Hallow We are definitely getting into the fall and Halloween spirit...so during a recent homeschool art session, we decided to make some air-dry clay pumpkins and jack-o-lanterns! πŸŽƒπŸŽƒπŸŽƒ
...
Back in 2019, Lauralee @2art.chambers shared several colorful, air-dry clay pumpkins that her students made...and after rediscovering the saved post, I decided that it would be a perfect October art lesson for us too! 🧑
...
We used various colors of air-dry clay, and rolled each color into whatever pumpkin shape we wanted...and then we added our lines/indentations using the side of a credit card. πŸ’³ The stems are just small, broken pieces of old crayons (another genius idea from Lauralee). πŸ– And we topped our stems with pieces of pipe cleaner, to create the little curly cues. 😍
...
Once we had our pumpkins...we decided to change things up a bit, and grabbed our stash of googly eyes. πŸ‘€ (Most of) our fall pumpkins then transformed into Halloween jack-o-lanterns! πŸŽƒ
We pressed the googly eyes into the clay, and we used a few small tools (that came with our box of air-dry clay) to add their mouths. πŸ˜ƒ
...
And now we have a cute and colorful crew of clay pumpkins adorning our mantle! πŸŽƒπŸ§‘πŸŽƒ
...
#pumpkins #jackolanterns #claypumpkins #airdryclay #airdryclaycreation #airdryclayart #airdryclaypumpkins #elementaryart #fallartprojects #fallartprojectsforkids #halloweenart #halloweenartprojects #halloweenartprojectsforkids #homeschool #homeschoolart #homeschoolfun #halloween #happyhalloween #capturingparenthood
Andrew from @elementaryarts shared a patterned, bl Andrew from @elementaryarts shared a patterned, block letter name project a couple of weeks ago (I'll share the post in stories today), and I immediately added it to our list of art projects to do this year! 😍
But we decided to switch things up a little bit! Instead of using our names, we each picked a color that we like...wrote the name of the color in block letters on our paper...and created our color patterns using at least two different shades of our chosen color. πŸ–
...
This colorful project ended up being a lot of fun, and also very relaxing...as we all quietly focused, and zoned in on adding the color patterns around all of our letters. It was actually a bit hypnotizing! 🀩
...
Needless to say, we are really happy with the way our block letter color project turned out! πŸ™Œ We even had a special guest who wanted to join in on this art project! ❀️
...
P.S. We also used Andrew’s free TPT handout on how to make block letters! The bundle includes bubble letters, cursive letters, graffiti letters, and more! πŸ‘
…
#blockletters #blocklettering #colors #color #colorful #artproject #artforkids #kidart #elementaryart #artactivity #artactivities #artactivitiesforkids #colorfun #homeschool #homeschoolart #homeschoolfun #capturingparenthood
We created self-portraits for our first art projec We created self-portraits for our first art project of our homeschool year...and we are pretty obsessed with them! 🀩✏️🀩
...
I love the idea of doing a self-portrait project at the beginning of the year, and then again at the end of the year...so that we can see how much we've grown and changed.
...
We used Kaitlyn's @artwithmrs.e Simple Self-Portrait Drawing Guide and it was so incredibly helpful (especially for this new homeschool teacher who wouldn't necessarily list drawing as one of her stronger suits). πŸ˜‰
We actually purchased her entire Guided Drawing Bundle (over on Teachers Pay Teachers) and we highly recommend it! πŸ™ŒπŸ™ŒπŸ™Œ
...
We looked through the self-portrait drawing guide to get different ideas for our eyes, nose, mouth, and hair. πŸ‘€πŸ‘ƒπŸ‘„
...
Now...if you caught our stories earlier this week, you know that our daughter recently made a pretty big change to her hair (that included a partial side-shave and bob-length cut - she also dyed it blue). πŸ’‡β€β™€οΈ
She was used to drawing pictures of herself with her long, blonde locks...and her new hairstyle proved rather difficult. But she persevered, and ended up with a self-portrait that she was truly proud of! πŸ₯°
...
When we were finished drawing our likenesses, we decided to cut them out and create a special background to glue them onto. I went with random black and white designs...and our nugget decided to draw various things that she loves (her family, winter, candy, books, dolphins...and more)! ❀️
...
It was such a fun project...and I can't wait to see what our self-portraits look like at the end of our school year! πŸ˜ƒ
...
#selfportrait #selfportraits #homeschool #homeschoolart #elementaryart #artactivities #artactivitiesforkids #artforkids #kidart #homeschoolfun #capturingparenthood
Follow on Instagram

Popular Posts

Virtual Spring Break: Day Five - New York City

Virtual Spring Break: Day Five – New York City

Virtual Spring Break: Day Four - Mexico

Virtual Spring Break: Day Four – Mexico

Virtual Spring Break: Day Three - India

Virtual Spring Break: Day Three – India

Join Us on Instagram

Ok...@artwithmrs.e Haunted House project is hands- Ok...@artwithmrs.e Haunted House project is hands-down the best Halloween-themed art project out there! πŸ™ŒπŸ™ŒπŸ™Œ
We had a blast creating haunted houses for homeschool art this month! 🧑
...
We followed Kaitlyn's extremely helpful Haunted House Drawing Guide (you can find it over on her Teachers Pay Teachers account) and completed the project over the course of 3 lessons.
...
During our first lesson, we sketched our houses in pencil, and added some eerie exterior landscaping. πŸͺ¦πŸ¦‡
We popped in a few spooky characters (ghosts, spiders, pumpkins, and a vampire). πŸ‘»πŸ•·πŸŽƒπŸ§›
And then we traced over our pencil lines with black Sharpie.
...
During our next lesson, we used a coloring technique that we learned from Kristian @friendsartlab ❀️ We colored our pictures with oil pastels...and then painted over the top of the oil pastels with baby oil...it causes the oil pastels to bleed and blend together! 🀩
...
During our final lesson...we added more spooky characters to the inside of our house...that can peek out behind the doors and windows. πŸ’€πŸ§™β€β™€οΈπŸ‘»
To do this...I used an X-acto knife and carefully cut around the outside edges of the doors/windows (leaving the hinge sides intact so that they could fold open and closed).
We placed yellow construction paper in the background...and added witches, ghosts, skeletons, a mummy, and a Frankenstein! 😍
This step made our haunted houses really come to life...and we just can't thank Kaitlyn @artwithmrs.e enough for sharing this awesome lesson and drawing guide! THE ABSOLUTE BEST! ❀️❀️❀️
...
It was very evident how much our daughter loved this project...as we worked through each step...but the thing that solidified just how much she enjoyed it was - one weekend morning I walked downstairs to find her and her dad sitting at the table - and she was very excitedly teaching him how to draw his own haunted house - while she drew a few more herself (scroll to the last picture in the carousel)! πŸ₯°
...
#hauntedhouse #hauntedhouses #hauntedhousedrawing #directeddrawing #spookyart #halloween #happyhalloween #halloweenart #halloweenfun #elementaryart #homeschoolart #homeschool #homeschoolfun #capturingparenthood
I decided that these six little pumpkins needed a I decided that these six little pumpkins needed a permanent place on our feed...because WE GREW THEM OURSELVES!!! πŸŽƒ
That's right...first-time pumpkin-growers over here...and it was all actually a bit of a surprise. πŸ˜ƒ
...
You see, when we went to prep our garden beds this spring, we noticed a plant that had already started growing. We assumed it was a cucumber plant, since it was in the same place we had cucumbers last year.
We left it alone and planted a couple of other cucumber plants nearby. πŸ₯’
At first, the leaves on our mystery plant looked very similar to the leaves on our other cucumber plants.
But a couple of weeks later the plant had grown A LOT bigger. It was now obvious that it was not a cucumber plant. But what was it? πŸ€·β€β™€οΈ
...
And that's when it suddenly dawned on these exhausted parents, that our daughter had spontaneously tossed seeds from her pumpkin (last Halloween), into the garden bed. πŸ€¦β€β™€οΈ The mystery was finally solved...and by the looks of the large golden flowers that were emerging all over the vines...we figured we might have a few pumpkins come fall! πŸ™ŒπŸŽƒπŸ™Œ
...
It was so much fun to watch the pumpkin plant grow! 🀩 We had to cut down the wire on one side of our garden bed to let the vines out...and they ended up growing 6-10 feet long in both directions! 😳 It was crazy!
They put out the most gorgeous flowers...that the bees absolutely loved! 🧑 And soon enough, we spotted a few round gourds growing at the base of some of the flowers. They grew quickly...and then turned a beautiful shade of orange! 😍
...
Needless to say, we are now officially pumpkin-growing people! πŸ˜‚ My husband can't wait to plant more next year...and he's already looking in to different varieties - hoping to grow some larger jack-o-lantern style ones next season! πŸŽƒ
…
#pumpkins #growingpumpkins #ourpumpkinpatch #homegrownpumpkins #homegrown #homegarden #pumpkingrowing #gardening #fallharvest #happyhalloween #timetocarvesomepumpkins #gardensurprises #gardenfun #capturingparenthood
Free the Frankensteins from the Frozen Rainbow Bra Free the Frankensteins from the Frozen Rainbow Brain! 😬🌈🧠
…
Yesterday, we shared how we made this colorful, frozen rainbow brain - full of Frankenstein mini erasers…and today we wanted to show you what became of our beautiful brain! πŸ˜ƒ
…
We popped it out onto a tray, grabbed a shaker of salt, a bottle of warm water (colored red for added effect), and some tongs.
And then it was time to Free the Frankensteins (our daughter coined the phrase)! πŸ˜‰
…
This spooky activity provides chilly sensory play, motor skills practice, and scientific exploration (salt and warm water speed-up the melting process)! πŸ™ŒπŸ™ŒπŸ™Œ
As an added bonus…you also get some color-mixing! And the addition of the salt makes it extra sparkly too! 😍🀩😍
…
Eventually, all you’re left with is some mini erasers floating in a pool of colorful water…and a happy kid! ❀️❀️❀️
…
#frozenbrain #rainbowbrain #frozenrainbowbrain #brains #freethefrankensteins #halloween #happyhalloween #halloweenactivities #halloweenactivitiesforkids #halloweensensoryplay #sensoryplay #sensoryexploration #motorskills #motorskillsdevelopment #scienceforkids #kidscience #funactivities #funactivitiesforkids #halloweenfun #capturingparenthood
We are definitely getting into the fall and Hallow We are definitely getting into the fall and Halloween spirit...so during a recent homeschool art session, we decided to make some air-dry clay pumpkins and jack-o-lanterns! πŸŽƒπŸŽƒπŸŽƒ
...
Back in 2019, Lauralee @2art.chambers shared several colorful, air-dry clay pumpkins that her students made...and after rediscovering the saved post, I decided that it would be a perfect October art lesson for us too! 🧑
...
We used various colors of air-dry clay, and rolled each color into whatever pumpkin shape we wanted...and then we added our lines/indentations using the side of a credit card. πŸ’³ The stems are just small, broken pieces of old crayons (another genius idea from Lauralee). πŸ– And we topped our stems with pieces of pipe cleaner, to create the little curly cues. 😍
...
Once we had our pumpkins...we decided to change things up a bit, and grabbed our stash of googly eyes. πŸ‘€ (Most of) our fall pumpkins then transformed into Halloween jack-o-lanterns! πŸŽƒ
We pressed the googly eyes into the clay, and we used a few small tools (that came with our box of air-dry clay) to add their mouths. πŸ˜ƒ
...
And now we have a cute and colorful crew of clay pumpkins adorning our mantle! πŸŽƒπŸ§‘πŸŽƒ
...
#pumpkins #jackolanterns #claypumpkins #airdryclay #airdryclaycreation #airdryclayart #airdryclaypumpkins #elementaryart #fallartprojects #fallartprojectsforkids #halloweenart #halloweenartprojects #halloweenartprojectsforkids #homeschool #homeschoolart #homeschoolfun #halloween #happyhalloween #capturingparenthood
Andrew from @elementaryarts shared a patterned, bl Andrew from @elementaryarts shared a patterned, block letter name project a couple of weeks ago (I'll share the post in stories today), and I immediately added it to our list of art projects to do this year! 😍
But we decided to switch things up a little bit! Instead of using our names, we each picked a color that we like...wrote the name of the color in block letters on our paper...and created our color patterns using at least two different shades of our chosen color. πŸ–
...
This colorful project ended up being a lot of fun, and also very relaxing...as we all quietly focused, and zoned in on adding the color patterns around all of our letters. It was actually a bit hypnotizing! 🀩
...
Needless to say, we are really happy with the way our block letter color project turned out! πŸ™Œ We even had a special guest who wanted to join in on this art project! ❀️
...
P.S. We also used Andrew’s free TPT handout on how to make block letters! The bundle includes bubble letters, cursive letters, graffiti letters, and more! πŸ‘
…
#blockletters #blocklettering #colors #color #colorful #artproject #artforkids #kidart #elementaryart #artactivity #artactivities #artactivitiesforkids #colorfun #homeschool #homeschoolart #homeschoolfun #capturingparenthood
We created self-portraits for our first art projec We created self-portraits for our first art project of our homeschool year...and we are pretty obsessed with them! 🀩✏️🀩
...
I love the idea of doing a self-portrait project at the beginning of the year, and then again at the end of the year...so that we can see how much we've grown and changed.
...
We used Kaitlyn's @artwithmrs.e Simple Self-Portrait Drawing Guide and it was so incredibly helpful (especially for this new homeschool teacher who wouldn't necessarily list drawing as one of her stronger suits). πŸ˜‰
We actually purchased her entire Guided Drawing Bundle (over on Teachers Pay Teachers) and we highly recommend it! πŸ™ŒπŸ™ŒπŸ™Œ
...
We looked through the self-portrait drawing guide to get different ideas for our eyes, nose, mouth, and hair. πŸ‘€πŸ‘ƒπŸ‘„
...
Now...if you caught our stories earlier this week, you know that our daughter recently made a pretty big change to her hair (that included a partial side-shave and bob-length cut - she also dyed it blue). πŸ’‡β€β™€οΈ
She was used to drawing pictures of herself with her long, blonde locks...and her new hairstyle proved rather difficult. But she persevered, and ended up with a self-portrait that she was truly proud of! πŸ₯°
...
When we were finished drawing our likenesses, we decided to cut them out and create a special background to glue them onto. I went with random black and white designs...and our nugget decided to draw various things that she loves (her family, winter, candy, books, dolphins...and more)! ❀️
...
It was such a fun project...and I can't wait to see what our self-portraits look like at the end of our school year! πŸ˜ƒ
...
#selfportrait #selfportraits #homeschool #homeschoolart #elementaryart #artactivities #artactivitiesforkids #artforkids #kidart #homeschoolfun #capturingparenthood
Follow on Instagram

Copyright © 2025 · glam theme by Restored 316

  • Policies + Disclosure
  • Contact