• Home
  • About
  • Kid Zone
    • Activities
    • Arts + Crafts
    • Books Books Books
  • Food
    • Family-Friendly
    • Kids
    • Sweets
    • Dog-Friendly
  • Life + Motherhood
    • Pregnancy
    • Parenting
    • House + Home
  • Let’s Party
    • Birthdays
    • Holidays
    • Instagram
    • Pinterest

Capturing Parenthood

Minion Sensory Bottle

in Uncategorized on October 7, 2017

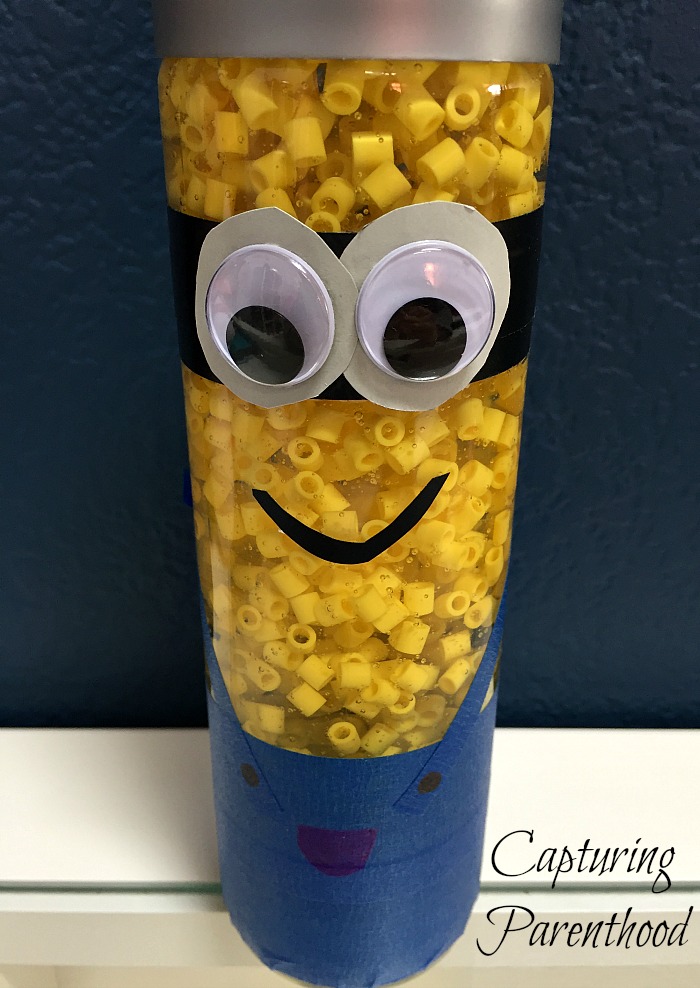
Do your little ones love the Minions? If so, our sensory bottle for Day 6 is going to be a huge hit! This Minion Sensory Bottle isย our daughter’s favorite sensory bottle (thus far)!

Minion Sensory Bottle ยฉ Capturing Parenthood

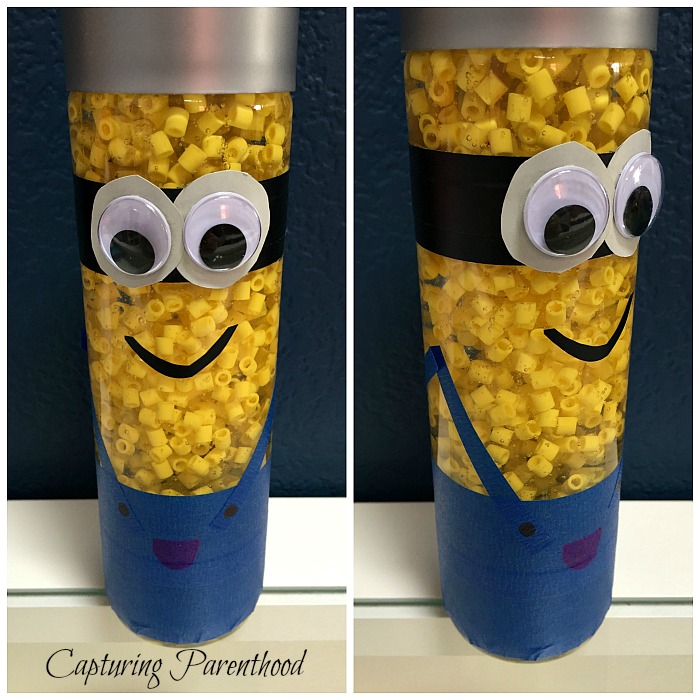
Over the past year, she has been introduced to Bob, Kevin, Stuart (and the whole gang), and just like many kiddos (and adults) I know, she was an instant fan. ๐Ÿ™‚ Bob happens to be her favorite Minion, but when our Minion bottle was complete, we both thought he looked a little more like Kevin.

I stumbled upon this awesome sensory bottle idea over on Little Bins for Little Hands (http://littlebinsforlittlehands.com/minion-sensory-bottle-with-loom-bands/). While they used yellow loom bands in their bottle, I could not find any loom bands at our local craft store (perhaps I wasn’t looking in the right place). What I did find was a little bag of yellow Perler Beads, and they worked perfectly!


Minion Sensory Bottle

Supplies:

Minion Sensory Bottle ยฉ Capturing Parenthood

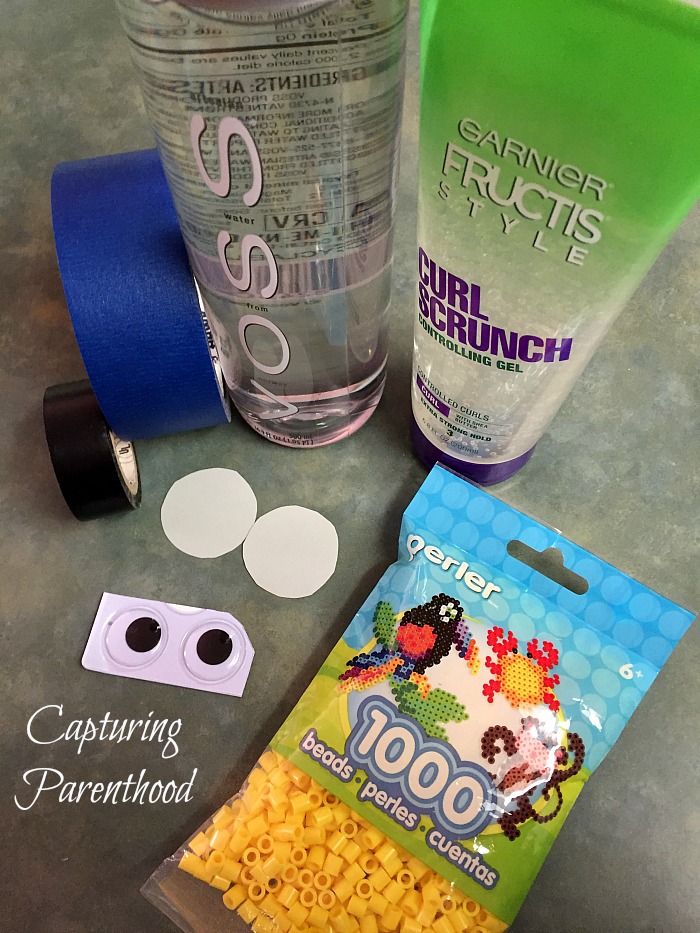
  • Plastic Bottle with Wide-Mouth (I love using Voss water bottles)
  • Clear Hair Gel
  • Hot Water (hottest water from your tap)
  • Yellow Perler Beads
  • Blue Tape (I used painter’s tape)
  • Black Tape (I used electrical tape)
  • Googly Eyes
  • Silver/Light Gray Paper
  • Glue
  • Navy Marker

Instructions:

  1. Empty the plastic bottle (if it contained a non-water beverage, rinse out the bottle). Remove all labels from the bottle. If you have a hard time getting the sticky residue off, Goo Gone works wonders. I find that if I take my time and peel slowly, I can get the Voss labels off without any fuss.
  2. Fill the bottom 1/3 of the bottle with clear hair gel. Pour in a hefty amount of the yellow beads.
  3. Next, add the hot water. Do not fill the bottle all the way up, at this point in time. Give yourself a decent amount of space to assess whether you want to add more hair gel (to make things move slower), more beads, or more water (to make things flow faster).
  4. Cap the bottle and shake vigorously, until all of the ingredients are thoroughly mixed. Take a minute to watch how the bottle behaves, before deciding how to fill the remainder of the bottle.
  5. Fill the last bit of the bottle with your ingredient of choice (I typically like to fill my bottles to the brim). Cap it and give it another vigorous shake. *Note: When I was finished with this bottle, it was likely close to 50% hair gel, and 50% water.
  6. If you’re happy with the results, let the bottle sit (uncapped) until the contents reach room temperature. Then, add a dab of hot glue around the inside of the cap, and quickly seal the bottle (you don’t want your child unscrewing a bottle full of hair gel and beads, inside your house). ๐Ÿ™‚
  7. Now, it’s time to decorate the exterior of the bottle. Toward the bottom of the bottle, wrap two bands of blue tape around the bottle, pressing firmly.
  8. Toward the top of the bottle (about an inch or two down from the cap) wrap one band of black tape around the bottle, pressing firmly.
  9. Cut two small circles (slightly larger than your googly eyes) from the silver paper, and glue them onto the black tape. Once dry, glue one googly eye into the middle of each of the silver circles.
  10. Then you can cut a few small strips of the blue tape (to create the overall straps), and one skinny semi-circle out of the black tape (for the Minion’s mouth).
  11. For the finishing touch, take your navy marker and draw on some overall buttons, and the overall’s front pouch pocket!

What I love about this Minion Sensory Bottle (aside from the fact that it’s super cute) is how slow-moving it is (thanks to the hair gel), and the fact that the beads are suspended in the bottle for quite some time (before they all float to the top).

Minion Sensory Bottle ยฉ Capturing Parenthood

I also enjoy watching my little nugget walk around with the bottle, making all sorts of obscure Minion noises. ๐Ÿ™‚

So…have some fun with this one! Get creative with your kiddos, and bring your favorite Minions to life! I will see you back here tomorrow, with a brand new sensory bottle!

START SPREADING THE NEWS!

Related Posts

  • Celebrating Holidays Through Literature – Halloween 2017Celebrating Holidays Through Literature – Halloween 2017
  • St. Patrick’s Day – Rainbow Arts + CraftsSt. Patrick’s Day – Rainbow Arts + Crafts
  • Do-A-Dot Learning ActivitiesDo-A-Dot Learning Activities
  • Paint-Marbled Christmas OrnamentsPaint-Marbled Christmas Ornaments
« Share the Love Sensory Bottle
Rice Zoo Sensory Bottle »

Hello! Nice to meet you!

Welcome to the Capturing Parenthood blog! I'm Stacey...wife and first-time parent, former full-time working mom, turned stay-at-home mom. Join me as I capture and share my thoughts and experiences on this crazy adventure we call parenthood! Click here to learn more about me!

Search Capturing Parenthood

Instagram

Ok...@artwithmrs.e Haunted House project is hands- Ok...@artwithmrs.e Haunted House project is hands-down the best Halloween-themed art project out there! ๐Ÿ™Œ๐Ÿ™Œ๐Ÿ™Œ
We had a blast creating haunted houses for homeschool art this month! ๐Ÿงก
...
We followed Kaitlyn's extremely helpful Haunted House Drawing Guide (you can find it over on her Teachers Pay Teachers account) and completed the project over the course of 3 lessons.
...
During our first lesson, we sketched our houses in pencil, and added some eerie exterior landscaping. ๐Ÿชฆ๐Ÿฆ‡
We popped in a few spooky characters (ghosts, spiders, pumpkins, and a vampire). ๐Ÿ‘ป๐Ÿ•ท๐ŸŽƒ๐Ÿง›
And then we traced over our pencil lines with black Sharpie.
...
During our next lesson, we used a coloring technique that we learned from Kristian @friendsartlab โค๏ธ We colored our pictures with oil pastels...and then painted over the top of the oil pastels with baby oil...it causes the oil pastels to bleed and blend together! ๐Ÿคฉ
...
During our final lesson...we added more spooky characters to the inside of our house...that can peek out behind the doors and windows. ๐Ÿ’€๐Ÿง™โ€โ™€๏ธ๐Ÿ‘ป
To do this...I used an X-acto knife and carefully cut around the outside edges of the doors/windows (leaving the hinge sides intact so that they could fold open and closed).
We placed yellow construction paper in the background...and added witches, ghosts, skeletons, a mummy, and a Frankenstein! ๐Ÿ˜
This step made our haunted houses really come to life...and we just can't thank Kaitlyn @artwithmrs.e enough for sharing this awesome lesson and drawing guide! THE ABSOLUTE BEST! โค๏ธโค๏ธโค๏ธ
...
It was very evident how much our daughter loved this project...as we worked through each step...but the thing that solidified just how much she enjoyed it was - one weekend morning I walked downstairs to find her and her dad sitting at the table - and she was very excitedly teaching him how to draw his own haunted house - while she drew a few more herself (scroll to the last picture in the carousel)! ๐Ÿฅฐ
...
#hauntedhouse #hauntedhouses #hauntedhousedrawing #directeddrawing #spookyart #halloween #happyhalloween #halloweenart #halloweenfun #elementaryart #homeschoolart #homeschool #homeschoolfun #capturingparenthood
I decided that these six little pumpkins needed a I decided that these six little pumpkins needed a permanent place on our feed...because WE GREW THEM OURSELVES!!! ๐ŸŽƒ
That's right...first-time pumpkin-growers over here...and it was all actually a bit of a surprise. ๐Ÿ˜ƒ
...
You see, when we went to prep our garden beds this spring, we noticed a plant that had already started growing. We assumed it was a cucumber plant, since it was in the same place we had cucumbers last year.
We left it alone and planted a couple of other cucumber plants nearby. ๐Ÿฅ’
At first, the leaves on our mystery plant looked very similar to the leaves on our other cucumber plants.
But a couple of weeks later the plant had grown A LOT bigger. It was now obvious that it was not a cucumber plant. But what was it? ๐Ÿคทโ€โ™€๏ธ
...
And that's when it suddenly dawned on these exhausted parents, that our daughter had spontaneously tossed seeds from her pumpkin (last Halloween), into the garden bed. ๐Ÿคฆโ€โ™€๏ธ The mystery was finally solved...and by the looks of the large golden flowers that were emerging all over the vines...we figured we might have a few pumpkins come fall! ๐Ÿ™Œ๐ŸŽƒ๐Ÿ™Œ
...
It was so much fun to watch the pumpkin plant grow! ๐Ÿคฉ We had to cut down the wire on one side of our garden bed to let the vines out...and they ended up growing 6-10 feet long in both directions! ๐Ÿ˜ณ It was crazy!
They put out the most gorgeous flowers...that the bees absolutely loved! ๐Ÿงก And soon enough, we spotted a few round gourds growing at the base of some of the flowers. They grew quickly...and then turned a beautiful shade of orange! ๐Ÿ˜
...
Needless to say, we are now officially pumpkin-growing people! ๐Ÿ˜‚ My husband can't wait to plant more next year...and he's already looking in to different varieties - hoping to grow some larger jack-o-lantern style ones next season! ๐ŸŽƒ
โ€ฆ
#pumpkins #growingpumpkins #ourpumpkinpatch #homegrownpumpkins #homegrown #homegarden #pumpkingrowing #gardening #fallharvest #happyhalloween #timetocarvesomepumpkins #gardensurprises #gardenfun #capturingparenthood
Free the Frankensteins from the Frozen Rainbow Bra Free the Frankensteins from the Frozen Rainbow Brain! ๐Ÿ˜ฌ๐ŸŒˆ๐Ÿง 
โ€ฆ
Yesterday, we shared how we made this colorful, frozen rainbow brain - full of Frankenstein mini erasersโ€ฆand today we wanted to show you what became of our beautiful brain! ๐Ÿ˜ƒ
โ€ฆ
We popped it out onto a tray, grabbed a shaker of salt, a bottle of warm water (colored red for added effect), and some tongs.
And then it was time to Free the Frankensteins (our daughter coined the phrase)! ๐Ÿ˜‰
โ€ฆ
This spooky activity provides chilly sensory play, motor skills practice, and scientific exploration (salt and warm water speed-up the melting process)! ๐Ÿ™Œ๐Ÿ™Œ๐Ÿ™Œ
As an added bonusโ€ฆyou also get some color-mixing! And the addition of the salt makes it extra sparkly too! ๐Ÿ˜๐Ÿคฉ๐Ÿ˜
โ€ฆ
Eventually, all youโ€™re left with is some mini erasers floating in a pool of colorful waterโ€ฆand a happy kid! โค๏ธโค๏ธโค๏ธ
โ€ฆ
#frozenbrain #rainbowbrain #frozenrainbowbrain #brains #freethefrankensteins #halloween #happyhalloween #halloweenactivities #halloweenactivitiesforkids #halloweensensoryplay #sensoryplay #sensoryexploration #motorskills #motorskillsdevelopment #scienceforkids #kidscience #funactivities #funactivitiesforkids #halloweenfun #capturingparenthood
We are definitely getting into the fall and Hallow We are definitely getting into the fall and Halloween spirit...so during a recent homeschool art session, we decided to make some air-dry clay pumpkins and jack-o-lanterns! ๐ŸŽƒ๐ŸŽƒ๐ŸŽƒ
...
Back in 2019, Lauralee @2art.chambers shared several colorful, air-dry clay pumpkins that her students made...and after rediscovering the saved post, I decided that it would be a perfect October art lesson for us too! ๐Ÿงก
...
We used various colors of air-dry clay, and rolled each color into whatever pumpkin shape we wanted...and then we added our lines/indentations using the side of a credit card. ๐Ÿ’ณ The stems are just small, broken pieces of old crayons (another genius idea from Lauralee). ๐Ÿ– And we topped our stems with pieces of pipe cleaner, to create the little curly cues. ๐Ÿ˜
...
Once we had our pumpkins...we decided to change things up a bit, and grabbed our stash of googly eyes. ๐Ÿ‘€ (Most of) our fall pumpkins then transformed into Halloween jack-o-lanterns! ๐ŸŽƒ
We pressed the googly eyes into the clay, and we used a few small tools (that came with our box of air-dry clay) to add their mouths. ๐Ÿ˜ƒ
...
And now we have a cute and colorful crew of clay pumpkins adorning our mantle! ๐ŸŽƒ๐Ÿงก๐ŸŽƒ
...
#pumpkins #jackolanterns #claypumpkins #airdryclay #airdryclaycreation #airdryclayart #airdryclaypumpkins #elementaryart #fallartprojects #fallartprojectsforkids #halloweenart #halloweenartprojects #halloweenartprojectsforkids #homeschool #homeschoolart #homeschoolfun #halloween #happyhalloween #capturingparenthood
Andrew from @elementaryarts shared a patterned, bl Andrew from @elementaryarts shared a patterned, block letter name project a couple of weeks ago (I'll share the post in stories today), and I immediately added it to our list of art projects to do this year! ๐Ÿ˜
But we decided to switch things up a little bit! Instead of using our names, we each picked a color that we like...wrote the name of the color in block letters on our paper...and created our color patterns using at least two different shades of our chosen color. ๐Ÿ–
...
This colorful project ended up being a lot of fun, and also very relaxing...as we all quietly focused, and zoned in on adding the color patterns around all of our letters. It was actually a bit hypnotizing! ๐Ÿคฉ
...
Needless to say, we are really happy with the way our block letter color project turned out! ๐Ÿ™Œ We even had a special guest who wanted to join in on this art project! โค๏ธ
...
P.S. We also used Andrewโ€™s free TPT handout on how to make block letters! The bundle includes bubble letters, cursive letters, graffiti letters, and more! ๐Ÿ‘
โ€ฆ
#blockletters #blocklettering #colors #color #colorful #artproject #artforkids #kidart #elementaryart #artactivity #artactivities #artactivitiesforkids #colorfun #homeschool #homeschoolart #homeschoolfun #capturingparenthood
We created self-portraits for our first art projec We created self-portraits for our first art project of our homeschool year...and we are pretty obsessed with them! ๐Ÿคฉโœ๏ธ๐Ÿคฉ
...
I love the idea of doing a self-portrait project at the beginning of the year, and then again at the end of the year...so that we can see how much we've grown and changed.
...
We used Kaitlyn's @artwithmrs.e Simple Self-Portrait Drawing Guide and it was so incredibly helpful (especially for this new homeschool teacher who wouldn't necessarily list drawing as one of her stronger suits). ๐Ÿ˜‰
We actually purchased her entire Guided Drawing Bundle (over on Teachers Pay Teachers) and we highly recommend it! ๐Ÿ™Œ๐Ÿ™Œ๐Ÿ™Œ
...
We looked through the self-portrait drawing guide to get different ideas for our eyes, nose, mouth, and hair. ๐Ÿ‘€๐Ÿ‘ƒ๐Ÿ‘„
...
Now...if you caught our stories earlier this week, you know that our daughter recently made a pretty big change to her hair (that included a partial side-shave and bob-length cut - she also dyed it blue). ๐Ÿ’‡โ€โ™€๏ธ
She was used to drawing pictures of herself with her long, blonde locks...and her new hairstyle proved rather difficult. But she persevered, and ended up with a self-portrait that she was truly proud of! ๐Ÿฅฐ
...
When we were finished drawing our likenesses, we decided to cut them out and create a special background to glue them onto. I went with random black and white designs...and our nugget decided to draw various things that she loves (her family, winter, candy, books, dolphins...and more)! โค๏ธ
...
It was such a fun project...and I can't wait to see what our self-portraits look like at the end of our school year! ๐Ÿ˜ƒ
...
#selfportrait #selfportraits #homeschool #homeschoolart #elementaryart #artactivities #artactivitiesforkids #artforkids #kidart #homeschoolfun #capturingparenthood
Follow on Instagram

Popular Posts

Virtual Spring Break: Day Five - New York City

Virtual Spring Break: Day Five – New York City

Virtual Spring Break: Day Four - Mexico

Virtual Spring Break: Day Four – Mexico

Virtual Spring Break: Day Three - India

Virtual Spring Break: Day Three – India

Join Us on Instagram

Ok...@artwithmrs.e Haunted House project is hands- Ok...@artwithmrs.e Haunted House project is hands-down the best Halloween-themed art project out there! ๐Ÿ™Œ๐Ÿ™Œ๐Ÿ™Œ
We had a blast creating haunted houses for homeschool art this month! ๐Ÿงก
...
We followed Kaitlyn's extremely helpful Haunted House Drawing Guide (you can find it over on her Teachers Pay Teachers account) and completed the project over the course of 3 lessons.
...
During our first lesson, we sketched our houses in pencil, and added some eerie exterior landscaping. ๐Ÿชฆ๐Ÿฆ‡
We popped in a few spooky characters (ghosts, spiders, pumpkins, and a vampire). ๐Ÿ‘ป๐Ÿ•ท๐ŸŽƒ๐Ÿง›
And then we traced over our pencil lines with black Sharpie.
...
During our next lesson, we used a coloring technique that we learned from Kristian @friendsartlab โค๏ธ We colored our pictures with oil pastels...and then painted over the top of the oil pastels with baby oil...it causes the oil pastels to bleed and blend together! ๐Ÿคฉ
...
During our final lesson...we added more spooky characters to the inside of our house...that can peek out behind the doors and windows. ๐Ÿ’€๐Ÿง™โ€โ™€๏ธ๐Ÿ‘ป
To do this...I used an X-acto knife and carefully cut around the outside edges of the doors/windows (leaving the hinge sides intact so that they could fold open and closed).
We placed yellow construction paper in the background...and added witches, ghosts, skeletons, a mummy, and a Frankenstein! ๐Ÿ˜
This step made our haunted houses really come to life...and we just can't thank Kaitlyn @artwithmrs.e enough for sharing this awesome lesson and drawing guide! THE ABSOLUTE BEST! โค๏ธโค๏ธโค๏ธ
...
It was very evident how much our daughter loved this project...as we worked through each step...but the thing that solidified just how much she enjoyed it was - one weekend morning I walked downstairs to find her and her dad sitting at the table - and she was very excitedly teaching him how to draw his own haunted house - while she drew a few more herself (scroll to the last picture in the carousel)! ๐Ÿฅฐ
...
#hauntedhouse #hauntedhouses #hauntedhousedrawing #directeddrawing #spookyart #halloween #happyhalloween #halloweenart #halloweenfun #elementaryart #homeschoolart #homeschool #homeschoolfun #capturingparenthood
I decided that these six little pumpkins needed a I decided that these six little pumpkins needed a permanent place on our feed...because WE GREW THEM OURSELVES!!! ๐ŸŽƒ
That's right...first-time pumpkin-growers over here...and it was all actually a bit of a surprise. ๐Ÿ˜ƒ
...
You see, when we went to prep our garden beds this spring, we noticed a plant that had already started growing. We assumed it was a cucumber plant, since it was in the same place we had cucumbers last year.
We left it alone and planted a couple of other cucumber plants nearby. ๐Ÿฅ’
At first, the leaves on our mystery plant looked very similar to the leaves on our other cucumber plants.
But a couple of weeks later the plant had grown A LOT bigger. It was now obvious that it was not a cucumber plant. But what was it? ๐Ÿคทโ€โ™€๏ธ
...
And that's when it suddenly dawned on these exhausted parents, that our daughter had spontaneously tossed seeds from her pumpkin (last Halloween), into the garden bed. ๐Ÿคฆโ€โ™€๏ธ The mystery was finally solved...and by the looks of the large golden flowers that were emerging all over the vines...we figured we might have a few pumpkins come fall! ๐Ÿ™Œ๐ŸŽƒ๐Ÿ™Œ
...
It was so much fun to watch the pumpkin plant grow! ๐Ÿคฉ We had to cut down the wire on one side of our garden bed to let the vines out...and they ended up growing 6-10 feet long in both directions! ๐Ÿ˜ณ It was crazy!
They put out the most gorgeous flowers...that the bees absolutely loved! ๐Ÿงก And soon enough, we spotted a few round gourds growing at the base of some of the flowers. They grew quickly...and then turned a beautiful shade of orange! ๐Ÿ˜
...
Needless to say, we are now officially pumpkin-growing people! ๐Ÿ˜‚ My husband can't wait to plant more next year...and he's already looking in to different varieties - hoping to grow some larger jack-o-lantern style ones next season! ๐ŸŽƒ
โ€ฆ
#pumpkins #growingpumpkins #ourpumpkinpatch #homegrownpumpkins #homegrown #homegarden #pumpkingrowing #gardening #fallharvest #happyhalloween #timetocarvesomepumpkins #gardensurprises #gardenfun #capturingparenthood
Free the Frankensteins from the Frozen Rainbow Bra Free the Frankensteins from the Frozen Rainbow Brain! ๐Ÿ˜ฌ๐ŸŒˆ๐Ÿง 
โ€ฆ
Yesterday, we shared how we made this colorful, frozen rainbow brain - full of Frankenstein mini erasersโ€ฆand today we wanted to show you what became of our beautiful brain! ๐Ÿ˜ƒ
โ€ฆ
We popped it out onto a tray, grabbed a shaker of salt, a bottle of warm water (colored red for added effect), and some tongs.
And then it was time to Free the Frankensteins (our daughter coined the phrase)! ๐Ÿ˜‰
โ€ฆ
This spooky activity provides chilly sensory play, motor skills practice, and scientific exploration (salt and warm water speed-up the melting process)! ๐Ÿ™Œ๐Ÿ™Œ๐Ÿ™Œ
As an added bonusโ€ฆyou also get some color-mixing! And the addition of the salt makes it extra sparkly too! ๐Ÿ˜๐Ÿคฉ๐Ÿ˜
โ€ฆ
Eventually, all youโ€™re left with is some mini erasers floating in a pool of colorful waterโ€ฆand a happy kid! โค๏ธโค๏ธโค๏ธ
โ€ฆ
#frozenbrain #rainbowbrain #frozenrainbowbrain #brains #freethefrankensteins #halloween #happyhalloween #halloweenactivities #halloweenactivitiesforkids #halloweensensoryplay #sensoryplay #sensoryexploration #motorskills #motorskillsdevelopment #scienceforkids #kidscience #funactivities #funactivitiesforkids #halloweenfun #capturingparenthood
We are definitely getting into the fall and Hallow We are definitely getting into the fall and Halloween spirit...so during a recent homeschool art session, we decided to make some air-dry clay pumpkins and jack-o-lanterns! ๐ŸŽƒ๐ŸŽƒ๐ŸŽƒ
...
Back in 2019, Lauralee @2art.chambers shared several colorful, air-dry clay pumpkins that her students made...and after rediscovering the saved post, I decided that it would be a perfect October art lesson for us too! ๐Ÿงก
...
We used various colors of air-dry clay, and rolled each color into whatever pumpkin shape we wanted...and then we added our lines/indentations using the side of a credit card. ๐Ÿ’ณ The stems are just small, broken pieces of old crayons (another genius idea from Lauralee). ๐Ÿ– And we topped our stems with pieces of pipe cleaner, to create the little curly cues. ๐Ÿ˜
...
Once we had our pumpkins...we decided to change things up a bit, and grabbed our stash of googly eyes. ๐Ÿ‘€ (Most of) our fall pumpkins then transformed into Halloween jack-o-lanterns! ๐ŸŽƒ
We pressed the googly eyes into the clay, and we used a few small tools (that came with our box of air-dry clay) to add their mouths. ๐Ÿ˜ƒ
...
And now we have a cute and colorful crew of clay pumpkins adorning our mantle! ๐ŸŽƒ๐Ÿงก๐ŸŽƒ
...
#pumpkins #jackolanterns #claypumpkins #airdryclay #airdryclaycreation #airdryclayart #airdryclaypumpkins #elementaryart #fallartprojects #fallartprojectsforkids #halloweenart #halloweenartprojects #halloweenartprojectsforkids #homeschool #homeschoolart #homeschoolfun #halloween #happyhalloween #capturingparenthood
Andrew from @elementaryarts shared a patterned, bl Andrew from @elementaryarts shared a patterned, block letter name project a couple of weeks ago (I'll share the post in stories today), and I immediately added it to our list of art projects to do this year! ๐Ÿ˜
But we decided to switch things up a little bit! Instead of using our names, we each picked a color that we like...wrote the name of the color in block letters on our paper...and created our color patterns using at least two different shades of our chosen color. ๐Ÿ–
...
This colorful project ended up being a lot of fun, and also very relaxing...as we all quietly focused, and zoned in on adding the color patterns around all of our letters. It was actually a bit hypnotizing! ๐Ÿคฉ
...
Needless to say, we are really happy with the way our block letter color project turned out! ๐Ÿ™Œ We even had a special guest who wanted to join in on this art project! โค๏ธ
...
P.S. We also used Andrewโ€™s free TPT handout on how to make block letters! The bundle includes bubble letters, cursive letters, graffiti letters, and more! ๐Ÿ‘
โ€ฆ
#blockletters #blocklettering #colors #color #colorful #artproject #artforkids #kidart #elementaryart #artactivity #artactivities #artactivitiesforkids #colorfun #homeschool #homeschoolart #homeschoolfun #capturingparenthood
We created self-portraits for our first art projec We created self-portraits for our first art project of our homeschool year...and we are pretty obsessed with them! ๐Ÿคฉโœ๏ธ๐Ÿคฉ
...
I love the idea of doing a self-portrait project at the beginning of the year, and then again at the end of the year...so that we can see how much we've grown and changed.
...
We used Kaitlyn's @artwithmrs.e Simple Self-Portrait Drawing Guide and it was so incredibly helpful (especially for this new homeschool teacher who wouldn't necessarily list drawing as one of her stronger suits). ๐Ÿ˜‰
We actually purchased her entire Guided Drawing Bundle (over on Teachers Pay Teachers) and we highly recommend it! ๐Ÿ™Œ๐Ÿ™Œ๐Ÿ™Œ
...
We looked through the self-portrait drawing guide to get different ideas for our eyes, nose, mouth, and hair. ๐Ÿ‘€๐Ÿ‘ƒ๐Ÿ‘„
...
Now...if you caught our stories earlier this week, you know that our daughter recently made a pretty big change to her hair (that included a partial side-shave and bob-length cut - she also dyed it blue). ๐Ÿ’‡โ€โ™€๏ธ
She was used to drawing pictures of herself with her long, blonde locks...and her new hairstyle proved rather difficult. But she persevered, and ended up with a self-portrait that she was truly proud of! ๐Ÿฅฐ
...
When we were finished drawing our likenesses, we decided to cut them out and create a special background to glue them onto. I went with random black and white designs...and our nugget decided to draw various things that she loves (her family, winter, candy, books, dolphins...and more)! โค๏ธ
...
It was such a fun project...and I can't wait to see what our self-portraits look like at the end of our school year! ๐Ÿ˜ƒ
...
#selfportrait #selfportraits #homeschool #homeschoolart #elementaryart #artactivities #artactivitiesforkids #artforkids #kidart #homeschoolfun #capturingparenthood
Follow on Instagram

Copyright © 2025 · glam theme by Restored 316

  • Policies + Disclosure
  • Contact