• Home
  • About
  • Kid Zone
    • Activities
    • Arts + Crafts
    • Books Books Books
  • Food
    • Family-Friendly
    • Kids
    • Sweets
    • Dog-Friendly
  • Life + Motherhood
    • Pregnancy
    • Parenting
    • House + Home
  • Let’s Party
    • Birthdays
    • Holidays
    • Instagram
    • Pinterest

Capturing Parenthood

Oil & Water Galaxy Sensory Bottle

in Activities, Toddler Zone on October 11, 2017

Are you sick of sensory bottles yet? πŸ™‚ I hope not, because today I’m sharing one of our favorite bottles – an Oil & Water Galaxy Sensory Bottle!

Oil & Water Galaxy Sensory Bottle Β© Capturing Parenthood

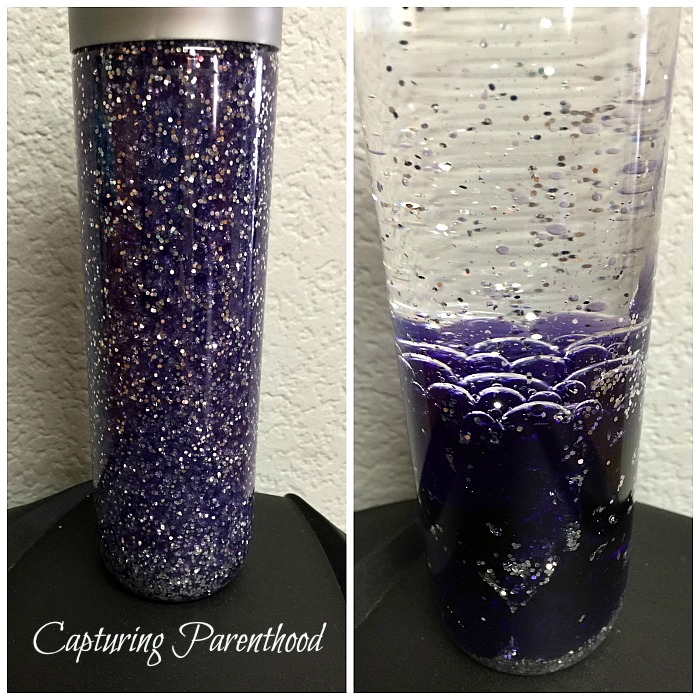
I love this bottle, because it truly shimmers and sparkles when each piece of glitter catches a ray of light (just like the millions of stars that glimmer in a galaxy). The combination of oil and water also makes for some amazing bubbles!

My daughter loves this bottle because its purple, of course. πŸ™‚

I came across this sensory bottle idea over on One Little Project (http://onelittleproject.com/galaxy-in-a-bottle/2/). When Debbie explained the calming effect that this bottle had on her kiddos (and herself), along with the added detail that when the glitter-filled bubbles pop, it looks like fireworks going off inside the bottle – I was sold!


Oil & Water Galaxy Sensory Bottle

Supplies:

Oil & Water Galaxy Sensory Bottle Β© Capturing Parenthood

  • Plastic Bottle with Wide-Mouth (I love using Voss water bottles)
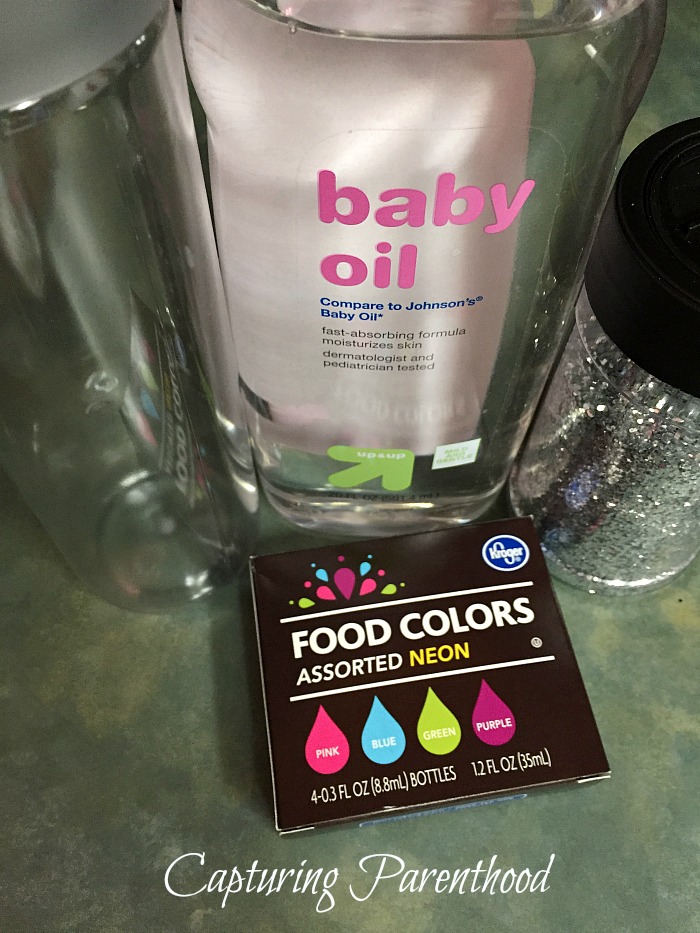
  • Baby Oil
  • Water
  • Purple and Blue Food Coloring (neon set)
  • Silver Glitter (we use 1/24 sized glitter) Note: It has been brought to my attention that using fine or super fine glitter may result in the glitter sticking to the sides of the sensory bottle.Β 

Instructions:

  1. Empty the plastic bottle (if it contained a non-water beverage, rinse out the bottle). Remove all labels from the bottle. If you have a hard time getting the sticky residue off, Goo Gone works wonders. I find that if I take my time and peel slowly, I can get the Voss labels off without any fuss.
  2. Fill the bottom 1/2 of the bottle with baby oil.
  3. Top the baby oil with a decent amount of silver glitter – covering the surface of the oil.
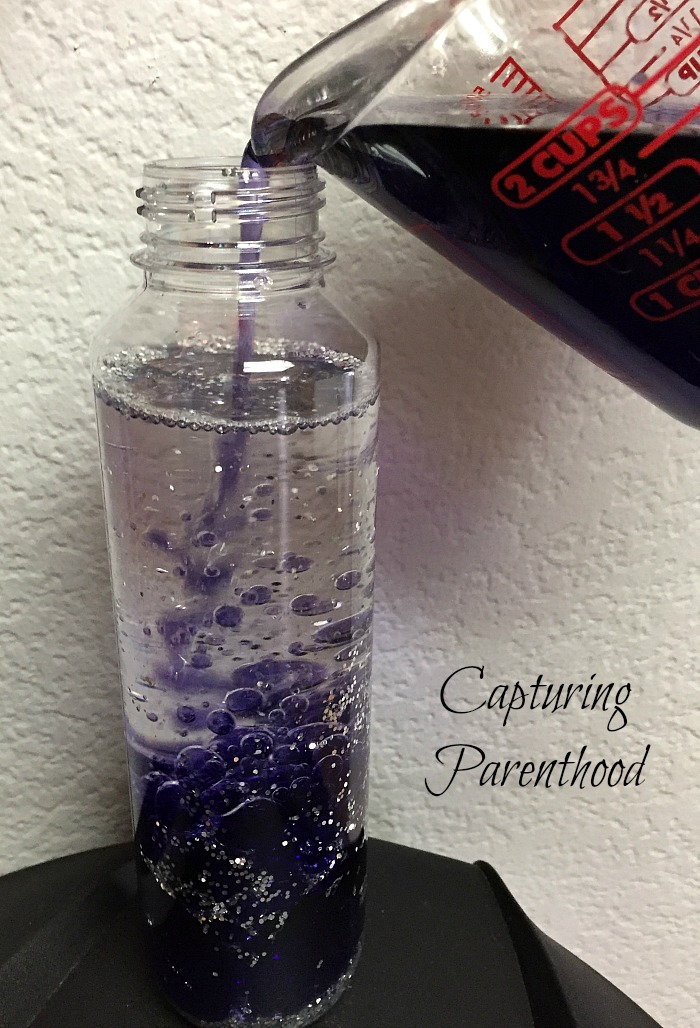
  4. Add water to a glassΒ (I used my 2-cup glass measuring device, because it conveniently has a pour spout)! Stir in approximately 8 drops of purple food coloring, and 5 drops of blue food coloring – or as many drops of each until you’ve created the perfect purple “galaxy” hue.
  5. Fill the remainderΒ of the bottle with the purple water, leaving just a bit of space under the cap free for the ingredients to move around.
  6. Then, add a dab of hot glue around the inside of the cap, and quickly seal the bottle (you don’t want your child unscrewing a bottle full of colored water, glitter, and oil, inside your house). πŸ™‚

I could literally sit and stare at this bottle all day long – I just love it! Of course, I have to wait until my little nugget is finished shaking and swirling…and watching the glitter gracefully fall down into the purple water. Thank goodness for nap time. πŸ™‚

Oil & Water Galaxy Sensory Bottle Β© Capturing Parenthood

Tomorrow , we will be sharing another glittery sensory bottle, but this one is made using an ingredient that we have yet to see in our Sensory Bottle Extravaganza! Are you excited? Stay tuned…

START SPREADING THE NEWS!

Related Posts

  • Our Favorite Books (The Fourth Year)Our Favorite Books (The Fourth Year)
  • Sight Word Stomp + SplashSight Word Stomp + Splash
  • Yogurt Pretzel Snowman Jars – Teacher GiftsYogurt Pretzel Snowman Jars – Teacher Gifts
  • Building with Recycled Materials – Recycled Art Projects for KidsBuilding with Recycled Materials – Recycled Art Projects for Kids
« Flower Garden Sensory Bottle
Blue Glitter Glue Sensory Bottle »

Comments

  1. Viola says

    October 20, 2018 at 8:07 AM

    Thank U 😁Started a New Job and I have kids that wnt nap or stay on cots !! πŸ˜’So I hope this will help them get Sleepy eyes .

    • Stacey says

      October 22, 2018 at 10:41 AM

      Hi Viola! Happy to help! πŸ™‚ I know it’s tough when they stop napping and need a quieter activity to keep them busy…my daughter gave up naps all too soon. πŸ™ There are a bunch of sensory bottles on the blog, if you need more ideas (and most of them are quiet). I also have a post about the quiet time boxes that I put together for my daughter to keep her occupied during nap time…though I’m not sure if the same would work in a daycare/preschool setting or not. Good luck and congrats on the new job!

      • Vicki says

        December 11, 2019 at 8:16 AM

        Hallo Stacey

        I hope my message finds you well.

        Can I use sunflower oil instead of baby oil?

        Hope to hear from you soon.

        Thank you for the wonderful idea. I am busy making a few as Christmas presents πŸ€—

        Many thanks,
        Vicki
        (South Africa)

        • Stacey says

          December 11, 2019 at 1:29 PM

          Hi Vicki! Thank you so much for your kind words…and all the way from South Africa! Your comment made my day! πŸ™‚
          I have never tried to use sunflower oil in a sensory bottle before…but in reality, any oil should work for this Oil & Water Galaxy Sensory Bottle. The only reason that we chose to use baby oil for this particular bottle, is because it is completely clear. Other types of cooking oils typically have a yellowish tint. So the overall color of the bottle might fluctuate a bit with the sunflower oil…and I have no idea how it will look paired with the purple-colored water…but the fascinating interaction between the oil and the water should remain the same. If you give it a try…please let me know how they turn out!
          Sensory bottles make wonderful gifts! Happy Holidays!

  2. Doris says

    December 13, 2018 at 5:33 PM

    Thanks for the idea.i work in a nursing home.i am gonna try this idea for my dementia residents.

    • Stacey says

      December 14, 2018 at 11:41 AM

      That’s such a wonderful idea! I hope they enjoy them. There are several more sensory bottles on the blog, if these are a hit with your residents and you need a few more ideas!

  3. Rosalie says

    February 21, 2019 at 11:14 PM

    Great rainy day project! I was wonder what size Voss bottles did you use for the galaxy sensory bottles?
    Thanks in adavance.

    • Stacey says

      February 24, 2019 at 12:30 PM

      Thanks Rosalie! I use the 500ml plastic Voss water bottles for my sensory bottles and they work great!

  4. Fatima says

    April 1, 2019 at 2:46 AM

    Thank you for sharing your ideas, as a Montessori teacher these are very helpful for small children

    • Stacey says

      April 1, 2019 at 1:00 PM

      Thanks for your kind words Fatima! I’m so glad that they come in handy. Every child I know loves playing with sensory bottles. πŸ™‚

  5. Katie says

    April 1, 2019 at 12:09 PM

    I was wondering if you could help me I mad a bottle with baby oil, water, look bands, buttons and glitter and some reason all my things stick together and stay on top any suggestions?

    • Stacey says

      April 1, 2019 at 1:17 PM

      Hi Katie! Hmmm…it’s strange that everything would stay all together at the top. With all of the sensory bottles that I used baby oil in, once the bottle is shaken vigorously and set down, all of the glitter, etc. falls to the bottom of the bottle. Do you happen to remember what ratio of baby oil and water you used? I’m also curious…when you flip the bottle over…do the loom bands, buttons, and glitter float up? Or do they remain stuck? Whenever I combine two liquid elements in a sensory bottle, I typically add one (glue, baby oil, etc.) and then drop in my glitter, confetti, beads, etc. before adding the other liquid (which is usually water). I really have no idea if it makes any difference, I’m just trying to troubleshoot a bit. πŸ™‚ Also…what type of bottle are you using?
      Let me know and we will see if we can figure this out. πŸ™‚

  6. Toniaweaver1352@msn.com says

    May 13, 2019 at 2:14 PM

    Love the idea. We are still practicing. Cant figure out how to keep the glitter from gathering along the side of the bottle. We will keep trying. Any solutions. Please share
    Thx

    • Stacey says

      May 14, 2019 at 1:46 PM

      Hi Tonia! I’m sorry to hear that your glitter keeps collecting on the sides of the bottle. We usually only have a few random specks of glitter that do that, while most of it swirls around and sinks right down. I’m not really sure what would be causing the glitter to stick to the sides. What type/shape of bottle are you using? Did the bottle contain any sugary/sticky drinks prior to being used as a sensory bottle? And in what order did you add the ingredients? I typically add the first liquid (oil, in this case) and then pour the glitter in on top of it, before adding the second liquid (water). It also might have something to do with the amount of glitter – do you know about how much you poured into the bottle? Just trying to think of all the possibilities, so that we can figure this out! πŸ™‚ Let me know!

      • Melissa Wolff says

        May 31, 2019 at 7:05 PM

        I’m having this problem as well. I used fine (maybe extra fine) glitter, whereas it looks like the glitter here is larger – maybe that is contributing to the sticking?

        • Stacey says

          June 1, 2019 at 4:22 PM

          Hi Melissa –
          I think you may have discovered the cause of the sticking glitter! πŸ™‚ I never even considered the size of the glitter, but it makes complete sense. You are correct…the glitter that I use in our sensory bottles is larger – 1/24 to be exact. The fine and extra fine glitter may be a bit too small to move around freely in the bottle. Give the larger glitter a try, and if you still have a sticking issue, please let me know. One way or another, we will figure this out! πŸ™‚

          • Melissa Wolff says

            June 4, 2019 at 10:43 AM

            Larger glitter seems to have resolved the sticking issue! I also used much less of it this time, just enough to cover the surface of the oil, whereas the first time I used LOADS and it was just too much. Turned out fantastic this time πŸ™‚

          • Stacey says

            June 6, 2019 at 1:01 PM

            Great! I’m so happy to hear that the larger glitter (in a smaller quantity) was the solution. Thanks for letting me know Melissa. I’ve now added a little note in the blog post for the recommended glitter size. πŸ™‚ Have fun with your new Oil & Water Galaxy Sensory Bottle!

  7. Paula says

    June 12, 2019 at 2:25 PM

    Is water cold or warm? Also can it be any baby oil or brand make

    • Stacey says

      June 13, 2019 at 1:24 PM

      Hi Paula! I used cold tap water for this galaxy sensory bottle. And I’m pretty sure that any brand of baby oil will work. I used Target’s generic Up & Up brand and it worked great!

  8. Maggie says

    October 15, 2019 at 7:22 PM

    I sure wish I had read the comments before I made my bottle. I added way too much glitter. Oops! Have to redo 😁

    • Stacey says

      October 17, 2019 at 12:52 PM

      I’m so sorry, Maggie. I never measured out any of the glitter for our sensory bottles – I just eyeballed it every time. Obviously that does not translate very well to recipes/instructions. πŸ™‚ I’ve since updated the wording to remove “a hefty amount of glitter” – as I understand that can be taken many different ways and is not very definitive. I hope your “redo” turns out perfect. Also be sure not to use fine or extra fine glitter! Please let me know if you have any more trouble with your sensory bottle. One thing that I’ve learned about making sensory bottles is that it often involves a bit of trial and error. πŸ™‚

  9. Monika says

    October 29, 2019 at 12:37 PM

    My food coloring is coloring the oil. Am I using the wrong kind? I’ve tried gel based color and the traditional drop kind from the cake isle.

    • Stacey says

      October 29, 2019 at 1:11 PM

      Hi Monika. The food coloring should definitely not be coloring the oil…just the water. Standard food coloring is water-based, so it should repel the oil and only color the water. For this bottle, I just used a standard neon food coloring set from the baking aisle of our local grocery store. There are certain types of coloring agents that will dye oil (we used Wilton’s Candy Colors for our “Color-Mixing Sensory Bottle”), but the “traditional drop kind” that you find at your grocery store should not dye the oil. When you shake up the bottle, all of the ingredients should interact…with the entire bottle turning the purple hue…before the water and oil separate again (and the purple water sinks to the bottom of the bottle – with the clear oil returning to the top). It sounds like you’ve tried a couple of different types of food coloring (ones that should not color the oil)…maybe it’s the type of baby oil that you’re using…I’m really not sure what would be causing it…but it might be worth trying a different type/brand of baby oil to see if it makes any difference.
      Let me know how it goes…we will figure it out one way or another. πŸ™‚

Hello! Nice to meet you!

Welcome to the Capturing Parenthood blog! I'm Stacey...wife and first-time parent, former full-time working mom, turned stay-at-home mom. Join me as I capture and share my thoughts and experiences on this crazy adventure we call parenthood! Click here to learn more about me!

Search Capturing Parenthood

Instagram

Ok...@artwithmrs.e Haunted House project is hands- Ok...@artwithmrs.e Haunted House project is hands-down the best Halloween-themed art project out there! πŸ™ŒπŸ™ŒπŸ™Œ
We had a blast creating haunted houses for homeschool art this month! 🧑
...
We followed Kaitlyn's extremely helpful Haunted House Drawing Guide (you can find it over on her Teachers Pay Teachers account) and completed the project over the course of 3 lessons.
...
During our first lesson, we sketched our houses in pencil, and added some eerie exterior landscaping. πŸͺ¦πŸ¦‡
We popped in a few spooky characters (ghosts, spiders, pumpkins, and a vampire). πŸ‘»πŸ•·πŸŽƒπŸ§›
And then we traced over our pencil lines with black Sharpie.
...
During our next lesson, we used a coloring technique that we learned from Kristian @friendsartlab ❀️ We colored our pictures with oil pastels...and then painted over the top of the oil pastels with baby oil...it causes the oil pastels to bleed and blend together! 🀩
...
During our final lesson...we added more spooky characters to the inside of our house...that can peek out behind the doors and windows. πŸ’€πŸ§™β€β™€οΈπŸ‘»
To do this...I used an X-acto knife and carefully cut around the outside edges of the doors/windows (leaving the hinge sides intact so that they could fold open and closed).
We placed yellow construction paper in the background...and added witches, ghosts, skeletons, a mummy, and a Frankenstein! 😍
This step made our haunted houses really come to life...and we just can't thank Kaitlyn @artwithmrs.e enough for sharing this awesome lesson and drawing guide! THE ABSOLUTE BEST! ❀️❀️❀️
...
It was very evident how much our daughter loved this project...as we worked through each step...but the thing that solidified just how much she enjoyed it was - one weekend morning I walked downstairs to find her and her dad sitting at the table - and she was very excitedly teaching him how to draw his own haunted house - while she drew a few more herself (scroll to the last picture in the carousel)! πŸ₯°
...
#hauntedhouse #hauntedhouses #hauntedhousedrawing #directeddrawing #spookyart #halloween #happyhalloween #halloweenart #halloweenfun #elementaryart #homeschoolart #homeschool #homeschoolfun #capturingparenthood
I decided that these six little pumpkins needed a I decided that these six little pumpkins needed a permanent place on our feed...because WE GREW THEM OURSELVES!!! πŸŽƒ
That's right...first-time pumpkin-growers over here...and it was all actually a bit of a surprise. πŸ˜ƒ
...
You see, when we went to prep our garden beds this spring, we noticed a plant that had already started growing. We assumed it was a cucumber plant, since it was in the same place we had cucumbers last year.
We left it alone and planted a couple of other cucumber plants nearby. πŸ₯’
At first, the leaves on our mystery plant looked very similar to the leaves on our other cucumber plants.
But a couple of weeks later the plant had grown A LOT bigger. It was now obvious that it was not a cucumber plant. But what was it? πŸ€·β€β™€οΈ
...
And that's when it suddenly dawned on these exhausted parents, that our daughter had spontaneously tossed seeds from her pumpkin (last Halloween), into the garden bed. πŸ€¦β€β™€οΈ The mystery was finally solved...and by the looks of the large golden flowers that were emerging all over the vines...we figured we might have a few pumpkins come fall! πŸ™ŒπŸŽƒπŸ™Œ
...
It was so much fun to watch the pumpkin plant grow! 🀩 We had to cut down the wire on one side of our garden bed to let the vines out...and they ended up growing 6-10 feet long in both directions! 😳 It was crazy!
They put out the most gorgeous flowers...that the bees absolutely loved! 🧑 And soon enough, we spotted a few round gourds growing at the base of some of the flowers. They grew quickly...and then turned a beautiful shade of orange! 😍
...
Needless to say, we are now officially pumpkin-growing people! πŸ˜‚ My husband can't wait to plant more next year...and he's already looking in to different varieties - hoping to grow some larger jack-o-lantern style ones next season! πŸŽƒ
…
#pumpkins #growingpumpkins #ourpumpkinpatch #homegrownpumpkins #homegrown #homegarden #pumpkingrowing #gardening #fallharvest #happyhalloween #timetocarvesomepumpkins #gardensurprises #gardenfun #capturingparenthood
Free the Frankensteins from the Frozen Rainbow Bra Free the Frankensteins from the Frozen Rainbow Brain! 😬🌈🧠
…
Yesterday, we shared how we made this colorful, frozen rainbow brain - full of Frankenstein mini erasers…and today we wanted to show you what became of our beautiful brain! πŸ˜ƒ
…
We popped it out onto a tray, grabbed a shaker of salt, a bottle of warm water (colored red for added effect), and some tongs.
And then it was time to Free the Frankensteins (our daughter coined the phrase)! πŸ˜‰
…
This spooky activity provides chilly sensory play, motor skills practice, and scientific exploration (salt and warm water speed-up the melting process)! πŸ™ŒπŸ™ŒπŸ™Œ
As an added bonus…you also get some color-mixing! And the addition of the salt makes it extra sparkly too! 😍🀩😍
…
Eventually, all you’re left with is some mini erasers floating in a pool of colorful water…and a happy kid! ❀️❀️❀️
…
#frozenbrain #rainbowbrain #frozenrainbowbrain #brains #freethefrankensteins #halloween #happyhalloween #halloweenactivities #halloweenactivitiesforkids #halloweensensoryplay #sensoryplay #sensoryexploration #motorskills #motorskillsdevelopment #scienceforkids #kidscience #funactivities #funactivitiesforkids #halloweenfun #capturingparenthood
We are definitely getting into the fall and Hallow We are definitely getting into the fall and Halloween spirit...so during a recent homeschool art session, we decided to make some air-dry clay pumpkins and jack-o-lanterns! πŸŽƒπŸŽƒπŸŽƒ
...
Back in 2019, Lauralee @2art.chambers shared several colorful, air-dry clay pumpkins that her students made...and after rediscovering the saved post, I decided that it would be a perfect October art lesson for us too! 🧑
...
We used various colors of air-dry clay, and rolled each color into whatever pumpkin shape we wanted...and then we added our lines/indentations using the side of a credit card. πŸ’³ The stems are just small, broken pieces of old crayons (another genius idea from Lauralee). πŸ– And we topped our stems with pieces of pipe cleaner, to create the little curly cues. 😍
...
Once we had our pumpkins...we decided to change things up a bit, and grabbed our stash of googly eyes. πŸ‘€ (Most of) our fall pumpkins then transformed into Halloween jack-o-lanterns! πŸŽƒ
We pressed the googly eyes into the clay, and we used a few small tools (that came with our box of air-dry clay) to add their mouths. πŸ˜ƒ
...
And now we have a cute and colorful crew of clay pumpkins adorning our mantle! πŸŽƒπŸ§‘πŸŽƒ
...
#pumpkins #jackolanterns #claypumpkins #airdryclay #airdryclaycreation #airdryclayart #airdryclaypumpkins #elementaryart #fallartprojects #fallartprojectsforkids #halloweenart #halloweenartprojects #halloweenartprojectsforkids #homeschool #homeschoolart #homeschoolfun #halloween #happyhalloween #capturingparenthood
Andrew from @elementaryarts shared a patterned, bl Andrew from @elementaryarts shared a patterned, block letter name project a couple of weeks ago (I'll share the post in stories today), and I immediately added it to our list of art projects to do this year! 😍
But we decided to switch things up a little bit! Instead of using our names, we each picked a color that we like...wrote the name of the color in block letters on our paper...and created our color patterns using at least two different shades of our chosen color. πŸ–
...
This colorful project ended up being a lot of fun, and also very relaxing...as we all quietly focused, and zoned in on adding the color patterns around all of our letters. It was actually a bit hypnotizing! 🀩
...
Needless to say, we are really happy with the way our block letter color project turned out! πŸ™Œ We even had a special guest who wanted to join in on this art project! ❀️
...
P.S. We also used Andrew’s free TPT handout on how to make block letters! The bundle includes bubble letters, cursive letters, graffiti letters, and more! πŸ‘
…
#blockletters #blocklettering #colors #color #colorful #artproject #artforkids #kidart #elementaryart #artactivity #artactivities #artactivitiesforkids #colorfun #homeschool #homeschoolart #homeschoolfun #capturingparenthood
We created self-portraits for our first art projec We created self-portraits for our first art project of our homeschool year...and we are pretty obsessed with them! 🀩✏️🀩
...
I love the idea of doing a self-portrait project at the beginning of the year, and then again at the end of the year...so that we can see how much we've grown and changed.
...
We used Kaitlyn's @artwithmrs.e Simple Self-Portrait Drawing Guide and it was so incredibly helpful (especially for this new homeschool teacher who wouldn't necessarily list drawing as one of her stronger suits). πŸ˜‰
We actually purchased her entire Guided Drawing Bundle (over on Teachers Pay Teachers) and we highly recommend it! πŸ™ŒπŸ™ŒπŸ™Œ
...
We looked through the self-portrait drawing guide to get different ideas for our eyes, nose, mouth, and hair. πŸ‘€πŸ‘ƒπŸ‘„
...
Now...if you caught our stories earlier this week, you know that our daughter recently made a pretty big change to her hair (that included a partial side-shave and bob-length cut - she also dyed it blue). πŸ’‡β€β™€οΈ
She was used to drawing pictures of herself with her long, blonde locks...and her new hairstyle proved rather difficult. But she persevered, and ended up with a self-portrait that she was truly proud of! πŸ₯°
...
When we were finished drawing our likenesses, we decided to cut them out and create a special background to glue them onto. I went with random black and white designs...and our nugget decided to draw various things that she loves (her family, winter, candy, books, dolphins...and more)! ❀️
...
It was such a fun project...and I can't wait to see what our self-portraits look like at the end of our school year! πŸ˜ƒ
...
#selfportrait #selfportraits #homeschool #homeschoolart #elementaryart #artactivities #artactivitiesforkids #artforkids #kidart #homeschoolfun #capturingparenthood
Follow on Instagram

Popular Posts

Virtual Spring Break: Day Five - New York City

Virtual Spring Break: Day Five – New York City

Virtual Spring Break: Day Four - Mexico

Virtual Spring Break: Day Four – Mexico

Virtual Spring Break: Day Three - India

Virtual Spring Break: Day Three – India

Join Us on Instagram

Ok...@artwithmrs.e Haunted House project is hands- Ok...@artwithmrs.e Haunted House project is hands-down the best Halloween-themed art project out there! πŸ™ŒπŸ™ŒπŸ™Œ
We had a blast creating haunted houses for homeschool art this month! 🧑
...
We followed Kaitlyn's extremely helpful Haunted House Drawing Guide (you can find it over on her Teachers Pay Teachers account) and completed the project over the course of 3 lessons.
...
During our first lesson, we sketched our houses in pencil, and added some eerie exterior landscaping. πŸͺ¦πŸ¦‡
We popped in a few spooky characters (ghosts, spiders, pumpkins, and a vampire). πŸ‘»πŸ•·πŸŽƒπŸ§›
And then we traced over our pencil lines with black Sharpie.
...
During our next lesson, we used a coloring technique that we learned from Kristian @friendsartlab ❀️ We colored our pictures with oil pastels...and then painted over the top of the oil pastels with baby oil...it causes the oil pastels to bleed and blend together! 🀩
...
During our final lesson...we added more spooky characters to the inside of our house...that can peek out behind the doors and windows. πŸ’€πŸ§™β€β™€οΈπŸ‘»
To do this...I used an X-acto knife and carefully cut around the outside edges of the doors/windows (leaving the hinge sides intact so that they could fold open and closed).
We placed yellow construction paper in the background...and added witches, ghosts, skeletons, a mummy, and a Frankenstein! 😍
This step made our haunted houses really come to life...and we just can't thank Kaitlyn @artwithmrs.e enough for sharing this awesome lesson and drawing guide! THE ABSOLUTE BEST! ❀️❀️❀️
...
It was very evident how much our daughter loved this project...as we worked through each step...but the thing that solidified just how much she enjoyed it was - one weekend morning I walked downstairs to find her and her dad sitting at the table - and she was very excitedly teaching him how to draw his own haunted house - while she drew a few more herself (scroll to the last picture in the carousel)! πŸ₯°
...
#hauntedhouse #hauntedhouses #hauntedhousedrawing #directeddrawing #spookyart #halloween #happyhalloween #halloweenart #halloweenfun #elementaryart #homeschoolart #homeschool #homeschoolfun #capturingparenthood
I decided that these six little pumpkins needed a I decided that these six little pumpkins needed a permanent place on our feed...because WE GREW THEM OURSELVES!!! πŸŽƒ
That's right...first-time pumpkin-growers over here...and it was all actually a bit of a surprise. πŸ˜ƒ
...
You see, when we went to prep our garden beds this spring, we noticed a plant that had already started growing. We assumed it was a cucumber plant, since it was in the same place we had cucumbers last year.
We left it alone and planted a couple of other cucumber plants nearby. πŸ₯’
At first, the leaves on our mystery plant looked very similar to the leaves on our other cucumber plants.
But a couple of weeks later the plant had grown A LOT bigger. It was now obvious that it was not a cucumber plant. But what was it? πŸ€·β€β™€οΈ
...
And that's when it suddenly dawned on these exhausted parents, that our daughter had spontaneously tossed seeds from her pumpkin (last Halloween), into the garden bed. πŸ€¦β€β™€οΈ The mystery was finally solved...and by the looks of the large golden flowers that were emerging all over the vines...we figured we might have a few pumpkins come fall! πŸ™ŒπŸŽƒπŸ™Œ
...
It was so much fun to watch the pumpkin plant grow! 🀩 We had to cut down the wire on one side of our garden bed to let the vines out...and they ended up growing 6-10 feet long in both directions! 😳 It was crazy!
They put out the most gorgeous flowers...that the bees absolutely loved! 🧑 And soon enough, we spotted a few round gourds growing at the base of some of the flowers. They grew quickly...and then turned a beautiful shade of orange! 😍
...
Needless to say, we are now officially pumpkin-growing people! πŸ˜‚ My husband can't wait to plant more next year...and he's already looking in to different varieties - hoping to grow some larger jack-o-lantern style ones next season! πŸŽƒ
…
#pumpkins #growingpumpkins #ourpumpkinpatch #homegrownpumpkins #homegrown #homegarden #pumpkingrowing #gardening #fallharvest #happyhalloween #timetocarvesomepumpkins #gardensurprises #gardenfun #capturingparenthood
Free the Frankensteins from the Frozen Rainbow Bra Free the Frankensteins from the Frozen Rainbow Brain! 😬🌈🧠
…
Yesterday, we shared how we made this colorful, frozen rainbow brain - full of Frankenstein mini erasers…and today we wanted to show you what became of our beautiful brain! πŸ˜ƒ
…
We popped it out onto a tray, grabbed a shaker of salt, a bottle of warm water (colored red for added effect), and some tongs.
And then it was time to Free the Frankensteins (our daughter coined the phrase)! πŸ˜‰
…
This spooky activity provides chilly sensory play, motor skills practice, and scientific exploration (salt and warm water speed-up the melting process)! πŸ™ŒπŸ™ŒπŸ™Œ
As an added bonus…you also get some color-mixing! And the addition of the salt makes it extra sparkly too! 😍🀩😍
…
Eventually, all you’re left with is some mini erasers floating in a pool of colorful water…and a happy kid! ❀️❀️❀️
…
#frozenbrain #rainbowbrain #frozenrainbowbrain #brains #freethefrankensteins #halloween #happyhalloween #halloweenactivities #halloweenactivitiesforkids #halloweensensoryplay #sensoryplay #sensoryexploration #motorskills #motorskillsdevelopment #scienceforkids #kidscience #funactivities #funactivitiesforkids #halloweenfun #capturingparenthood
We are definitely getting into the fall and Hallow We are definitely getting into the fall and Halloween spirit...so during a recent homeschool art session, we decided to make some air-dry clay pumpkins and jack-o-lanterns! πŸŽƒπŸŽƒπŸŽƒ
...
Back in 2019, Lauralee @2art.chambers shared several colorful, air-dry clay pumpkins that her students made...and after rediscovering the saved post, I decided that it would be a perfect October art lesson for us too! 🧑
...
We used various colors of air-dry clay, and rolled each color into whatever pumpkin shape we wanted...and then we added our lines/indentations using the side of a credit card. πŸ’³ The stems are just small, broken pieces of old crayons (another genius idea from Lauralee). πŸ– And we topped our stems with pieces of pipe cleaner, to create the little curly cues. 😍
...
Once we had our pumpkins...we decided to change things up a bit, and grabbed our stash of googly eyes. πŸ‘€ (Most of) our fall pumpkins then transformed into Halloween jack-o-lanterns! πŸŽƒ
We pressed the googly eyes into the clay, and we used a few small tools (that came with our box of air-dry clay) to add their mouths. πŸ˜ƒ
...
And now we have a cute and colorful crew of clay pumpkins adorning our mantle! πŸŽƒπŸ§‘πŸŽƒ
...
#pumpkins #jackolanterns #claypumpkins #airdryclay #airdryclaycreation #airdryclayart #airdryclaypumpkins #elementaryart #fallartprojects #fallartprojectsforkids #halloweenart #halloweenartprojects #halloweenartprojectsforkids #homeschool #homeschoolart #homeschoolfun #halloween #happyhalloween #capturingparenthood
Andrew from @elementaryarts shared a patterned, bl Andrew from @elementaryarts shared a patterned, block letter name project a couple of weeks ago (I'll share the post in stories today), and I immediately added it to our list of art projects to do this year! 😍
But we decided to switch things up a little bit! Instead of using our names, we each picked a color that we like...wrote the name of the color in block letters on our paper...and created our color patterns using at least two different shades of our chosen color. πŸ–
...
This colorful project ended up being a lot of fun, and also very relaxing...as we all quietly focused, and zoned in on adding the color patterns around all of our letters. It was actually a bit hypnotizing! 🀩
...
Needless to say, we are really happy with the way our block letter color project turned out! πŸ™Œ We even had a special guest who wanted to join in on this art project! ❀️
...
P.S. We also used Andrew’s free TPT handout on how to make block letters! The bundle includes bubble letters, cursive letters, graffiti letters, and more! πŸ‘
…
#blockletters #blocklettering #colors #color #colorful #artproject #artforkids #kidart #elementaryart #artactivity #artactivities #artactivitiesforkids #colorfun #homeschool #homeschoolart #homeschoolfun #capturingparenthood
We created self-portraits for our first art projec We created self-portraits for our first art project of our homeschool year...and we are pretty obsessed with them! 🀩✏️🀩
...
I love the idea of doing a self-portrait project at the beginning of the year, and then again at the end of the year...so that we can see how much we've grown and changed.
...
We used Kaitlyn's @artwithmrs.e Simple Self-Portrait Drawing Guide and it was so incredibly helpful (especially for this new homeschool teacher who wouldn't necessarily list drawing as one of her stronger suits). πŸ˜‰
We actually purchased her entire Guided Drawing Bundle (over on Teachers Pay Teachers) and we highly recommend it! πŸ™ŒπŸ™ŒπŸ™Œ
...
We looked through the self-portrait drawing guide to get different ideas for our eyes, nose, mouth, and hair. πŸ‘€πŸ‘ƒπŸ‘„
...
Now...if you caught our stories earlier this week, you know that our daughter recently made a pretty big change to her hair (that included a partial side-shave and bob-length cut - she also dyed it blue). πŸ’‡β€β™€οΈ
She was used to drawing pictures of herself with her long, blonde locks...and her new hairstyle proved rather difficult. But she persevered, and ended up with a self-portrait that she was truly proud of! πŸ₯°
...
When we were finished drawing our likenesses, we decided to cut them out and create a special background to glue them onto. I went with random black and white designs...and our nugget decided to draw various things that she loves (her family, winter, candy, books, dolphins...and more)! ❀️
...
It was such a fun project...and I can't wait to see what our self-portraits look like at the end of our school year! πŸ˜ƒ
...
#selfportrait #selfportraits #homeschool #homeschoolart #elementaryart #artactivities #artactivitiesforkids #artforkids #kidart #homeschoolfun #capturingparenthood
Follow on Instagram

Copyright © 2025 · glam theme by Restored 316

  • Policies + Disclosure
  • Contact