• Home
  • About
  • Kid Zone
    • Activities
    • Arts + Crafts
    • Books Books Books
  • Food
    • Family-Friendly
    • Kids
    • Sweets
    • Dog-Friendly
  • Life + Motherhood
    • Pregnancy
    • Parenting
    • House + Home
  • Let’s Party
    • Birthdays
    • Holidays
    • Instagram
    • Pinterest

Capturing Parenthood

Paper Plate Halloween Crafts

in Arts + Crafts, Holidays, Let's Party on October 19, 2017

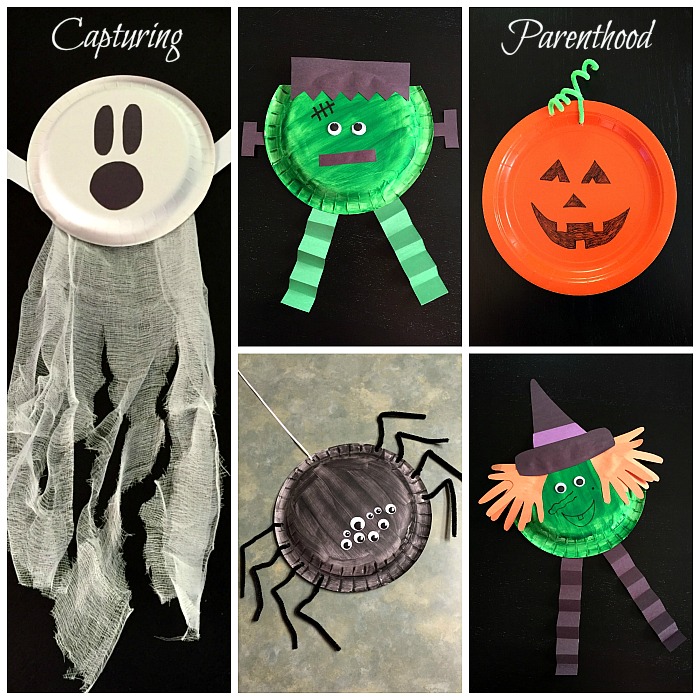
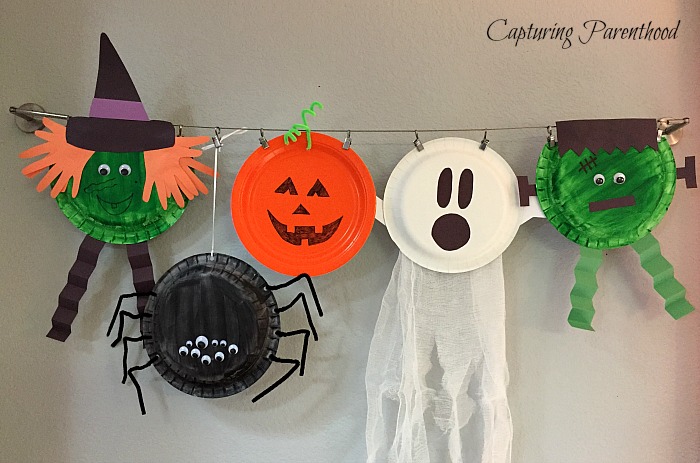
Are you ready for Halloween? We started decorating our house at the beginning of the month. We hung our monster wreath on the door, stuck our skeleton flamingos in the front yard, found the perfectly spooky spot for our gigantic hairy spider, and created these cute Paper Plate Halloween Crafts to hang in our dining room!

Paper Plate Halloween Crafts Β© Capturing Parenthood

Don’t you just love paper plate crafts? They are always so quick, versatile, easy to hang, and perfect for the little ones to assist with. Our little nugget especially loves painting the paper plates…and adding googly eyes! πŸ™‚


Paper Plate Ghost

BOO! I came across a photo on Pinterest of a similar paper plate ghost (fromΒ http://casacomidaeroupademarca.blogspot.pt/2012/10/travessuras-ou-gostosuras-decoracao.html) and I just couldn’t resist!

Paper Plate Halloween Crafts Β© Capturing Parenthood

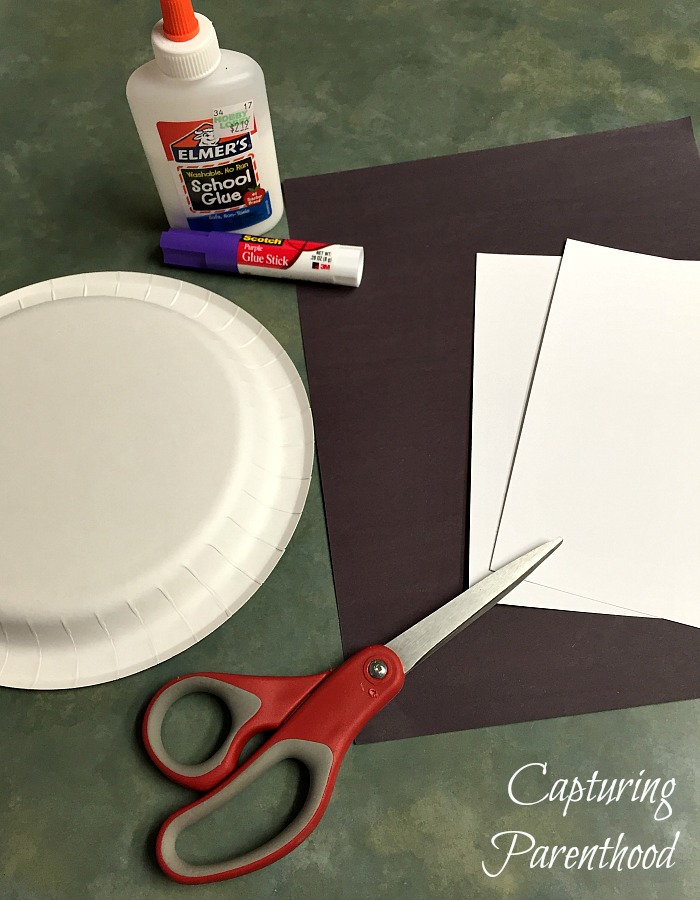
All you need to create your own paper plate ghost is a white paper plate, white and black construction paper, cheese cloth (or white streamers), glue, and scissors.

Paper Plate Halloween Crafts Β© Capturing Parenthood

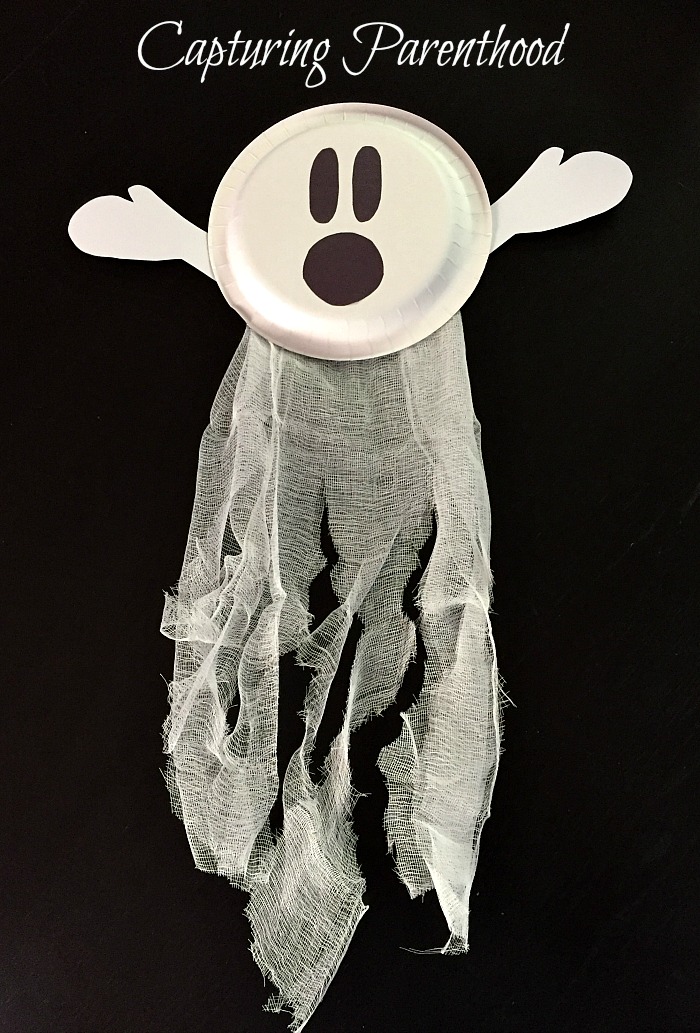
Simply cut out two eyes and a mouth from the black construction paper, and glue them onto the paper plate. From the white construction paper, cut out two arms with mitten hands (no fingers). Glue one arm on each side of the paper plate (adhering to the back side of the plate). Next, take a piece of cheese cloth and glue it to the back-side of the paper plate, on the bottom. Take your scissors and cut various sizes (and lengths) of strips into the cheese cloth. An alternative to using cheese cloth would be to use white streamers, and just tear them at varying lengths. Once finished, set the ghost aside for the glue to dry completely.

Paper Plate Frankenstein

I absolutely adore this little paper plate Frankenstein, with his springy green legs! He’s a big hit with our little nugget too! I came across this awesome Halloween craft idea over on Vicky Barone’s blog (http://blog.vickybarone.com/2014/10/08/paper-plate-halloween-characters/). Vicky shares two other adorable paper plate Halloween characters in her post, that you should definitely check out! I knew that the Frankenstein was a must for us, because he makes an appearance in our daughter’s favorite Danger Mouse book.

Paper Plate Halloween Crafts Β© Capturing Parenthood

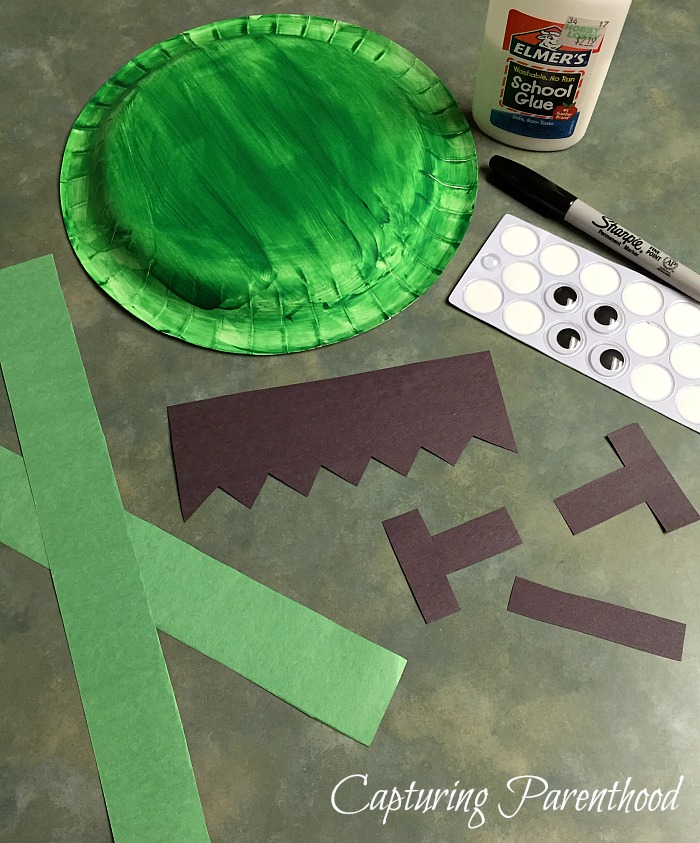
To make this Halloween craft you will need: a green paper plate (we just painted ours), green and black construction paper, a black marker, googly eyes (we love using peel-and-stick googly eyes), and glue.

Paper Plate Halloween Crafts Β© Capturing Parenthood

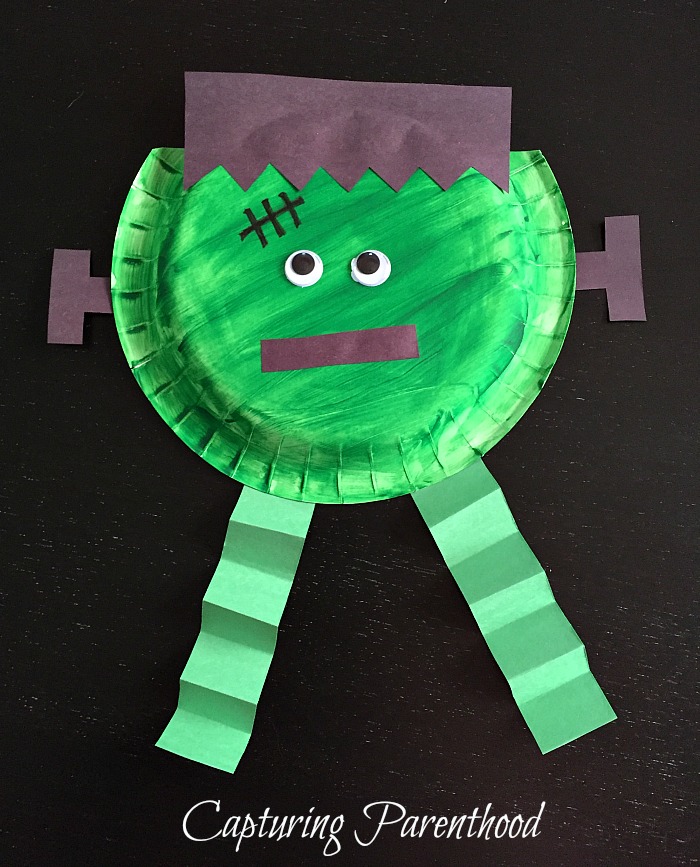
Cut two strips from the green construction paper and fold them accordion-style (for his legs). From the black construction paper, cut out his hair, mouth, and two bolts for the sides of his head. Glue his hair to the top of the green paper plate. Add two googly eyes, and then glue on his mouth. Using the black marker, add some stitches above one eye. Next, glue the bolts and legs to the back-side of the plate (in their appropriate locations). Once you’ve finished gluing, set Frankenstein aside to dry completely.

Paper Plate Pumpkin

I’m always game for easy, yet adorable crafts, so I was pumped when I stumbled across this paper plate pumpkin craft over on The Simple Parent (https://thesimpleparent.com/easiest-paper-plate-pumpkin-craft/). It truly is the easiest paper plate pumpkin craft! πŸ™‚

Paper Plate Halloween Crafts Β© Capturing Parenthood

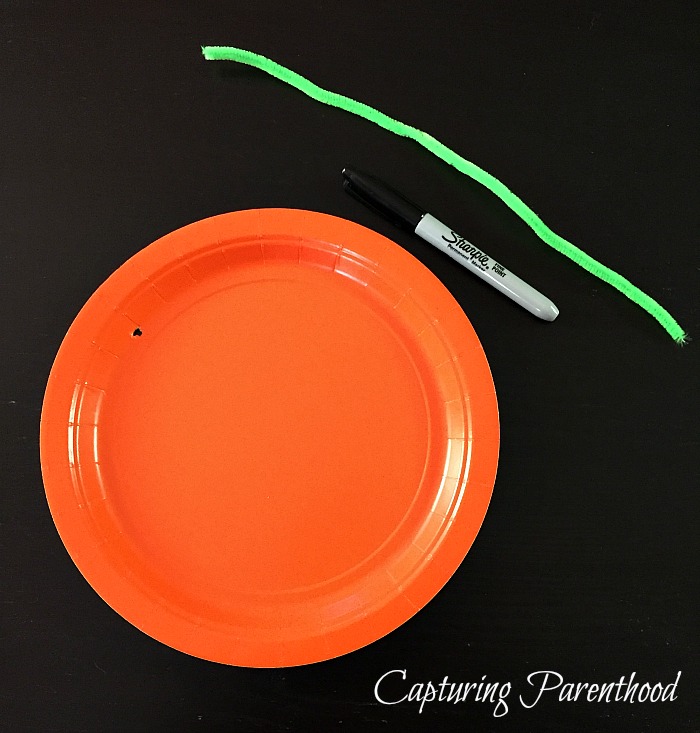
All you need to make your own paper plate pumpkin is an orange paper plate (you could always paint one orange too), a black marker, and a green pipe cleaner. Seriously…that’s it!

Paper Plate Halloween Crafts Β© Capturing Parenthood

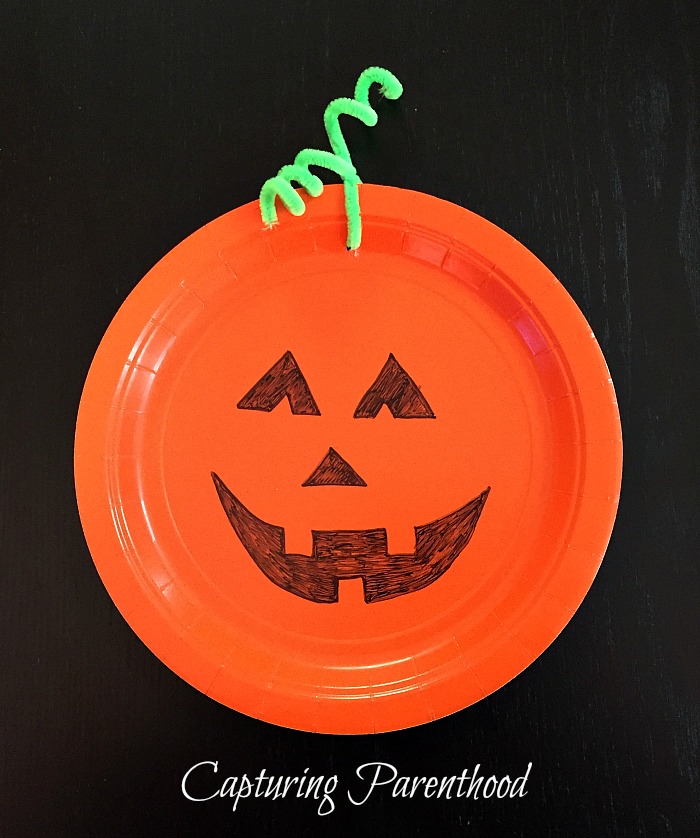
Draw the pumpkin face of your dreams onto the plate, using the black marker. Then punch a small hole through the top of the paper plate and slide the green pipe cleaner through. Fold the pipe cleaner in half and give it a twist at the top of the plate, to keep it in place. Then simply curl the ends of the pipe cleaner around a finger and TA DA! Pretty awesome, right?

Paper Plate Spider

We actually made a yellow paper plate spider last Halloween season, and we loved it so much that we decided to make another one! This year, my little nugget chose black…spooky! I found this brilliant spider craft over on I Heart Crafty Things (https://iheartcraftythings.com/paper-plate-spiders.html).

Paper Plate Halloween Crafts Β© Capturing Parenthood

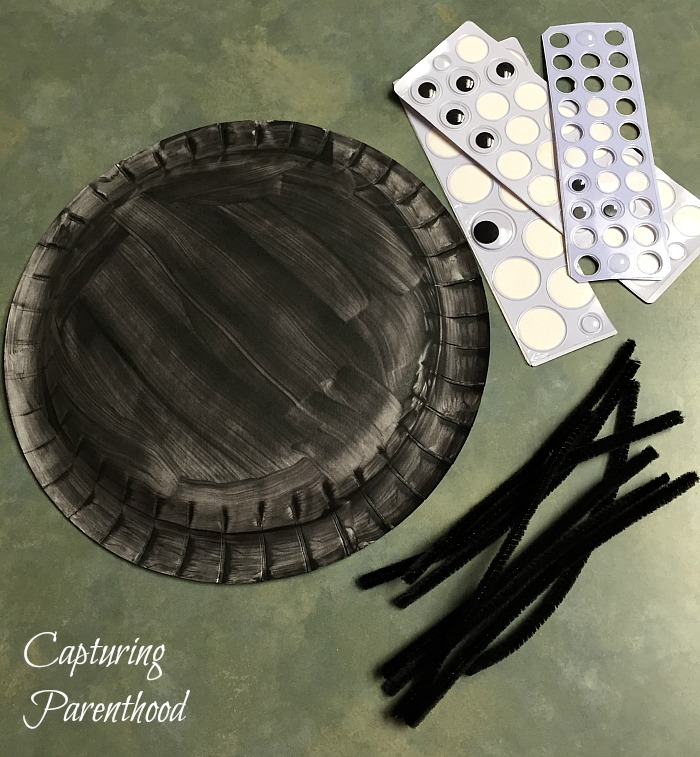
The supplies required to make this paper plate spider include: a black paper plate (we painted ours), black pipe cleaners (I cut four of ours in half, to make eight), and googly eyes.

Paper Plate Halloween Crafts Β© Capturing Parenthood

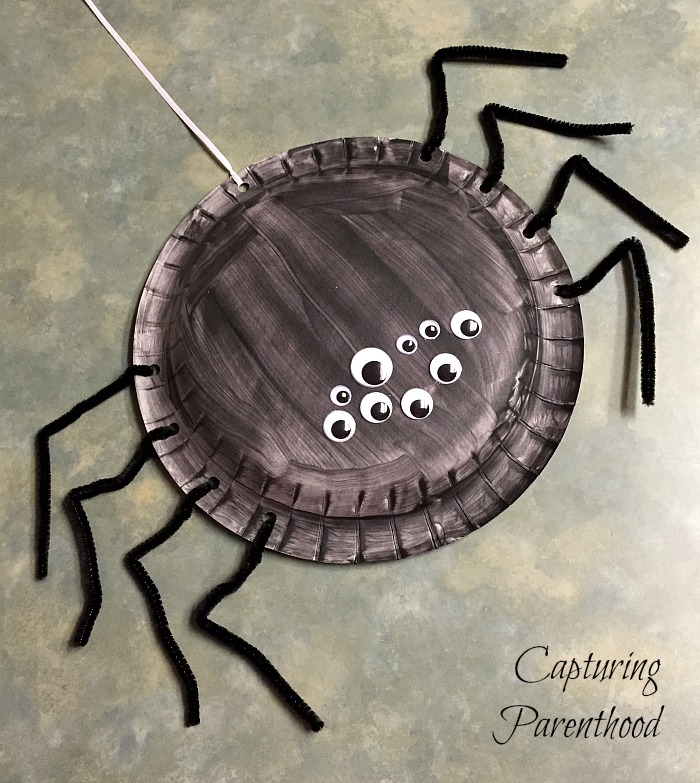
I simply punched four holes on each side of the plate (to attach the pipe cleaner legs). Rachel (I Heart Crafty Things) staples her legs onto the plate – either way works! I slide each pipe cleaner through the hole and folded a small piece back up to twist together with the other side, to keep them in place. Once all of the pipe cleaners are attached, create one bend in each leg to make the spider legs more realistic. And finally (our little nugget’s favorite part)…add an abundance of googly eyes! If you want to make it look like your spider is hanging from a web…poke a small hole into the top of the plate and feed a piece of white string (or ribbon) through. Tie a quick knot to hold it in place, and you’re all set!

Paper Plate Witch

After a recent trip to Home Depot…where we happened upon an inflatable, talking witch decoration…our little nugget became obsessed with witches. And I just so happened to find this perfectly wicked paper plate witch over on Crafty Morning (https://www.craftymorning.com/paper-plate-witch-craft-kids/).

Paper Plate Halloween Crafts Β© Capturing Parenthood

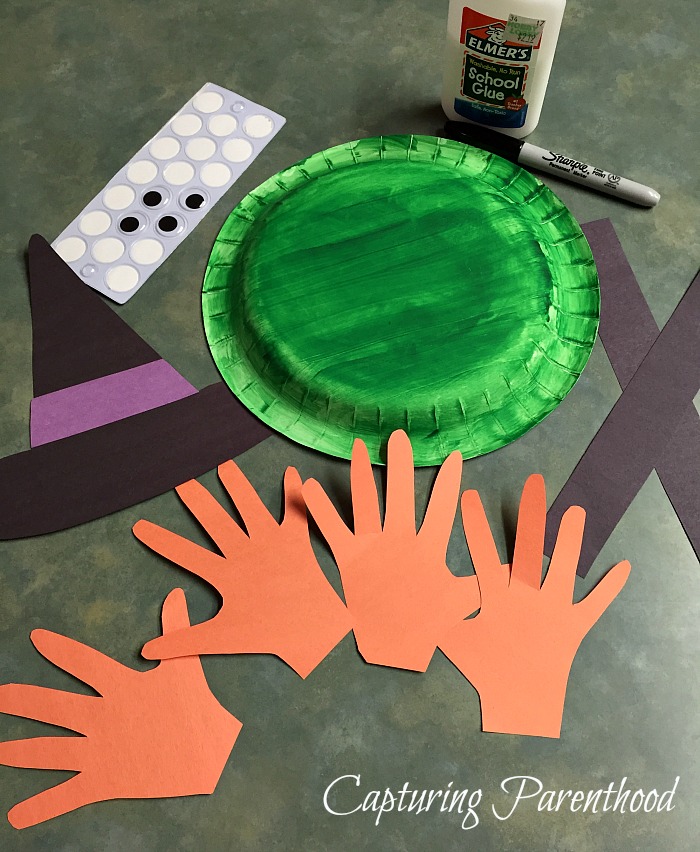
For this witch craft (he he he…get it…witchcraft) πŸ™‚ you will need a green paper plate (we painted ours), black, purple, and orange construction paper, a black marker, glue, and googly eyes.

Paper Plate Halloween Crafts Β© Capturing Parenthood

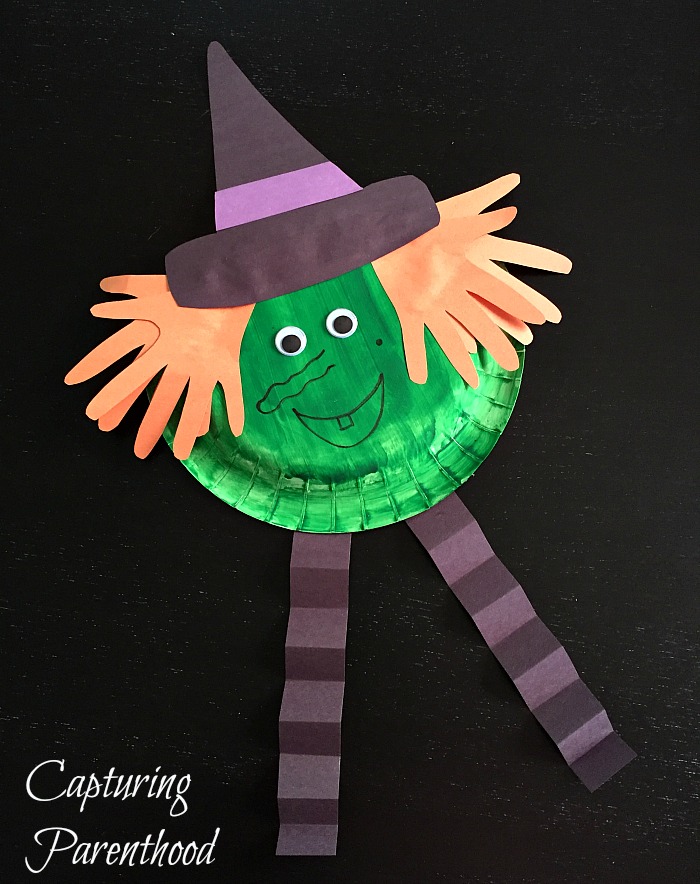
Using the black construction paper, cut out a witch’s hat and two strips (for her legs). Michelle’s witch (Crafty Morning) didn’t have legs, but we loved our Frankenstein legs so much, we decided that our witch needed some legs too! Fold the two black strips accordion-style, and set aside. Next, cut a purple strip of paper for the band of the witch’s hat. Glue the purple strip onto the hat. Using a folded piece of orange construction paper, trace your kiddo’s hands and cut them out (you should have a total of four hands). Glue two hands on the underneath of each side of the witch’s hat (to create hair). Next, glue the hair and hat to the top of the paper plate. Add two googly eyes, and then (using the black marker) draw on a crooked nose and grin. Don’t forget to add a wart! Lastly, glue the two legs to the underside of the plate. Set your witch aside to dry completely. Once dry…race her around the house, cackling loudly. πŸ™‚ Or just hang her on display…whatever you’re in to.


And there you have it…five perfectly simple, spooky, and adorable Paper Plate Halloween Crafts!

Paper Plate Halloween Crafts Β© Capturing Parenthood

What are some of your family’s favorite decorative Halloween crafts to create? I would love to hear about them in the comments section below.

HAPPY HALLOWEEN!Β 

START SPREADING THE NEWS!

Related Posts

  • Best Toddler Christmas Gift – 2016Best Toddler Christmas Gift – 2016
  • Color-Mixing Water TransferColor-Mixing Water Transfer
  • We’re Pregnant! Sharing the Big NewsWe’re Pregnant! Sharing the Big News
  • Toddler Snack IdeasToddler Snack Ideas
« Our Annual Adventure to the Pumpkin Patch
Celebrating Holidays Through Literature – Halloween 2017 »

Hello! Nice to meet you!

Welcome to the Capturing Parenthood blog! I'm Stacey...wife and first-time parent, former full-time working mom, turned stay-at-home mom. Join me as I capture and share my thoughts and experiences on this crazy adventure we call parenthood! Click here to learn more about me!

Search Capturing Parenthood

Instagram

Ok...@artwithmrs.e Haunted House project is hands- Ok...@artwithmrs.e Haunted House project is hands-down the best Halloween-themed art project out there! πŸ™ŒπŸ™ŒπŸ™Œ
We had a blast creating haunted houses for homeschool art this month! 🧑
...
We followed Kaitlyn's extremely helpful Haunted House Drawing Guide (you can find it over on her Teachers Pay Teachers account) and completed the project over the course of 3 lessons.
...
During our first lesson, we sketched our houses in pencil, and added some eerie exterior landscaping. πŸͺ¦πŸ¦‡
We popped in a few spooky characters (ghosts, spiders, pumpkins, and a vampire). πŸ‘»πŸ•·πŸŽƒπŸ§›
And then we traced over our pencil lines with black Sharpie.
...
During our next lesson, we used a coloring technique that we learned from Kristian @friendsartlab ❀️ We colored our pictures with oil pastels...and then painted over the top of the oil pastels with baby oil...it causes the oil pastels to bleed and blend together! 🀩
...
During our final lesson...we added more spooky characters to the inside of our house...that can peek out behind the doors and windows. πŸ’€πŸ§™β€β™€οΈπŸ‘»
To do this...I used an X-acto knife and carefully cut around the outside edges of the doors/windows (leaving the hinge sides intact so that they could fold open and closed).
We placed yellow construction paper in the background...and added witches, ghosts, skeletons, a mummy, and a Frankenstein! 😍
This step made our haunted houses really come to life...and we just can't thank Kaitlyn @artwithmrs.e enough for sharing this awesome lesson and drawing guide! THE ABSOLUTE BEST! ❀️❀️❀️
...
It was very evident how much our daughter loved this project...as we worked through each step...but the thing that solidified just how much she enjoyed it was - one weekend morning I walked downstairs to find her and her dad sitting at the table - and she was very excitedly teaching him how to draw his own haunted house - while she drew a few more herself (scroll to the last picture in the carousel)! πŸ₯°
...
#hauntedhouse #hauntedhouses #hauntedhousedrawing #directeddrawing #spookyart #halloween #happyhalloween #halloweenart #halloweenfun #elementaryart #homeschoolart #homeschool #homeschoolfun #capturingparenthood
I decided that these six little pumpkins needed a I decided that these six little pumpkins needed a permanent place on our feed...because WE GREW THEM OURSELVES!!! πŸŽƒ
That's right...first-time pumpkin-growers over here...and it was all actually a bit of a surprise. πŸ˜ƒ
...
You see, when we went to prep our garden beds this spring, we noticed a plant that had already started growing. We assumed it was a cucumber plant, since it was in the same place we had cucumbers last year.
We left it alone and planted a couple of other cucumber plants nearby. πŸ₯’
At first, the leaves on our mystery plant looked very similar to the leaves on our other cucumber plants.
But a couple of weeks later the plant had grown A LOT bigger. It was now obvious that it was not a cucumber plant. But what was it? πŸ€·β€β™€οΈ
...
And that's when it suddenly dawned on these exhausted parents, that our daughter had spontaneously tossed seeds from her pumpkin (last Halloween), into the garden bed. πŸ€¦β€β™€οΈ The mystery was finally solved...and by the looks of the large golden flowers that were emerging all over the vines...we figured we might have a few pumpkins come fall! πŸ™ŒπŸŽƒπŸ™Œ
...
It was so much fun to watch the pumpkin plant grow! 🀩 We had to cut down the wire on one side of our garden bed to let the vines out...and they ended up growing 6-10 feet long in both directions! 😳 It was crazy!
They put out the most gorgeous flowers...that the bees absolutely loved! 🧑 And soon enough, we spotted a few round gourds growing at the base of some of the flowers. They grew quickly...and then turned a beautiful shade of orange! 😍
...
Needless to say, we are now officially pumpkin-growing people! πŸ˜‚ My husband can't wait to plant more next year...and he's already looking in to different varieties - hoping to grow some larger jack-o-lantern style ones next season! πŸŽƒ
…
#pumpkins #growingpumpkins #ourpumpkinpatch #homegrownpumpkins #homegrown #homegarden #pumpkingrowing #gardening #fallharvest #happyhalloween #timetocarvesomepumpkins #gardensurprises #gardenfun #capturingparenthood
Free the Frankensteins from the Frozen Rainbow Bra Free the Frankensteins from the Frozen Rainbow Brain! 😬🌈🧠
…
Yesterday, we shared how we made this colorful, frozen rainbow brain - full of Frankenstein mini erasers…and today we wanted to show you what became of our beautiful brain! πŸ˜ƒ
…
We popped it out onto a tray, grabbed a shaker of salt, a bottle of warm water (colored red for added effect), and some tongs.
And then it was time to Free the Frankensteins (our daughter coined the phrase)! πŸ˜‰
…
This spooky activity provides chilly sensory play, motor skills practice, and scientific exploration (salt and warm water speed-up the melting process)! πŸ™ŒπŸ™ŒπŸ™Œ
As an added bonus…you also get some color-mixing! And the addition of the salt makes it extra sparkly too! 😍🀩😍
…
Eventually, all you’re left with is some mini erasers floating in a pool of colorful water…and a happy kid! ❀️❀️❀️
…
#frozenbrain #rainbowbrain #frozenrainbowbrain #brains #freethefrankensteins #halloween #happyhalloween #halloweenactivities #halloweenactivitiesforkids #halloweensensoryplay #sensoryplay #sensoryexploration #motorskills #motorskillsdevelopment #scienceforkids #kidscience #funactivities #funactivitiesforkids #halloweenfun #capturingparenthood
We are definitely getting into the fall and Hallow We are definitely getting into the fall and Halloween spirit...so during a recent homeschool art session, we decided to make some air-dry clay pumpkins and jack-o-lanterns! πŸŽƒπŸŽƒπŸŽƒ
...
Back in 2019, Lauralee @2art.chambers shared several colorful, air-dry clay pumpkins that her students made...and after rediscovering the saved post, I decided that it would be a perfect October art lesson for us too! 🧑
...
We used various colors of air-dry clay, and rolled each color into whatever pumpkin shape we wanted...and then we added our lines/indentations using the side of a credit card. πŸ’³ The stems are just small, broken pieces of old crayons (another genius idea from Lauralee). πŸ– And we topped our stems with pieces of pipe cleaner, to create the little curly cues. 😍
...
Once we had our pumpkins...we decided to change things up a bit, and grabbed our stash of googly eyes. πŸ‘€ (Most of) our fall pumpkins then transformed into Halloween jack-o-lanterns! πŸŽƒ
We pressed the googly eyes into the clay, and we used a few small tools (that came with our box of air-dry clay) to add their mouths. πŸ˜ƒ
...
And now we have a cute and colorful crew of clay pumpkins adorning our mantle! πŸŽƒπŸ§‘πŸŽƒ
...
#pumpkins #jackolanterns #claypumpkins #airdryclay #airdryclaycreation #airdryclayart #airdryclaypumpkins #elementaryart #fallartprojects #fallartprojectsforkids #halloweenart #halloweenartprojects #halloweenartprojectsforkids #homeschool #homeschoolart #homeschoolfun #halloween #happyhalloween #capturingparenthood
Andrew from @elementaryarts shared a patterned, bl Andrew from @elementaryarts shared a patterned, block letter name project a couple of weeks ago (I'll share the post in stories today), and I immediately added it to our list of art projects to do this year! 😍
But we decided to switch things up a little bit! Instead of using our names, we each picked a color that we like...wrote the name of the color in block letters on our paper...and created our color patterns using at least two different shades of our chosen color. πŸ–
...
This colorful project ended up being a lot of fun, and also very relaxing...as we all quietly focused, and zoned in on adding the color patterns around all of our letters. It was actually a bit hypnotizing! 🀩
...
Needless to say, we are really happy with the way our block letter color project turned out! πŸ™Œ We even had a special guest who wanted to join in on this art project! ❀️
...
P.S. We also used Andrew’s free TPT handout on how to make block letters! The bundle includes bubble letters, cursive letters, graffiti letters, and more! πŸ‘
…
#blockletters #blocklettering #colors #color #colorful #artproject #artforkids #kidart #elementaryart #artactivity #artactivities #artactivitiesforkids #colorfun #homeschool #homeschoolart #homeschoolfun #capturingparenthood
We created self-portraits for our first art projec We created self-portraits for our first art project of our homeschool year...and we are pretty obsessed with them! 🀩✏️🀩
...
I love the idea of doing a self-portrait project at the beginning of the year, and then again at the end of the year...so that we can see how much we've grown and changed.
...
We used Kaitlyn's @artwithmrs.e Simple Self-Portrait Drawing Guide and it was so incredibly helpful (especially for this new homeschool teacher who wouldn't necessarily list drawing as one of her stronger suits). πŸ˜‰
We actually purchased her entire Guided Drawing Bundle (over on Teachers Pay Teachers) and we highly recommend it! πŸ™ŒπŸ™ŒπŸ™Œ
...
We looked through the self-portrait drawing guide to get different ideas for our eyes, nose, mouth, and hair. πŸ‘€πŸ‘ƒπŸ‘„
...
Now...if you caught our stories earlier this week, you know that our daughter recently made a pretty big change to her hair (that included a partial side-shave and bob-length cut - she also dyed it blue). πŸ’‡β€β™€οΈ
She was used to drawing pictures of herself with her long, blonde locks...and her new hairstyle proved rather difficult. But she persevered, and ended up with a self-portrait that she was truly proud of! πŸ₯°
...
When we were finished drawing our likenesses, we decided to cut them out and create a special background to glue them onto. I went with random black and white designs...and our nugget decided to draw various things that she loves (her family, winter, candy, books, dolphins...and more)! ❀️
...
It was such a fun project...and I can't wait to see what our self-portraits look like at the end of our school year! πŸ˜ƒ
...
#selfportrait #selfportraits #homeschool #homeschoolart #elementaryart #artactivities #artactivitiesforkids #artforkids #kidart #homeschoolfun #capturingparenthood
Follow on Instagram

Popular Posts

Virtual Spring Break: Day Five - New York City

Virtual Spring Break: Day Five – New York City

Virtual Spring Break: Day Four - Mexico

Virtual Spring Break: Day Four – Mexico

Virtual Spring Break: Day Three - India

Virtual Spring Break: Day Three – India

Join Us on Instagram

Ok...@artwithmrs.e Haunted House project is hands- Ok...@artwithmrs.e Haunted House project is hands-down the best Halloween-themed art project out there! πŸ™ŒπŸ™ŒπŸ™Œ
We had a blast creating haunted houses for homeschool art this month! 🧑
...
We followed Kaitlyn's extremely helpful Haunted House Drawing Guide (you can find it over on her Teachers Pay Teachers account) and completed the project over the course of 3 lessons.
...
During our first lesson, we sketched our houses in pencil, and added some eerie exterior landscaping. πŸͺ¦πŸ¦‡
We popped in a few spooky characters (ghosts, spiders, pumpkins, and a vampire). πŸ‘»πŸ•·πŸŽƒπŸ§›
And then we traced over our pencil lines with black Sharpie.
...
During our next lesson, we used a coloring technique that we learned from Kristian @friendsartlab ❀️ We colored our pictures with oil pastels...and then painted over the top of the oil pastels with baby oil...it causes the oil pastels to bleed and blend together! 🀩
...
During our final lesson...we added more spooky characters to the inside of our house...that can peek out behind the doors and windows. πŸ’€πŸ§™β€β™€οΈπŸ‘»
To do this...I used an X-acto knife and carefully cut around the outside edges of the doors/windows (leaving the hinge sides intact so that they could fold open and closed).
We placed yellow construction paper in the background...and added witches, ghosts, skeletons, a mummy, and a Frankenstein! 😍
This step made our haunted houses really come to life...and we just can't thank Kaitlyn @artwithmrs.e enough for sharing this awesome lesson and drawing guide! THE ABSOLUTE BEST! ❀️❀️❀️
...
It was very evident how much our daughter loved this project...as we worked through each step...but the thing that solidified just how much she enjoyed it was - one weekend morning I walked downstairs to find her and her dad sitting at the table - and she was very excitedly teaching him how to draw his own haunted house - while she drew a few more herself (scroll to the last picture in the carousel)! πŸ₯°
...
#hauntedhouse #hauntedhouses #hauntedhousedrawing #directeddrawing #spookyart #halloween #happyhalloween #halloweenart #halloweenfun #elementaryart #homeschoolart #homeschool #homeschoolfun #capturingparenthood
I decided that these six little pumpkins needed a I decided that these six little pumpkins needed a permanent place on our feed...because WE GREW THEM OURSELVES!!! πŸŽƒ
That's right...first-time pumpkin-growers over here...and it was all actually a bit of a surprise. πŸ˜ƒ
...
You see, when we went to prep our garden beds this spring, we noticed a plant that had already started growing. We assumed it was a cucumber plant, since it was in the same place we had cucumbers last year.
We left it alone and planted a couple of other cucumber plants nearby. πŸ₯’
At first, the leaves on our mystery plant looked very similar to the leaves on our other cucumber plants.
But a couple of weeks later the plant had grown A LOT bigger. It was now obvious that it was not a cucumber plant. But what was it? πŸ€·β€β™€οΈ
...
And that's when it suddenly dawned on these exhausted parents, that our daughter had spontaneously tossed seeds from her pumpkin (last Halloween), into the garden bed. πŸ€¦β€β™€οΈ The mystery was finally solved...and by the looks of the large golden flowers that were emerging all over the vines...we figured we might have a few pumpkins come fall! πŸ™ŒπŸŽƒπŸ™Œ
...
It was so much fun to watch the pumpkin plant grow! 🀩 We had to cut down the wire on one side of our garden bed to let the vines out...and they ended up growing 6-10 feet long in both directions! 😳 It was crazy!
They put out the most gorgeous flowers...that the bees absolutely loved! 🧑 And soon enough, we spotted a few round gourds growing at the base of some of the flowers. They grew quickly...and then turned a beautiful shade of orange! 😍
...
Needless to say, we are now officially pumpkin-growing people! πŸ˜‚ My husband can't wait to plant more next year...and he's already looking in to different varieties - hoping to grow some larger jack-o-lantern style ones next season! πŸŽƒ
…
#pumpkins #growingpumpkins #ourpumpkinpatch #homegrownpumpkins #homegrown #homegarden #pumpkingrowing #gardening #fallharvest #happyhalloween #timetocarvesomepumpkins #gardensurprises #gardenfun #capturingparenthood
Free the Frankensteins from the Frozen Rainbow Bra Free the Frankensteins from the Frozen Rainbow Brain! 😬🌈🧠
…
Yesterday, we shared how we made this colorful, frozen rainbow brain - full of Frankenstein mini erasers…and today we wanted to show you what became of our beautiful brain! πŸ˜ƒ
…
We popped it out onto a tray, grabbed a shaker of salt, a bottle of warm water (colored red for added effect), and some tongs.
And then it was time to Free the Frankensteins (our daughter coined the phrase)! πŸ˜‰
…
This spooky activity provides chilly sensory play, motor skills practice, and scientific exploration (salt and warm water speed-up the melting process)! πŸ™ŒπŸ™ŒπŸ™Œ
As an added bonus…you also get some color-mixing! And the addition of the salt makes it extra sparkly too! 😍🀩😍
…
Eventually, all you’re left with is some mini erasers floating in a pool of colorful water…and a happy kid! ❀️❀️❀️
…
#frozenbrain #rainbowbrain #frozenrainbowbrain #brains #freethefrankensteins #halloween #happyhalloween #halloweenactivities #halloweenactivitiesforkids #halloweensensoryplay #sensoryplay #sensoryexploration #motorskills #motorskillsdevelopment #scienceforkids #kidscience #funactivities #funactivitiesforkids #halloweenfun #capturingparenthood
We are definitely getting into the fall and Hallow We are definitely getting into the fall and Halloween spirit...so during a recent homeschool art session, we decided to make some air-dry clay pumpkins and jack-o-lanterns! πŸŽƒπŸŽƒπŸŽƒ
...
Back in 2019, Lauralee @2art.chambers shared several colorful, air-dry clay pumpkins that her students made...and after rediscovering the saved post, I decided that it would be a perfect October art lesson for us too! 🧑
...
We used various colors of air-dry clay, and rolled each color into whatever pumpkin shape we wanted...and then we added our lines/indentations using the side of a credit card. πŸ’³ The stems are just small, broken pieces of old crayons (another genius idea from Lauralee). πŸ– And we topped our stems with pieces of pipe cleaner, to create the little curly cues. 😍
...
Once we had our pumpkins...we decided to change things up a bit, and grabbed our stash of googly eyes. πŸ‘€ (Most of) our fall pumpkins then transformed into Halloween jack-o-lanterns! πŸŽƒ
We pressed the googly eyes into the clay, and we used a few small tools (that came with our box of air-dry clay) to add their mouths. πŸ˜ƒ
...
And now we have a cute and colorful crew of clay pumpkins adorning our mantle! πŸŽƒπŸ§‘πŸŽƒ
...
#pumpkins #jackolanterns #claypumpkins #airdryclay #airdryclaycreation #airdryclayart #airdryclaypumpkins #elementaryart #fallartprojects #fallartprojectsforkids #halloweenart #halloweenartprojects #halloweenartprojectsforkids #homeschool #homeschoolart #homeschoolfun #halloween #happyhalloween #capturingparenthood
Andrew from @elementaryarts shared a patterned, bl Andrew from @elementaryarts shared a patterned, block letter name project a couple of weeks ago (I'll share the post in stories today), and I immediately added it to our list of art projects to do this year! 😍
But we decided to switch things up a little bit! Instead of using our names, we each picked a color that we like...wrote the name of the color in block letters on our paper...and created our color patterns using at least two different shades of our chosen color. πŸ–
...
This colorful project ended up being a lot of fun, and also very relaxing...as we all quietly focused, and zoned in on adding the color patterns around all of our letters. It was actually a bit hypnotizing! 🀩
...
Needless to say, we are really happy with the way our block letter color project turned out! πŸ™Œ We even had a special guest who wanted to join in on this art project! ❀️
...
P.S. We also used Andrew’s free TPT handout on how to make block letters! The bundle includes bubble letters, cursive letters, graffiti letters, and more! πŸ‘
…
#blockletters #blocklettering #colors #color #colorful #artproject #artforkids #kidart #elementaryart #artactivity #artactivities #artactivitiesforkids #colorfun #homeschool #homeschoolart #homeschoolfun #capturingparenthood
We created self-portraits for our first art projec We created self-portraits for our first art project of our homeschool year...and we are pretty obsessed with them! 🀩✏️🀩
...
I love the idea of doing a self-portrait project at the beginning of the year, and then again at the end of the year...so that we can see how much we've grown and changed.
...
We used Kaitlyn's @artwithmrs.e Simple Self-Portrait Drawing Guide and it was so incredibly helpful (especially for this new homeschool teacher who wouldn't necessarily list drawing as one of her stronger suits). πŸ˜‰
We actually purchased her entire Guided Drawing Bundle (over on Teachers Pay Teachers) and we highly recommend it! πŸ™ŒπŸ™ŒπŸ™Œ
...
We looked through the self-portrait drawing guide to get different ideas for our eyes, nose, mouth, and hair. πŸ‘€πŸ‘ƒπŸ‘„
...
Now...if you caught our stories earlier this week, you know that our daughter recently made a pretty big change to her hair (that included a partial side-shave and bob-length cut - she also dyed it blue). πŸ’‡β€β™€οΈ
She was used to drawing pictures of herself with her long, blonde locks...and her new hairstyle proved rather difficult. But she persevered, and ended up with a self-portrait that she was truly proud of! πŸ₯°
...
When we were finished drawing our likenesses, we decided to cut them out and create a special background to glue them onto. I went with random black and white designs...and our nugget decided to draw various things that she loves (her family, winter, candy, books, dolphins...and more)! ❀️
...
It was such a fun project...and I can't wait to see what our self-portraits look like at the end of our school year! πŸ˜ƒ
...
#selfportrait #selfportraits #homeschool #homeschoolart #elementaryart #artactivities #artactivitiesforkids #artforkids #kidart #homeschoolfun #capturingparenthood
Follow on Instagram

Copyright © 2025 · glam theme by Restored 316

  • Policies + Disclosure
  • Contact