• Home
  • About
  • Kid Zone
    • Activities
    • Arts + Crafts
    • Books Books Books
  • Food
    • Family-Friendly
    • Kids
    • Sweets
    • Dog-Friendly
  • Life + Motherhood
    • Pregnancy
    • Parenting
    • House + Home
  • Let’s Party
    • Birthdays
    • Holidays
    • Instagram
    • Pinterest

Capturing Parenthood

Preschool Math – Springtime Subtraction

in Activities, Toddler Zone on May 28, 2019

A few months ago, I shared a blog post containing a few of our favorite resources for learning and practicing addition. At that time, I promised to share some more resources when we started working on subtraction. Well…I’m happy to announce that the day has finally arrived! It’s time to share some of our favorite Preschool Math – Springtime Subtraction math activities!

Preschool Math - Springtime Subtraction

There are so many fantastic (and typically free) printables out there for early education. And the best part is that you can usually find them in a wide array of popular themes. Since it’s springtime, and we’ve been busy celebrating all things flowers and bugs, it was only appropriate to stick with our theme when it came to learning all about subtraction! πŸ™‚


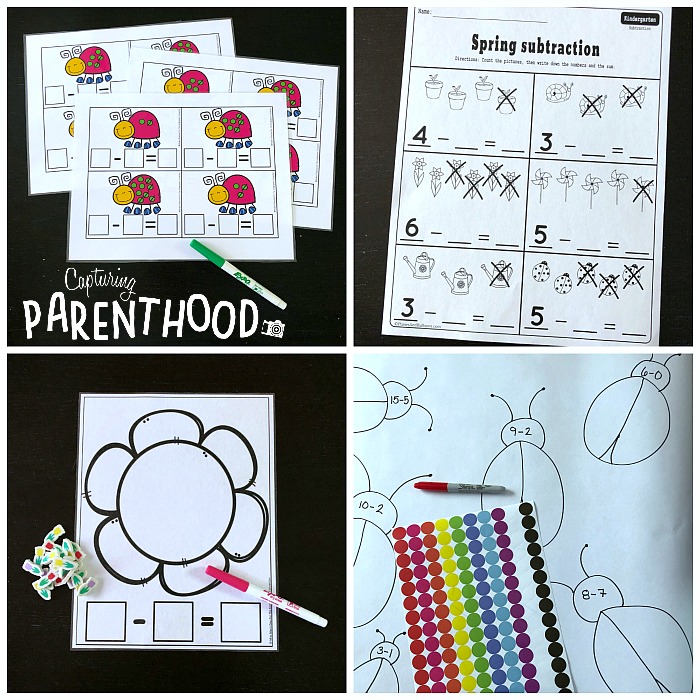
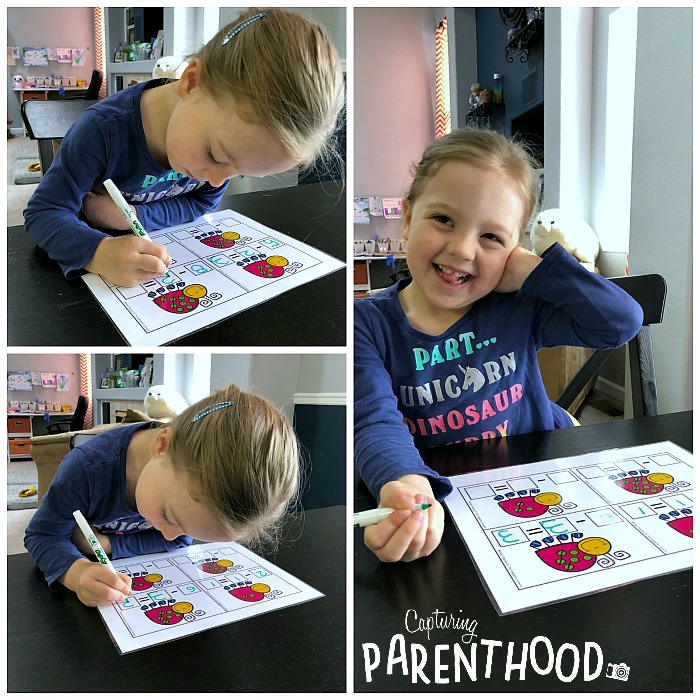
Bug Subtraction Cards – from The Kindergarten Connection

Preschool Math - Springtime Subtraction

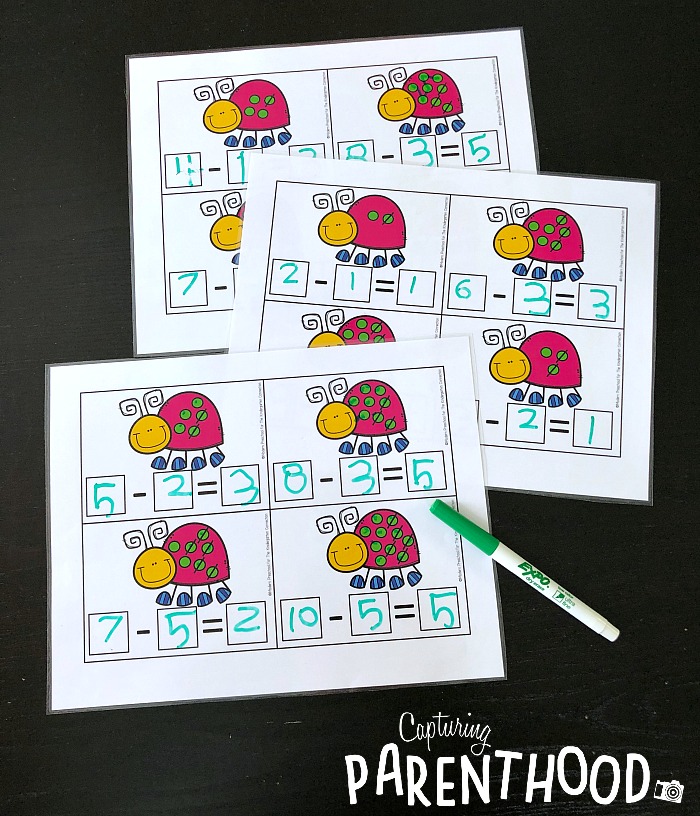
If you caught our Preschool Math – Learning Addition post a few months ago, then you already know that we found some fun Counting Bear Addition Cards over on The Kindergarten Connection. Needless to say, Alex’s website was the very first place that I went looking, when I started searching for Spring-themed subtraction printables. And these super cute Bug Subtraction Cards fit the bill perfectly!

Preschool Math - Springtime Subtraction

Since these subtraction cards are so adorable, I knew that I would want to utilize them on more than one occasion, so I decided to laminate them with my favorite Avery Self-Adhesive Laminating Sheets. And then all you need is a dry-erase marker!

Have your kiddos start by counting all of the dots on a bug, and then have them write the answer in the first box in the equation. Now, have them count how many dots are crossed out (or have a line through them) – that number is written in the second box in the equation. To reach the correct answer to the subtraction equation, all they need to do is count how many dots are remaining (i.e. how many dots there are without a line drawn through them). And that number gets written in the last (third) box of the equation. Ta Da!


Spring Subtraction Printable – from Planes and Balloons

Preschool Math - Springtime Subtraction

This simple Spring subtraction printable came in a Spring Kindergarten Worksheets Pack, from Planes and Balloons. Kristina put together a fantastic packet of Spring-themed activities that our little nugget has thoroughly enjoyed completing. Aside from some Spring addition and subtraction worksheets, there are also printables for practicing sight words, counting and place value, teen numbers, beginning and ending sounds, etc.

Preschool Math - Springtime Subtraction

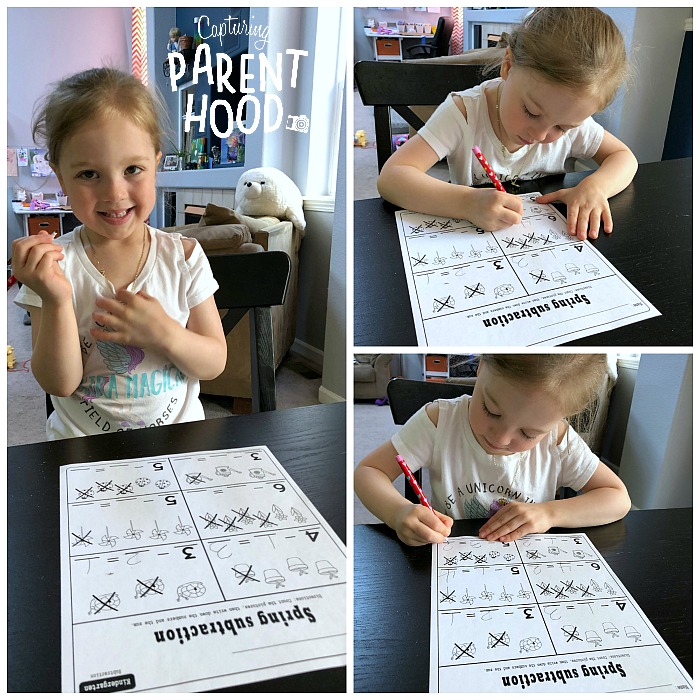
The concept behind the Spring subtraction sheet is very similar to the bug subtraction cards, except that the first number in each equation is already filled in on this particular worksheet. So, all your kiddos need to do is count how many of each item is crossed out, and write that number in the middle of the equation. To reach the final answer, your little one will need to count how many of each item is remaining (i.e. how many are not crossed out). Have them write their answer at the end of the equation.


Spring Flower Subtraction Mat – from The Kindergarten Connection

Preschool Math - Springtime Subtraction

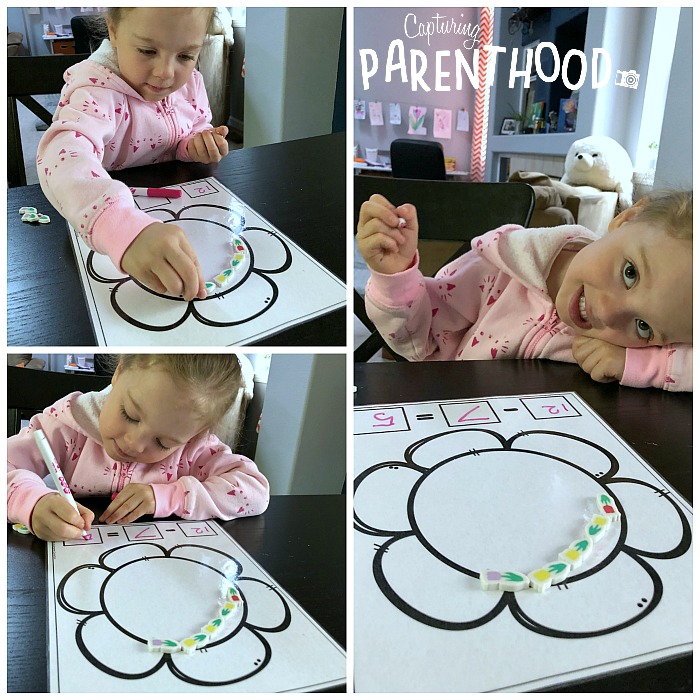
This Spring flower subtraction mat is yet another free printable from the ever-amazing Alex, over at The Kindergarten Connection. And it actually comes in a handy Spring Flower Math Mats set – for practicing both addition and subtraction! We like to use little manipulatives when we are learning with these math mats, and our mini flower erasers (from the Target Dollar Spot) worked perfectly.

For this subtraction activity, I typically give our daughter a number to start with (or she sometimes comes up with her own). She writes that number in the first box of the equation, and then places that many mini flower erasers on the flower math mat. We then choose a number that is equal to, or less than, our original number, and she writes that number in the second box of the equation. Then she removes that number of mini flower erasers from the math mat. All that’s left to do is count how many mini flower erasers are remaining, and write that number in the last box of the equation. I decided to laminate these flower math mats as well, so that our little nugget can just erase the equation and start all over again!


Ladybug Subtraction

Preschool Math - Springtime Subtraction

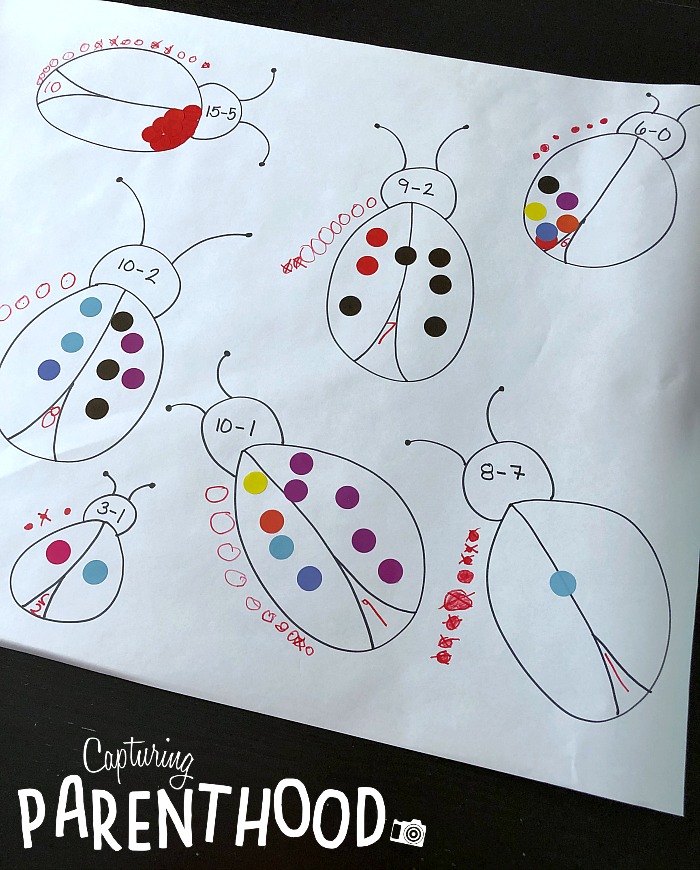
As you likely know by now, I get loads of sensory bin inspiration from Katy @prekwolfpack…but she also shares a ton of other amazing ideas and activities on her Instagram feed. And she’s become pretty popular for the various butcher paper activities that she sets up for her students. I knew that our little nugget would love the opportunity to use some colorful dot stickers, so working off of Katy’s brilliant examples, I created a Butterfly Addition butcher paper activity (that I shared on Instagram earlier this month). It was such a big hit with our daughter, that I decided to create this Ladybug Subtraction activity as well!

Preschool Math - Springtime Subtraction

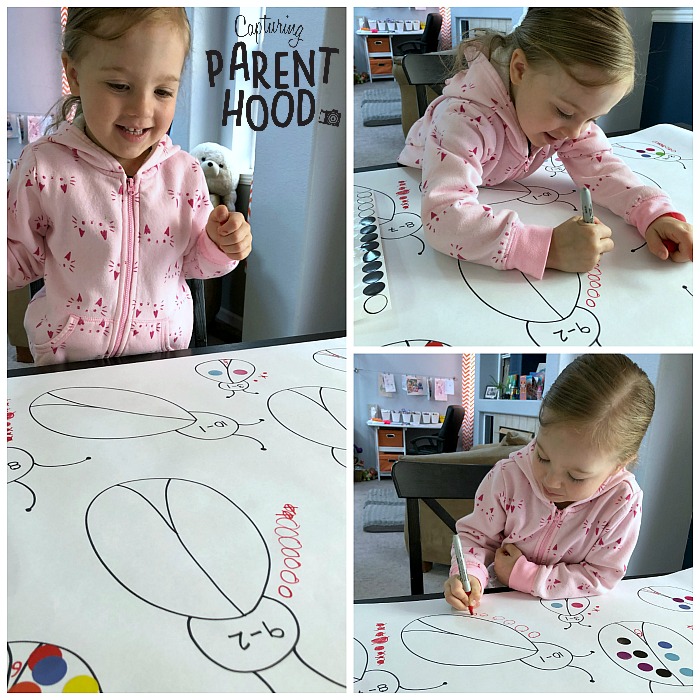
All you need is a large sheet of white butcher/craft paper, colorful dot stickers, and a marker (or two). Grab a marker and start drawing several large ladybugs on the sheet of butcher paper. Make sure not to add the ladybug’s dots – that is what the stickers are for – but feel free to add some antennae. πŸ™‚ Now, write a simple subtraction equation inside the head of each ladybug. Spread the butcher paper out on a flat surface and hand your little one the dot stickers, as well as a marker.

It is a lot easier for early learners to visualize the equation…so our little nugget would look at the first number in each equation, and draw that many circles next to the ladybug. She would then glance at the second number in the equation, and cross out that many dots. Next, she would count how many dots (that were not crossed out) were remaining to discover the answer to the equation. She wrote her answers in the little space on each ladybug where the wings separate. Once she had her answer written down, she would then apply the same number of dot stickers to each ladybug. And I’m very happy to report that she thoroughly enjoyed this multi-faceted math activity!


What are a few of your go-to websites for preschool/kindergarten learning printables and activities? I would love to hear your recommendations in the comments below!

START SPREADING THE NEWS!

Related Posts

  • Spray Bottle PaintingSpray Bottle Painting
  • Homemade Halloween SlimeHomemade Halloween Slime
  • Winter Wonderland Arts + CraftsWinter Wonderland Arts + Crafts
  • Baked Double-Chocolate DonutsBaked Double-Chocolate Donuts
« Air-Dry Clay Bugs
Chocolate Cookies & Cream Ice Cream Cake »

Hello! Nice to meet you!

Welcome to the Capturing Parenthood blog! I'm Stacey...wife and first-time parent, former full-time working mom, turned stay-at-home mom. Join me as I capture and share my thoughts and experiences on this crazy adventure we call parenthood! Click here to learn more about me!

Search Capturing Parenthood

Instagram

Ok...@artwithmrs.e Haunted House project is hands- Ok...@artwithmrs.e Haunted House project is hands-down the best Halloween-themed art project out there! πŸ™ŒπŸ™ŒπŸ™Œ
We had a blast creating haunted houses for homeschool art this month! 🧑
...
We followed Kaitlyn's extremely helpful Haunted House Drawing Guide (you can find it over on her Teachers Pay Teachers account) and completed the project over the course of 3 lessons.
...
During our first lesson, we sketched our houses in pencil, and added some eerie exterior landscaping. πŸͺ¦πŸ¦‡
We popped in a few spooky characters (ghosts, spiders, pumpkins, and a vampire). πŸ‘»πŸ•·πŸŽƒπŸ§›
And then we traced over our pencil lines with black Sharpie.
...
During our next lesson, we used a coloring technique that we learned from Kristian @friendsartlab ❀️ We colored our pictures with oil pastels...and then painted over the top of the oil pastels with baby oil...it causes the oil pastels to bleed and blend together! 🀩
...
During our final lesson...we added more spooky characters to the inside of our house...that can peek out behind the doors and windows. πŸ’€πŸ§™β€β™€οΈπŸ‘»
To do this...I used an X-acto knife and carefully cut around the outside edges of the doors/windows (leaving the hinge sides intact so that they could fold open and closed).
We placed yellow construction paper in the background...and added witches, ghosts, skeletons, a mummy, and a Frankenstein! 😍
This step made our haunted houses really come to life...and we just can't thank Kaitlyn @artwithmrs.e enough for sharing this awesome lesson and drawing guide! THE ABSOLUTE BEST! ❀️❀️❀️
...
It was very evident how much our daughter loved this project...as we worked through each step...but the thing that solidified just how much she enjoyed it was - one weekend morning I walked downstairs to find her and her dad sitting at the table - and she was very excitedly teaching him how to draw his own haunted house - while she drew a few more herself (scroll to the last picture in the carousel)! πŸ₯°
...
#hauntedhouse #hauntedhouses #hauntedhousedrawing #directeddrawing #spookyart #halloween #happyhalloween #halloweenart #halloweenfun #elementaryart #homeschoolart #homeschool #homeschoolfun #capturingparenthood
I decided that these six little pumpkins needed a I decided that these six little pumpkins needed a permanent place on our feed...because WE GREW THEM OURSELVES!!! πŸŽƒ
That's right...first-time pumpkin-growers over here...and it was all actually a bit of a surprise. πŸ˜ƒ
...
You see, when we went to prep our garden beds this spring, we noticed a plant that had already started growing. We assumed it was a cucumber plant, since it was in the same place we had cucumbers last year.
We left it alone and planted a couple of other cucumber plants nearby. πŸ₯’
At first, the leaves on our mystery plant looked very similar to the leaves on our other cucumber plants.
But a couple of weeks later the plant had grown A LOT bigger. It was now obvious that it was not a cucumber plant. But what was it? πŸ€·β€β™€οΈ
...
And that's when it suddenly dawned on these exhausted parents, that our daughter had spontaneously tossed seeds from her pumpkin (last Halloween), into the garden bed. πŸ€¦β€β™€οΈ The mystery was finally solved...and by the looks of the large golden flowers that were emerging all over the vines...we figured we might have a few pumpkins come fall! πŸ™ŒπŸŽƒπŸ™Œ
...
It was so much fun to watch the pumpkin plant grow! 🀩 We had to cut down the wire on one side of our garden bed to let the vines out...and they ended up growing 6-10 feet long in both directions! 😳 It was crazy!
They put out the most gorgeous flowers...that the bees absolutely loved! 🧑 And soon enough, we spotted a few round gourds growing at the base of some of the flowers. They grew quickly...and then turned a beautiful shade of orange! 😍
...
Needless to say, we are now officially pumpkin-growing people! πŸ˜‚ My husband can't wait to plant more next year...and he's already looking in to different varieties - hoping to grow some larger jack-o-lantern style ones next season! πŸŽƒ
…
#pumpkins #growingpumpkins #ourpumpkinpatch #homegrownpumpkins #homegrown #homegarden #pumpkingrowing #gardening #fallharvest #happyhalloween #timetocarvesomepumpkins #gardensurprises #gardenfun #capturingparenthood
Free the Frankensteins from the Frozen Rainbow Bra Free the Frankensteins from the Frozen Rainbow Brain! 😬🌈🧠
…
Yesterday, we shared how we made this colorful, frozen rainbow brain - full of Frankenstein mini erasers…and today we wanted to show you what became of our beautiful brain! πŸ˜ƒ
…
We popped it out onto a tray, grabbed a shaker of salt, a bottle of warm water (colored red for added effect), and some tongs.
And then it was time to Free the Frankensteins (our daughter coined the phrase)! πŸ˜‰
…
This spooky activity provides chilly sensory play, motor skills practice, and scientific exploration (salt and warm water speed-up the melting process)! πŸ™ŒπŸ™ŒπŸ™Œ
As an added bonus…you also get some color-mixing! And the addition of the salt makes it extra sparkly too! 😍🀩😍
…
Eventually, all you’re left with is some mini erasers floating in a pool of colorful water…and a happy kid! ❀️❀️❀️
…
#frozenbrain #rainbowbrain #frozenrainbowbrain #brains #freethefrankensteins #halloween #happyhalloween #halloweenactivities #halloweenactivitiesforkids #halloweensensoryplay #sensoryplay #sensoryexploration #motorskills #motorskillsdevelopment #scienceforkids #kidscience #funactivities #funactivitiesforkids #halloweenfun #capturingparenthood
We are definitely getting into the fall and Hallow We are definitely getting into the fall and Halloween spirit...so during a recent homeschool art session, we decided to make some air-dry clay pumpkins and jack-o-lanterns! πŸŽƒπŸŽƒπŸŽƒ
...
Back in 2019, Lauralee @2art.chambers shared several colorful, air-dry clay pumpkins that her students made...and after rediscovering the saved post, I decided that it would be a perfect October art lesson for us too! 🧑
...
We used various colors of air-dry clay, and rolled each color into whatever pumpkin shape we wanted...and then we added our lines/indentations using the side of a credit card. πŸ’³ The stems are just small, broken pieces of old crayons (another genius idea from Lauralee). πŸ– And we topped our stems with pieces of pipe cleaner, to create the little curly cues. 😍
...
Once we had our pumpkins...we decided to change things up a bit, and grabbed our stash of googly eyes. πŸ‘€ (Most of) our fall pumpkins then transformed into Halloween jack-o-lanterns! πŸŽƒ
We pressed the googly eyes into the clay, and we used a few small tools (that came with our box of air-dry clay) to add their mouths. πŸ˜ƒ
...
And now we have a cute and colorful crew of clay pumpkins adorning our mantle! πŸŽƒπŸ§‘πŸŽƒ
...
#pumpkins #jackolanterns #claypumpkins #airdryclay #airdryclaycreation #airdryclayart #airdryclaypumpkins #elementaryart #fallartprojects #fallartprojectsforkids #halloweenart #halloweenartprojects #halloweenartprojectsforkids #homeschool #homeschoolart #homeschoolfun #halloween #happyhalloween #capturingparenthood
Andrew from @elementaryarts shared a patterned, bl Andrew from @elementaryarts shared a patterned, block letter name project a couple of weeks ago (I'll share the post in stories today), and I immediately added it to our list of art projects to do this year! 😍
But we decided to switch things up a little bit! Instead of using our names, we each picked a color that we like...wrote the name of the color in block letters on our paper...and created our color patterns using at least two different shades of our chosen color. πŸ–
...
This colorful project ended up being a lot of fun, and also very relaxing...as we all quietly focused, and zoned in on adding the color patterns around all of our letters. It was actually a bit hypnotizing! 🀩
...
Needless to say, we are really happy with the way our block letter color project turned out! πŸ™Œ We even had a special guest who wanted to join in on this art project! ❀️
...
P.S. We also used Andrew’s free TPT handout on how to make block letters! The bundle includes bubble letters, cursive letters, graffiti letters, and more! πŸ‘
…
#blockletters #blocklettering #colors #color #colorful #artproject #artforkids #kidart #elementaryart #artactivity #artactivities #artactivitiesforkids #colorfun #homeschool #homeschoolart #homeschoolfun #capturingparenthood
We created self-portraits for our first art projec We created self-portraits for our first art project of our homeschool year...and we are pretty obsessed with them! 🀩✏️🀩
...
I love the idea of doing a self-portrait project at the beginning of the year, and then again at the end of the year...so that we can see how much we've grown and changed.
...
We used Kaitlyn's @artwithmrs.e Simple Self-Portrait Drawing Guide and it was so incredibly helpful (especially for this new homeschool teacher who wouldn't necessarily list drawing as one of her stronger suits). πŸ˜‰
We actually purchased her entire Guided Drawing Bundle (over on Teachers Pay Teachers) and we highly recommend it! πŸ™ŒπŸ™ŒπŸ™Œ
...
We looked through the self-portrait drawing guide to get different ideas for our eyes, nose, mouth, and hair. πŸ‘€πŸ‘ƒπŸ‘„
...
Now...if you caught our stories earlier this week, you know that our daughter recently made a pretty big change to her hair (that included a partial side-shave and bob-length cut - she also dyed it blue). πŸ’‡β€β™€οΈ
She was used to drawing pictures of herself with her long, blonde locks...and her new hairstyle proved rather difficult. But she persevered, and ended up with a self-portrait that she was truly proud of! πŸ₯°
...
When we were finished drawing our likenesses, we decided to cut them out and create a special background to glue them onto. I went with random black and white designs...and our nugget decided to draw various things that she loves (her family, winter, candy, books, dolphins...and more)! ❀️
...
It was such a fun project...and I can't wait to see what our self-portraits look like at the end of our school year! πŸ˜ƒ
...
#selfportrait #selfportraits #homeschool #homeschoolart #elementaryart #artactivities #artactivitiesforkids #artforkids #kidart #homeschoolfun #capturingparenthood
Follow on Instagram

Popular Posts

Virtual Spring Break: Day Five - New York City

Virtual Spring Break: Day Five – New York City

Virtual Spring Break: Day Four - Mexico

Virtual Spring Break: Day Four – Mexico

Virtual Spring Break: Day Three - India

Virtual Spring Break: Day Three – India

Join Us on Instagram

Ok...@artwithmrs.e Haunted House project is hands- Ok...@artwithmrs.e Haunted House project is hands-down the best Halloween-themed art project out there! πŸ™ŒπŸ™ŒπŸ™Œ
We had a blast creating haunted houses for homeschool art this month! 🧑
...
We followed Kaitlyn's extremely helpful Haunted House Drawing Guide (you can find it over on her Teachers Pay Teachers account) and completed the project over the course of 3 lessons.
...
During our first lesson, we sketched our houses in pencil, and added some eerie exterior landscaping. πŸͺ¦πŸ¦‡
We popped in a few spooky characters (ghosts, spiders, pumpkins, and a vampire). πŸ‘»πŸ•·πŸŽƒπŸ§›
And then we traced over our pencil lines with black Sharpie.
...
During our next lesson, we used a coloring technique that we learned from Kristian @friendsartlab ❀️ We colored our pictures with oil pastels...and then painted over the top of the oil pastels with baby oil...it causes the oil pastels to bleed and blend together! 🀩
...
During our final lesson...we added more spooky characters to the inside of our house...that can peek out behind the doors and windows. πŸ’€πŸ§™β€β™€οΈπŸ‘»
To do this...I used an X-acto knife and carefully cut around the outside edges of the doors/windows (leaving the hinge sides intact so that they could fold open and closed).
We placed yellow construction paper in the background...and added witches, ghosts, skeletons, a mummy, and a Frankenstein! 😍
This step made our haunted houses really come to life...and we just can't thank Kaitlyn @artwithmrs.e enough for sharing this awesome lesson and drawing guide! THE ABSOLUTE BEST! ❀️❀️❀️
...
It was very evident how much our daughter loved this project...as we worked through each step...but the thing that solidified just how much she enjoyed it was - one weekend morning I walked downstairs to find her and her dad sitting at the table - and she was very excitedly teaching him how to draw his own haunted house - while she drew a few more herself (scroll to the last picture in the carousel)! πŸ₯°
...
#hauntedhouse #hauntedhouses #hauntedhousedrawing #directeddrawing #spookyart #halloween #happyhalloween #halloweenart #halloweenfun #elementaryart #homeschoolart #homeschool #homeschoolfun #capturingparenthood
I decided that these six little pumpkins needed a I decided that these six little pumpkins needed a permanent place on our feed...because WE GREW THEM OURSELVES!!! πŸŽƒ
That's right...first-time pumpkin-growers over here...and it was all actually a bit of a surprise. πŸ˜ƒ
...
You see, when we went to prep our garden beds this spring, we noticed a plant that had already started growing. We assumed it was a cucumber plant, since it was in the same place we had cucumbers last year.
We left it alone and planted a couple of other cucumber plants nearby. πŸ₯’
At first, the leaves on our mystery plant looked very similar to the leaves on our other cucumber plants.
But a couple of weeks later the plant had grown A LOT bigger. It was now obvious that it was not a cucumber plant. But what was it? πŸ€·β€β™€οΈ
...
And that's when it suddenly dawned on these exhausted parents, that our daughter had spontaneously tossed seeds from her pumpkin (last Halloween), into the garden bed. πŸ€¦β€β™€οΈ The mystery was finally solved...and by the looks of the large golden flowers that were emerging all over the vines...we figured we might have a few pumpkins come fall! πŸ™ŒπŸŽƒπŸ™Œ
...
It was so much fun to watch the pumpkin plant grow! 🀩 We had to cut down the wire on one side of our garden bed to let the vines out...and they ended up growing 6-10 feet long in both directions! 😳 It was crazy!
They put out the most gorgeous flowers...that the bees absolutely loved! 🧑 And soon enough, we spotted a few round gourds growing at the base of some of the flowers. They grew quickly...and then turned a beautiful shade of orange! 😍
...
Needless to say, we are now officially pumpkin-growing people! πŸ˜‚ My husband can't wait to plant more next year...and he's already looking in to different varieties - hoping to grow some larger jack-o-lantern style ones next season! πŸŽƒ
…
#pumpkins #growingpumpkins #ourpumpkinpatch #homegrownpumpkins #homegrown #homegarden #pumpkingrowing #gardening #fallharvest #happyhalloween #timetocarvesomepumpkins #gardensurprises #gardenfun #capturingparenthood
Free the Frankensteins from the Frozen Rainbow Bra Free the Frankensteins from the Frozen Rainbow Brain! 😬🌈🧠
…
Yesterday, we shared how we made this colorful, frozen rainbow brain - full of Frankenstein mini erasers…and today we wanted to show you what became of our beautiful brain! πŸ˜ƒ
…
We popped it out onto a tray, grabbed a shaker of salt, a bottle of warm water (colored red for added effect), and some tongs.
And then it was time to Free the Frankensteins (our daughter coined the phrase)! πŸ˜‰
…
This spooky activity provides chilly sensory play, motor skills practice, and scientific exploration (salt and warm water speed-up the melting process)! πŸ™ŒπŸ™ŒπŸ™Œ
As an added bonus…you also get some color-mixing! And the addition of the salt makes it extra sparkly too! 😍🀩😍
…
Eventually, all you’re left with is some mini erasers floating in a pool of colorful water…and a happy kid! ❀️❀️❀️
…
#frozenbrain #rainbowbrain #frozenrainbowbrain #brains #freethefrankensteins #halloween #happyhalloween #halloweenactivities #halloweenactivitiesforkids #halloweensensoryplay #sensoryplay #sensoryexploration #motorskills #motorskillsdevelopment #scienceforkids #kidscience #funactivities #funactivitiesforkids #halloweenfun #capturingparenthood
We are definitely getting into the fall and Hallow We are definitely getting into the fall and Halloween spirit...so during a recent homeschool art session, we decided to make some air-dry clay pumpkins and jack-o-lanterns! πŸŽƒπŸŽƒπŸŽƒ
...
Back in 2019, Lauralee @2art.chambers shared several colorful, air-dry clay pumpkins that her students made...and after rediscovering the saved post, I decided that it would be a perfect October art lesson for us too! 🧑
...
We used various colors of air-dry clay, and rolled each color into whatever pumpkin shape we wanted...and then we added our lines/indentations using the side of a credit card. πŸ’³ The stems are just small, broken pieces of old crayons (another genius idea from Lauralee). πŸ– And we topped our stems with pieces of pipe cleaner, to create the little curly cues. 😍
...
Once we had our pumpkins...we decided to change things up a bit, and grabbed our stash of googly eyes. πŸ‘€ (Most of) our fall pumpkins then transformed into Halloween jack-o-lanterns! πŸŽƒ
We pressed the googly eyes into the clay, and we used a few small tools (that came with our box of air-dry clay) to add their mouths. πŸ˜ƒ
...
And now we have a cute and colorful crew of clay pumpkins adorning our mantle! πŸŽƒπŸ§‘πŸŽƒ
...
#pumpkins #jackolanterns #claypumpkins #airdryclay #airdryclaycreation #airdryclayart #airdryclaypumpkins #elementaryart #fallartprojects #fallartprojectsforkids #halloweenart #halloweenartprojects #halloweenartprojectsforkids #homeschool #homeschoolart #homeschoolfun #halloween #happyhalloween #capturingparenthood
Andrew from @elementaryarts shared a patterned, bl Andrew from @elementaryarts shared a patterned, block letter name project a couple of weeks ago (I'll share the post in stories today), and I immediately added it to our list of art projects to do this year! 😍
But we decided to switch things up a little bit! Instead of using our names, we each picked a color that we like...wrote the name of the color in block letters on our paper...and created our color patterns using at least two different shades of our chosen color. πŸ–
...
This colorful project ended up being a lot of fun, and also very relaxing...as we all quietly focused, and zoned in on adding the color patterns around all of our letters. It was actually a bit hypnotizing! 🀩
...
Needless to say, we are really happy with the way our block letter color project turned out! πŸ™Œ We even had a special guest who wanted to join in on this art project! ❀️
...
P.S. We also used Andrew’s free TPT handout on how to make block letters! The bundle includes bubble letters, cursive letters, graffiti letters, and more! πŸ‘
…
#blockletters #blocklettering #colors #color #colorful #artproject #artforkids #kidart #elementaryart #artactivity #artactivities #artactivitiesforkids #colorfun #homeschool #homeschoolart #homeschoolfun #capturingparenthood
We created self-portraits for our first art projec We created self-portraits for our first art project of our homeschool year...and we are pretty obsessed with them! 🀩✏️🀩
...
I love the idea of doing a self-portrait project at the beginning of the year, and then again at the end of the year...so that we can see how much we've grown and changed.
...
We used Kaitlyn's @artwithmrs.e Simple Self-Portrait Drawing Guide and it was so incredibly helpful (especially for this new homeschool teacher who wouldn't necessarily list drawing as one of her stronger suits). πŸ˜‰
We actually purchased her entire Guided Drawing Bundle (over on Teachers Pay Teachers) and we highly recommend it! πŸ™ŒπŸ™ŒπŸ™Œ
...
We looked through the self-portrait drawing guide to get different ideas for our eyes, nose, mouth, and hair. πŸ‘€πŸ‘ƒπŸ‘„
...
Now...if you caught our stories earlier this week, you know that our daughter recently made a pretty big change to her hair (that included a partial side-shave and bob-length cut - she also dyed it blue). πŸ’‡β€β™€οΈ
She was used to drawing pictures of herself with her long, blonde locks...and her new hairstyle proved rather difficult. But she persevered, and ended up with a self-portrait that she was truly proud of! πŸ₯°
...
When we were finished drawing our likenesses, we decided to cut them out and create a special background to glue them onto. I went with random black and white designs...and our nugget decided to draw various things that she loves (her family, winter, candy, books, dolphins...and more)! ❀️
...
It was such a fun project...and I can't wait to see what our self-portraits look like at the end of our school year! πŸ˜ƒ
...
#selfportrait #selfportraits #homeschool #homeschoolart #elementaryart #artactivities #artactivitiesforkids #artforkids #kidart #homeschoolfun #capturingparenthood
Follow on Instagram

Copyright © 2025 · glam theme by Restored 316

  • Policies + Disclosure
  • Contact