• Home
  • About
  • Kid Zone
    • Activities
    • Arts + Crafts
    • Books Books Books
  • Food
    • Family-Friendly
    • Kids
    • Sweets
    • Dog-Friendly
  • Life + Motherhood
    • Pregnancy
    • Parenting
    • House + Home
  • Let’s Party
    • Birthdays
    • Holidays
    • Instagram
    • Pinterest

Capturing Parenthood

Winter-Themed Arts + Crafts for Kids

in Arts + Crafts, Toddler Zone on January 18, 2018

We’ve been busy celebrating the coldest season of the year…snuggling up to read some wonderful winter stories (if you caught our post on Tuesday), playing in the snow (when we are lucky enough to get it), and decorating our home with these fun Winter-Themed Arts + Crafts for Kids!

Winter-Themed Arts + Crafts for Kids Β© Capturing Parenthood

We’ve loved breaking out the glitter, exploring the wonders of homemade puffy paint, coloring with our Do-A-Dot markers, creating a fabulously fun window decoration, and more! Keep scrolling to find out how we made each of these wonderful Winter-Themed Arts + Crafts!


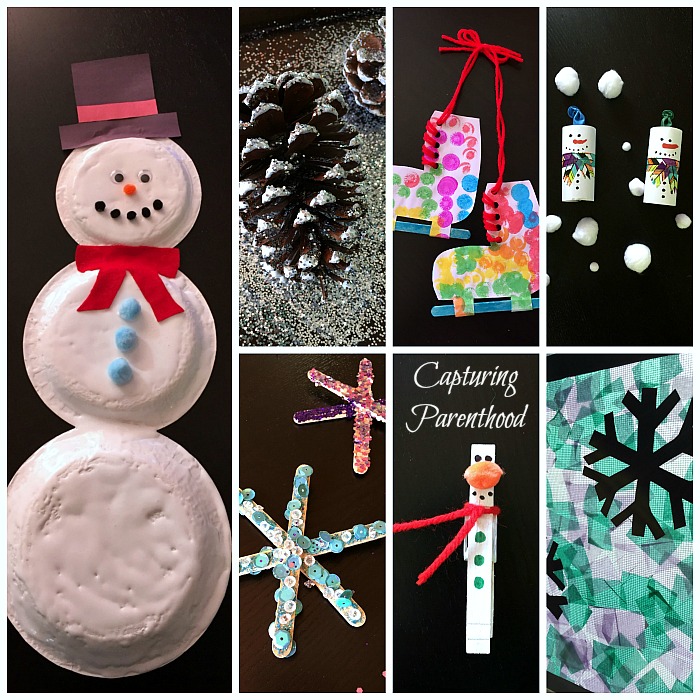
Paper Plate Puffy Paint Snowman

Winter-Themed Arts + Crafts for Kids Β© Capturing Parenthood

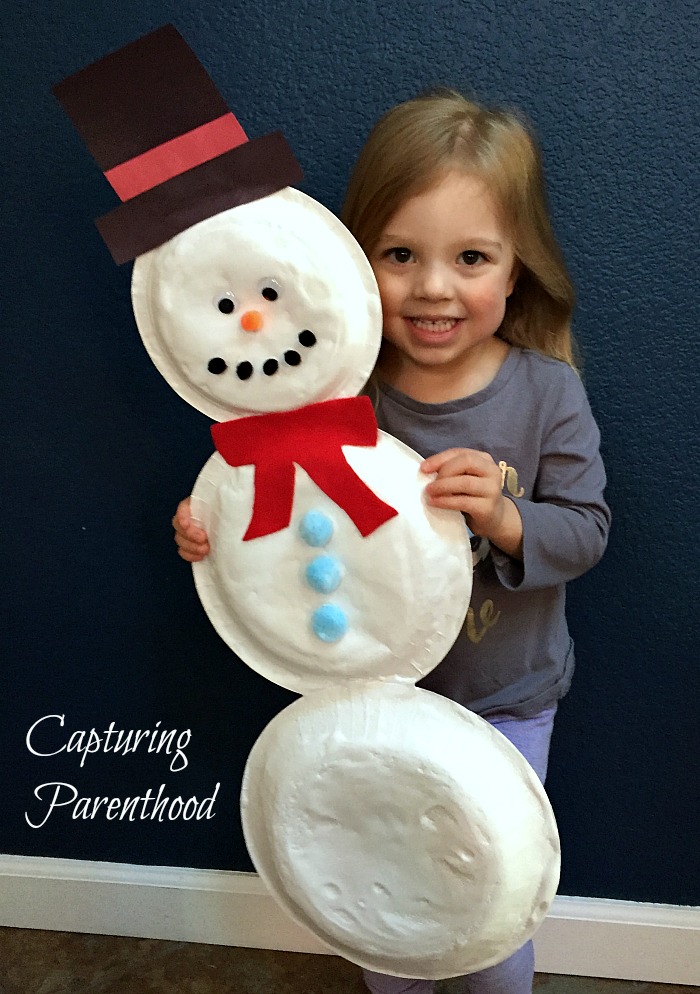
I came across the idea for a puffy paint snowman, over on The Resourceful Mama! I loved how Kim’s snowman face turned out, and I knew that the puffy paint would add a whole new sensory element. Our little nugget loved using the thicker paint, and exploring the new texture. She also enjoyed decorating her snowman…especially adding the bright blue buttons! πŸ™‚

Winter-Themed Arts + Crafts for Kids Β© Capturing Parenthood

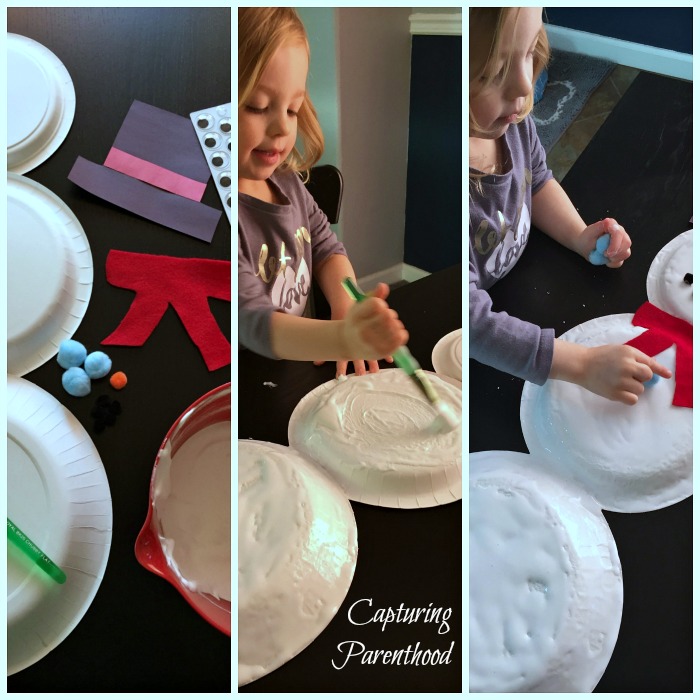
We chose to go big and create an entire snowman, so we started by taping three various sizes of paper plates together. Then it was time to mix up a batch of homemade puffy paint…to do this you just mix equal parts shaving cream and Elmer’s school glue. While our little nugget kept busy painting her giant snowman, I cut a simple top hat out of construction paper, a faux scarf from a piece of red felt, and gathered up a pair of googly eyes, a small orange pom, a handful of small black poms, and three larger blue poms. Once the snowman was completely covered in puffy paint, it was time to decorate! Make sure to stick on all your decorations while the paint is still wet. Since the puffy paint is made up of part glue, the decorations will automatically adhere to the snowman, saving you an additional round of gluing later on. Once the decorations are complete, set the snowman aside to dry completely.

Once the paint has dried, feel free to sing a quick round of Frosty the Snowman…or your own rendition of the song (like our little nugget chose to do). πŸ™‚ This little girl brings a smile to my face every single day!

Sparkly & Snowy Pine Cones

Winter-Themed Arts + Crafts for Kids Β© Capturing Parenthood

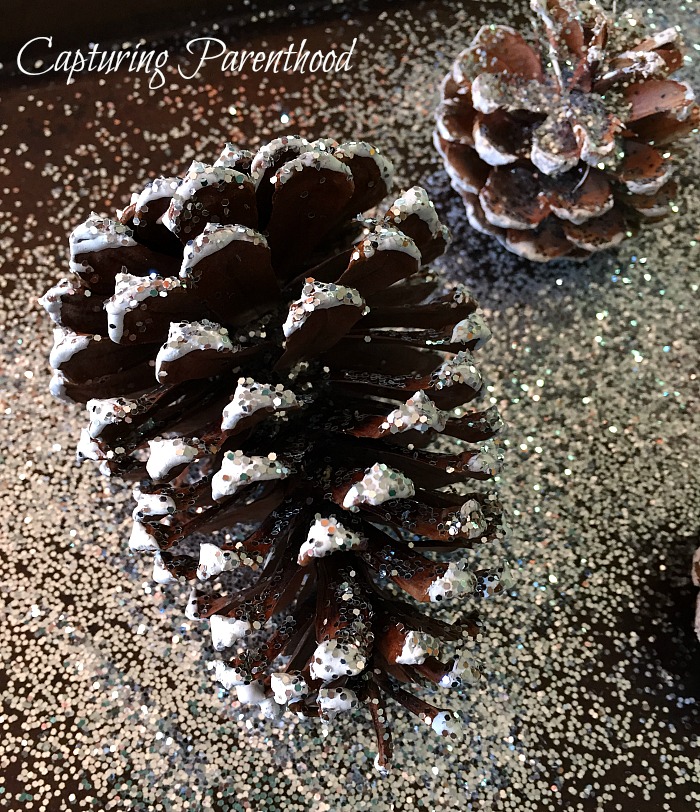
Don’t you just love how the ice and snow make everything sparkle during the winter? I love taking walks outside after a new blanket of snow has fallen. The way the sun glistens off of the snow-covered trees is simply magical. We wanted to bring a little bit of that sparkle inside, and these sparkly and snowy pine cones were just the trick!

Winter-Themed Arts + Crafts for Kids Β© Capturing Parenthood

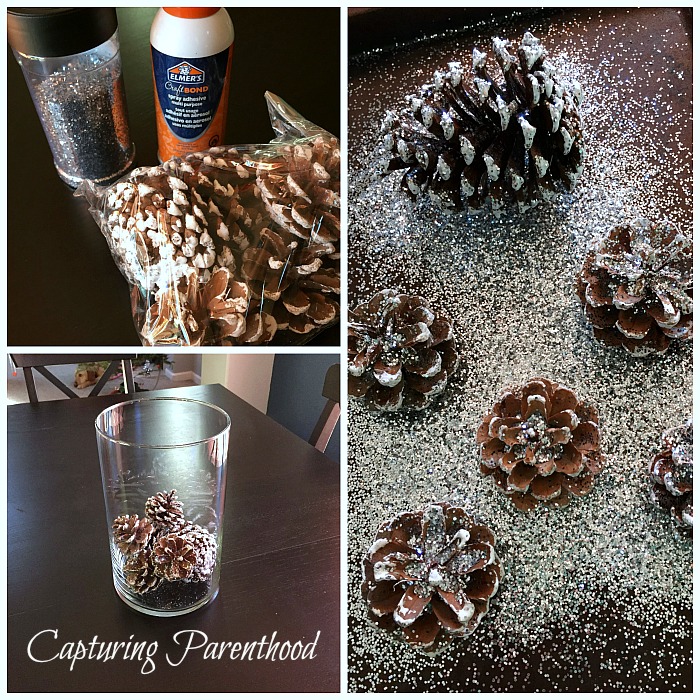
I stumbled upon the idea for this simple craft over at the Kids Craft Room! Emma’s photos of her frosty pine cones were all the inspiration I needed. I waltzed over to our nearest craft store and purchased a bag of pine cones, that just so happened to already be snow-covered (i.e. tipped with white paint). All that was left to do was to make them sparkle. We chose to utilize a can of spray adhesive. That being said, make sure to lay down some newspaper, as this crafts gets a little messy (we used a cookie sheet that was long ago designated as our crafting cookie sheet…thus it is never used for any food preparation). πŸ™‚ Place the pine cones on the prepared surface and coat with the spray adhesive. Sprinkle on the silver glitter and let stand for several minutes, before turning the pine cones over to repeat on the alternate side.

Winter-Themed Arts + Crafts for Kids Β© Capturing Parenthood

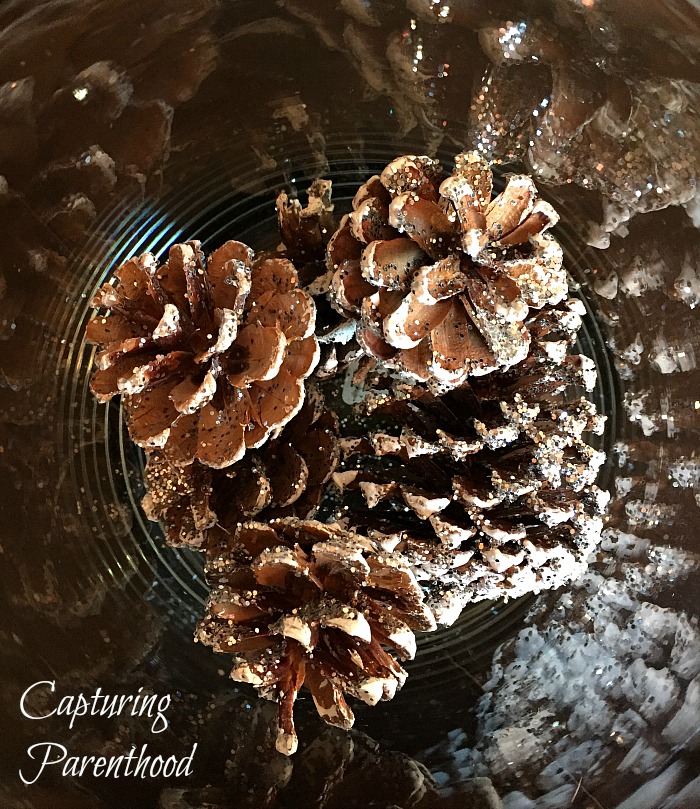
Once the pine cones have dried completely, it’s time to put them on display. Emma chose to hang her pine cones, which looked beautiful. We chose to place our sparkly and snowy pine cones in a large glass cylinder, and utilize it as the centerpiece for our dining room table. We love how the glitter sparkles when it catches the light from our dining room fixture!

Paper & Popsicle Stick Ice Skates

Winter-Themed Arts + Crafts for Kids Β© Capturing Parenthood

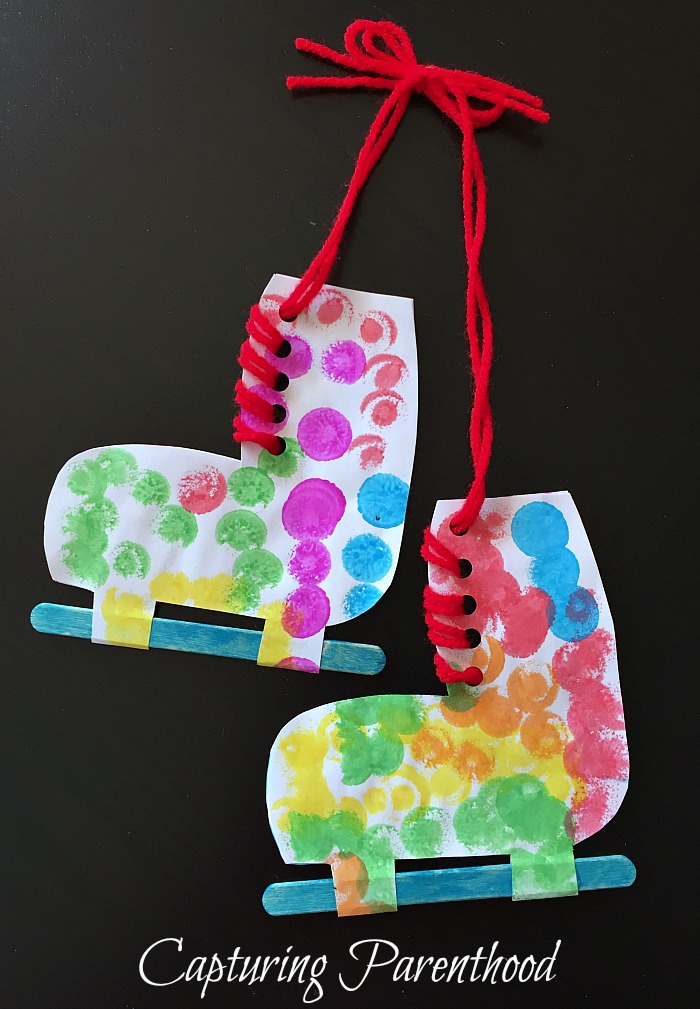
It was during an outing to a local park this winter, that we happened upon an ice skating rink. Our little nugget’s eyes widened with excitement and intrigue. She immediately wanted to lace up a pair of ice skates and slide out onto the rink. As it turned out, the age limit for the rink was 4-and-up, so we promised to return next winter. And to tide us over this season…we decided to make our very own pair of colorful ice skates, utilizing some white paper, two popsicle sticks, Do-A-Dot markers, a little bit of glue, and a couple strands of yarn!

Winter-Themed Arts + Crafts for Kids Β© Capturing Parenthood

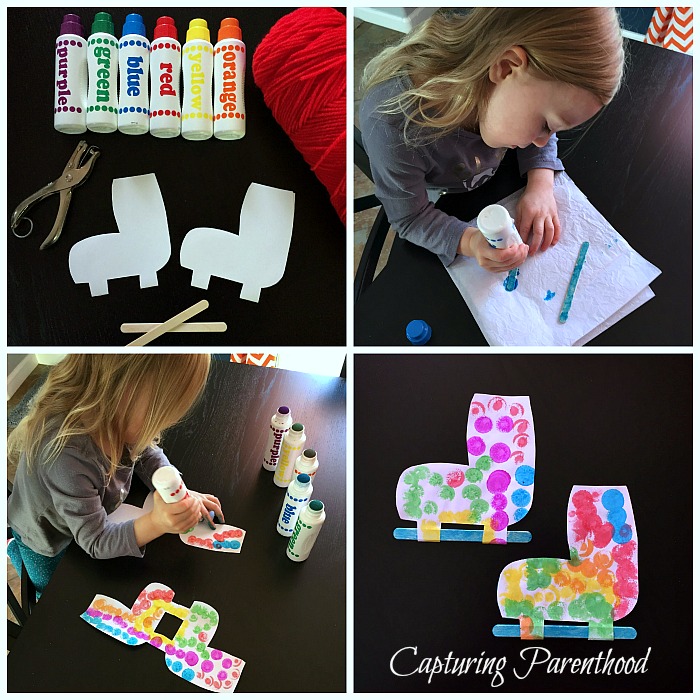
While our little nugget was busy turning the popsicle sticks blue (using her dot markers), I folded a piece of paper in two and cut out a simple boot shape, that I then replicated with another piece of white paper. I made sure to leave the two bottom components of each skate attached…this provided the resting place for our popsicle sticks when we folded the pieces of paper back together. Once the paper skates were cut out, it was time to stamp them with an array of beautiful colors. If your kiddos are anything like mine (i.e. heavy-handed on the dot marker stamping), your paper skates might start rolling up as they dry. Nothing that laying them flat underneath a couple of heavy books can’t fix! Once the paper is dry, attach the popsicle sticks with a small dab of glue, and then proceed by gluing the two interior sides of each paper skate together. Set aside for the glue to dry completely. The final step is to add the laces. We accomplished this by simply weaving yarn through a handful of holes that we created using a single-hole punch. Then we tied the pair of skates together and it was off to the ice rink…well, in our dreams at least! πŸ™‚

Snowman Snowball Shooters

Winter-Themed Arts + Crafts for Kids Β© Capturing Parenthood

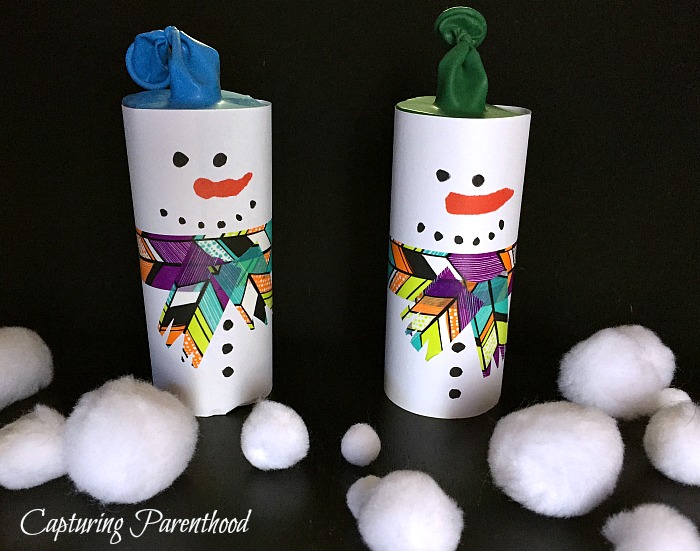
We loved constructing toilet paper tube confetti poppers this past Fourth of July, so when I came across the idea for these adorable Snowman Snowball Shooters on Playdough to Plato‘s Instagram feed (@playdough2plato) a few weeks ago, I knew a snowman snowball fight was in our future!

Winter-Themed Arts + Crafts for Kids Β© Capturing Parenthood

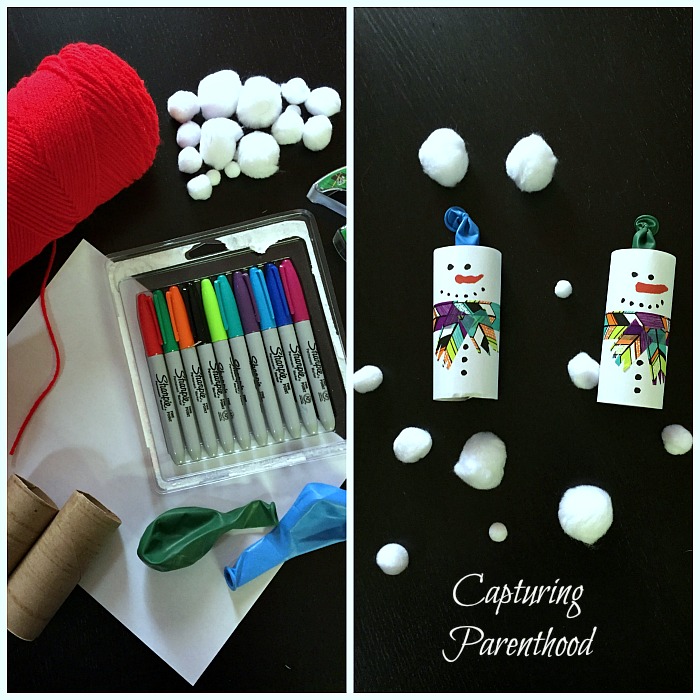
To create your own snowman snowball shooter you will need an empty toilet paper tube, and a regular latex balloon. Tie the deflated balloon as you normally would (if it were actually inflated) and then cut the balloon in half, using a pair of scissors. Keep the piece of balloon that holds the tied end, and discard the other half. Stretch the balloon over one end of the empty toilet paper tube, without causing the end of the tube to cave in on itself. Once the balloon is taut, secure it to the tube with some tape (I used clear packing tape). Next you will want to cover your tube with a piece of white paper. You can attach the paper using a few small pieces of tape. And then it’s time to bring your snowman to life…grab some markers and give your snowman some eyes, a carrot nose, a mouth, and some buttons. We like our snowmen to wear scarves, and while I was initially intending to use yarn to achieve this goal, I found that Washi Tape was much more useful! I figured if I glued a yarn scarf onto the tube, that it would just break off the moment the snowball fight commenced.

Winter-Themed Arts + Crafts for Kids Β© Capturing Parenthood

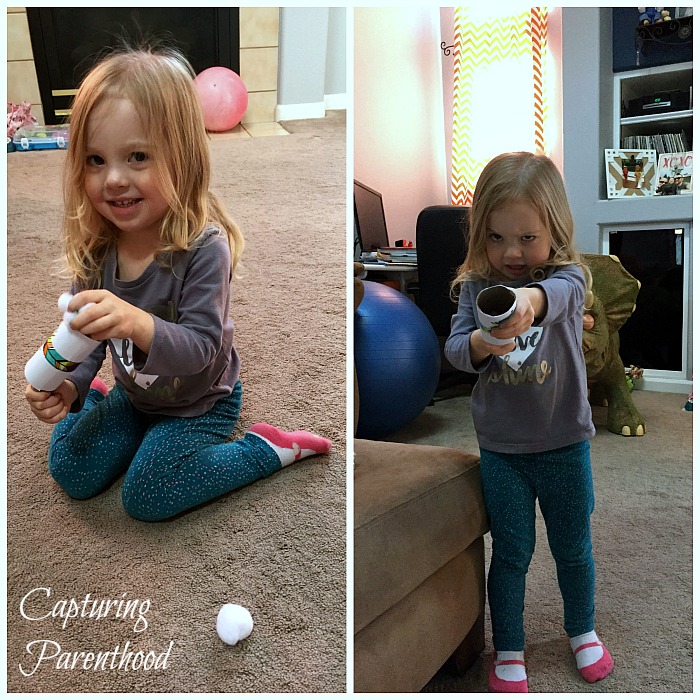
When our snowmen were complete, we gathered up a variety of white poms (you could also use some cotton balls) and set off for an epic snowball battle. I mean…the faces that our daughter was making each time she pulled back on the balloon (as she prepared to unleash a firestorm of snowballs in my direction) were absolutely legendary. I could not stop laughing. We have a fierce little fighter on our hands. πŸ™‚

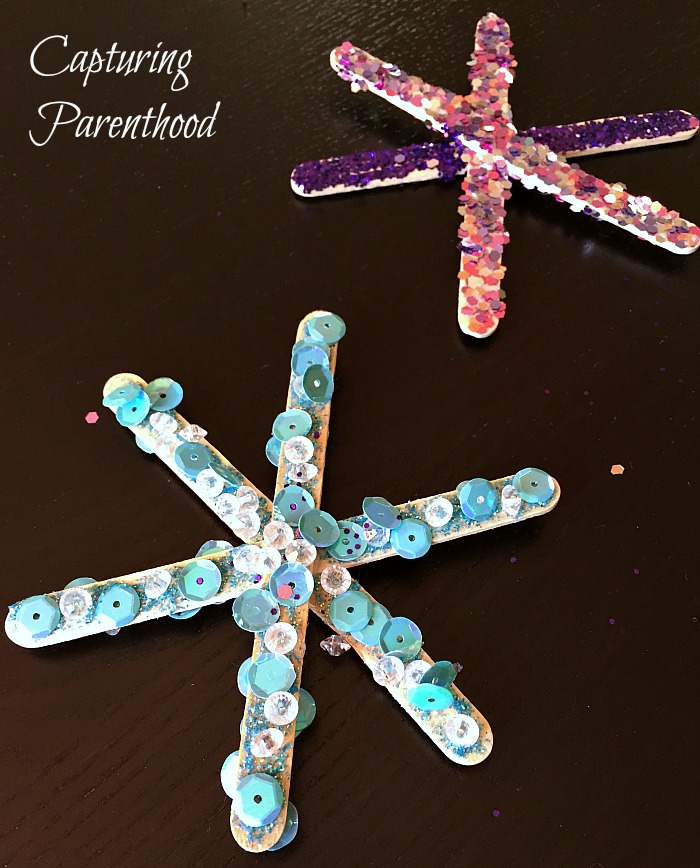
Popsicle Stick Snowflakes

Winter-Themed Arts + Crafts for Kids Β© Capturing Parenthood

We returned from our daughter’s Halloween party at school this past year, with a couple of popsicle stick spider webs. Once Halloween had passed, I removed the yarn webbing and realized that the popsicle sticks would also make wonderful snowflakes! I love being able to reuse things!

Winter-Themed Arts + Crafts for Kids Β© Capturing Parenthood

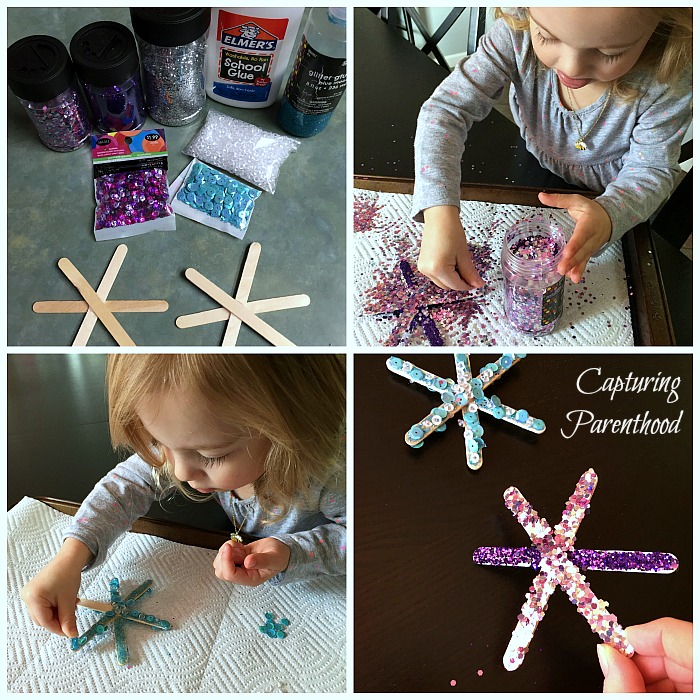
For our purple snowflake, we coated the popsicle sticks with white Elmer’s glue and then topped them with two different types of purple glitter. Once one side of the snowflake had been glued and glittered, we set it aside to dry completely, before flipping it over to repeat the process on the opposite side.

For our blue snowflake, we actually utilized some leftover blue glitter glue, blue sequins, and small clear beads that we had purchased for our Blue Glitter Glue Sensory Bottle. We coated the popsicle sticks with the glitter glue and then carefully placed the sequins and clear beads on top. We set our snowflake aside to dry, before flipping it over to repeat the process on the opposite side.

Once our snowflakes were completely dry, we wrapped some fishing line around them and hung them up for all to see!

Clothespin Snowmen

Winter-Themed Arts + Crafts for Kids Β© Capturing Parenthood

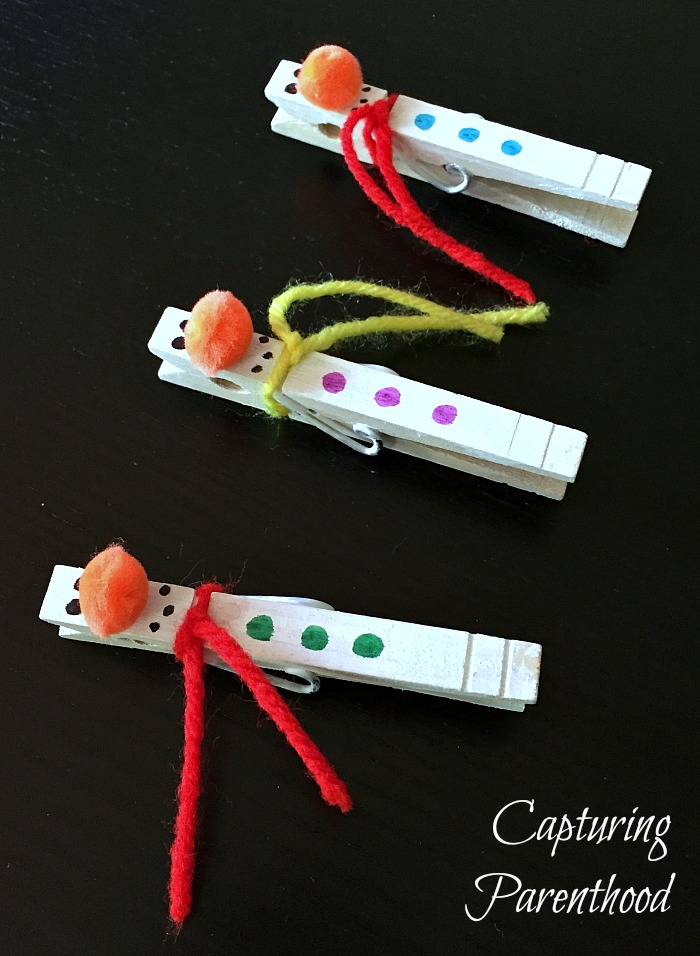
I fell in love with this adorable Clothespin Snowman Craft for Kids to Make, when I came across it over on Easy Peasy and Fun! And I figured that these snowmen would make the perfect addition to our winter-themed arts + crafts!

Winter-Themed Arts + Crafts for Kids Β© Capturing Parenthood

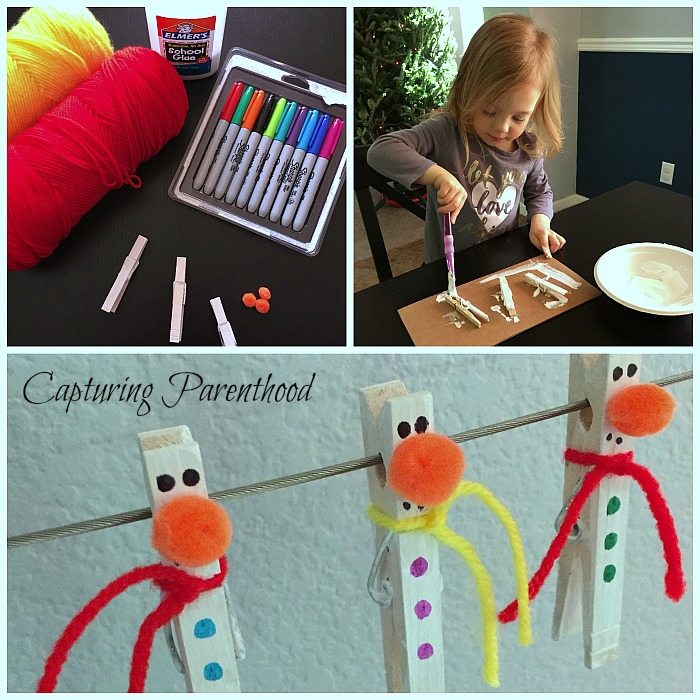
We started this fun craft by painting some clothespins white. Once all of the paint had dried, we grabbed some mini orange poms, some yarn, our colorful Sharpie markers, and some Elmer’s glue. We drew two eyes on each snowman (using a black Sharpie), and then with a small dab of glue, we attached each mini orange pom. Below the orange noses, we used our black marker to add a dotted smile. Then it was time to tie on the scarves (yarn). And lastly, we chose three different colored markers for their buttons. The best part about these cute little snowmen is that you can hang them up from just about anywhere. You could even glue a small magnet to the back of them, and utilize them to hang artwork on the refrigerator!

Wintry Faux Stained Glass Craft

Winter-Themed Arts + Crafts for Kids Β© Capturing Parenthood

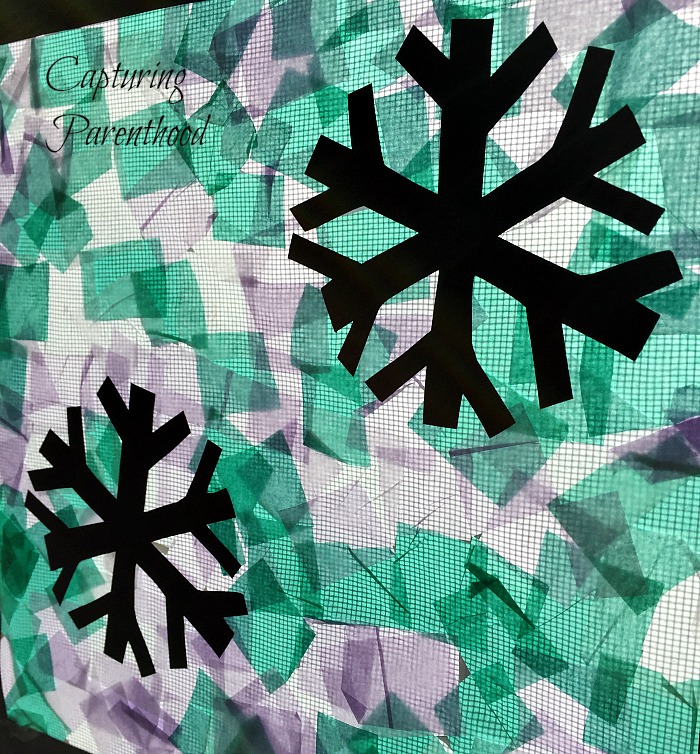
This beautiful, wintry faux stained-glass craft might just top my list of favorites for our winter crafts this year (though the ice skates come in a close second)! I absolutely love how it turned out…the way the colors light up when the sun shines down on our living room window. I find myself staring at it absentmindedly, several times a day. πŸ™‚ And our little nugget loves creating tissue paper sun-catchers…so it was a win-win!

Winter-Themed Arts + Crafts for Kids Β© Capturing Parenthood

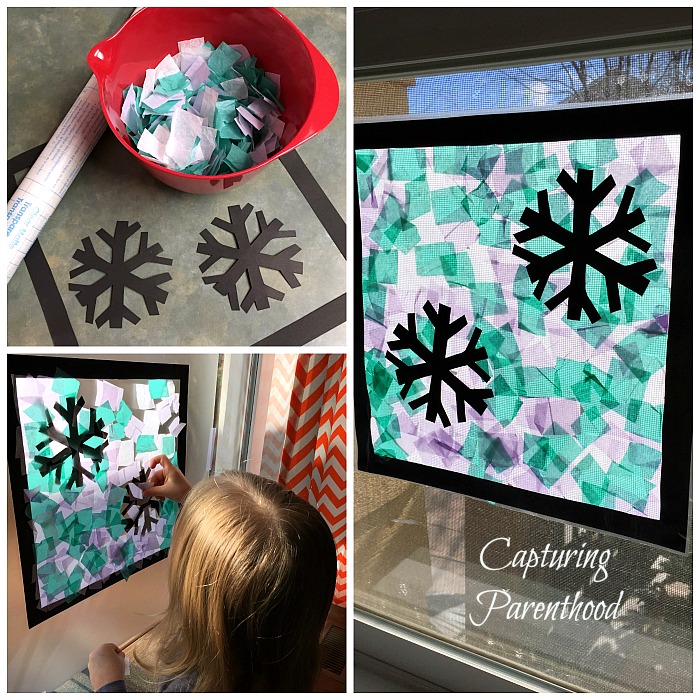
I found the idea for these “Stained Glass” Tissue Paper Winter Window Decorations over on Kinder Craze! I loved Maria’s idea, so I quickly gathered up some blue, purple, and white tissue paper, and cut them into small squares. Then I cut a border out of a piece of black construction paper. I cut two snowflakes from the remainder of the black paper. Once everything was prepped, I taped a piece of contact paper to our sliding glass door, stuck the black border and snowflakes to the contact paper, and let my little nugget go to town applying all of the tissue paper! When she was satisfied with her work, I stuck another piece of contact paper over the initial piece, pressing firmly to remove any air bubbles. I pulled the contact paper off of our sliding glass door, and cut out our faux stained glass with a pair of scissors. Finally, I taped it up in our living room window, where it adds the perfect wintry touch to the room!


And there you have it…the wonderful winter-themed arts + crafts that we’ve loved making this year! If you’re looking for more fun ideas, check out our Winter Wonderland Arts + Crafts that we created last year!

START SPREADING THE NEWS!

Related Posts

  • Snowman Crafts for KidsSnowman Crafts for Kids
  • Inspiring Books for Young GirlsInspiring Books for Young Girls
  • Virtual Spring Break: Day Five – New York CityVirtual Spring Break: Day Five – New York City
  • A Frozen Fourth Birthday PartyA Frozen Fourth Birthday Party
« Winter Books – Celebrating the Season
Marshmallow & Banana Penguins »

Hello! Nice to meet you!

Welcome to the Capturing Parenthood blog! I'm Stacey...wife and first-time parent, former full-time working mom, turned stay-at-home mom. Join me as I capture and share my thoughts and experiences on this crazy adventure we call parenthood! Click here to learn more about me!

Search Capturing Parenthood

Instagram

Ok...@artwithmrs.e Haunted House project is hands- Ok...@artwithmrs.e Haunted House project is hands-down the best Halloween-themed art project out there! πŸ™ŒπŸ™ŒπŸ™Œ
We had a blast creating haunted houses for homeschool art this month! 🧑
...
We followed Kaitlyn's extremely helpful Haunted House Drawing Guide (you can find it over on her Teachers Pay Teachers account) and completed the project over the course of 3 lessons.
...
During our first lesson, we sketched our houses in pencil, and added some eerie exterior landscaping. πŸͺ¦πŸ¦‡
We popped in a few spooky characters (ghosts, spiders, pumpkins, and a vampire). πŸ‘»πŸ•·πŸŽƒπŸ§›
And then we traced over our pencil lines with black Sharpie.
...
During our next lesson, we used a coloring technique that we learned from Kristian @friendsartlab ❀️ We colored our pictures with oil pastels...and then painted over the top of the oil pastels with baby oil...it causes the oil pastels to bleed and blend together! 🀩
...
During our final lesson...we added more spooky characters to the inside of our house...that can peek out behind the doors and windows. πŸ’€πŸ§™β€β™€οΈπŸ‘»
To do this...I used an X-acto knife and carefully cut around the outside edges of the doors/windows (leaving the hinge sides intact so that they could fold open and closed).
We placed yellow construction paper in the background...and added witches, ghosts, skeletons, a mummy, and a Frankenstein! 😍
This step made our haunted houses really come to life...and we just can't thank Kaitlyn @artwithmrs.e enough for sharing this awesome lesson and drawing guide! THE ABSOLUTE BEST! ❀️❀️❀️
...
It was very evident how much our daughter loved this project...as we worked through each step...but the thing that solidified just how much she enjoyed it was - one weekend morning I walked downstairs to find her and her dad sitting at the table - and she was very excitedly teaching him how to draw his own haunted house - while she drew a few more herself (scroll to the last picture in the carousel)! πŸ₯°
...
#hauntedhouse #hauntedhouses #hauntedhousedrawing #directeddrawing #spookyart #halloween #happyhalloween #halloweenart #halloweenfun #elementaryart #homeschoolart #homeschool #homeschoolfun #capturingparenthood
I decided that these six little pumpkins needed a I decided that these six little pumpkins needed a permanent place on our feed...because WE GREW THEM OURSELVES!!! πŸŽƒ
That's right...first-time pumpkin-growers over here...and it was all actually a bit of a surprise. πŸ˜ƒ
...
You see, when we went to prep our garden beds this spring, we noticed a plant that had already started growing. We assumed it was a cucumber plant, since it was in the same place we had cucumbers last year.
We left it alone and planted a couple of other cucumber plants nearby. πŸ₯’
At first, the leaves on our mystery plant looked very similar to the leaves on our other cucumber plants.
But a couple of weeks later the plant had grown A LOT bigger. It was now obvious that it was not a cucumber plant. But what was it? πŸ€·β€β™€οΈ
...
And that's when it suddenly dawned on these exhausted parents, that our daughter had spontaneously tossed seeds from her pumpkin (last Halloween), into the garden bed. πŸ€¦β€β™€οΈ The mystery was finally solved...and by the looks of the large golden flowers that were emerging all over the vines...we figured we might have a few pumpkins come fall! πŸ™ŒπŸŽƒπŸ™Œ
...
It was so much fun to watch the pumpkin plant grow! 🀩 We had to cut down the wire on one side of our garden bed to let the vines out...and they ended up growing 6-10 feet long in both directions! 😳 It was crazy!
They put out the most gorgeous flowers...that the bees absolutely loved! 🧑 And soon enough, we spotted a few round gourds growing at the base of some of the flowers. They grew quickly...and then turned a beautiful shade of orange! 😍
...
Needless to say, we are now officially pumpkin-growing people! πŸ˜‚ My husband can't wait to plant more next year...and he's already looking in to different varieties - hoping to grow some larger jack-o-lantern style ones next season! πŸŽƒ
…
#pumpkins #growingpumpkins #ourpumpkinpatch #homegrownpumpkins #homegrown #homegarden #pumpkingrowing #gardening #fallharvest #happyhalloween #timetocarvesomepumpkins #gardensurprises #gardenfun #capturingparenthood
Free the Frankensteins from the Frozen Rainbow Bra Free the Frankensteins from the Frozen Rainbow Brain! 😬🌈🧠
…
Yesterday, we shared how we made this colorful, frozen rainbow brain - full of Frankenstein mini erasers…and today we wanted to show you what became of our beautiful brain! πŸ˜ƒ
…
We popped it out onto a tray, grabbed a shaker of salt, a bottle of warm water (colored red for added effect), and some tongs.
And then it was time to Free the Frankensteins (our daughter coined the phrase)! πŸ˜‰
…
This spooky activity provides chilly sensory play, motor skills practice, and scientific exploration (salt and warm water speed-up the melting process)! πŸ™ŒπŸ™ŒπŸ™Œ
As an added bonus…you also get some color-mixing! And the addition of the salt makes it extra sparkly too! 😍🀩😍
…
Eventually, all you’re left with is some mini erasers floating in a pool of colorful water…and a happy kid! ❀️❀️❀️
…
#frozenbrain #rainbowbrain #frozenrainbowbrain #brains #freethefrankensteins #halloween #happyhalloween #halloweenactivities #halloweenactivitiesforkids #halloweensensoryplay #sensoryplay #sensoryexploration #motorskills #motorskillsdevelopment #scienceforkids #kidscience #funactivities #funactivitiesforkids #halloweenfun #capturingparenthood
We are definitely getting into the fall and Hallow We are definitely getting into the fall and Halloween spirit...so during a recent homeschool art session, we decided to make some air-dry clay pumpkins and jack-o-lanterns! πŸŽƒπŸŽƒπŸŽƒ
...
Back in 2019, Lauralee @2art.chambers shared several colorful, air-dry clay pumpkins that her students made...and after rediscovering the saved post, I decided that it would be a perfect October art lesson for us too! 🧑
...
We used various colors of air-dry clay, and rolled each color into whatever pumpkin shape we wanted...and then we added our lines/indentations using the side of a credit card. πŸ’³ The stems are just small, broken pieces of old crayons (another genius idea from Lauralee). πŸ– And we topped our stems with pieces of pipe cleaner, to create the little curly cues. 😍
...
Once we had our pumpkins...we decided to change things up a bit, and grabbed our stash of googly eyes. πŸ‘€ (Most of) our fall pumpkins then transformed into Halloween jack-o-lanterns! πŸŽƒ
We pressed the googly eyes into the clay, and we used a few small tools (that came with our box of air-dry clay) to add their mouths. πŸ˜ƒ
...
And now we have a cute and colorful crew of clay pumpkins adorning our mantle! πŸŽƒπŸ§‘πŸŽƒ
...
#pumpkins #jackolanterns #claypumpkins #airdryclay #airdryclaycreation #airdryclayart #airdryclaypumpkins #elementaryart #fallartprojects #fallartprojectsforkids #halloweenart #halloweenartprojects #halloweenartprojectsforkids #homeschool #homeschoolart #homeschoolfun #halloween #happyhalloween #capturingparenthood
Andrew from @elementaryarts shared a patterned, bl Andrew from @elementaryarts shared a patterned, block letter name project a couple of weeks ago (I'll share the post in stories today), and I immediately added it to our list of art projects to do this year! 😍
But we decided to switch things up a little bit! Instead of using our names, we each picked a color that we like...wrote the name of the color in block letters on our paper...and created our color patterns using at least two different shades of our chosen color. πŸ–
...
This colorful project ended up being a lot of fun, and also very relaxing...as we all quietly focused, and zoned in on adding the color patterns around all of our letters. It was actually a bit hypnotizing! 🀩
...
Needless to say, we are really happy with the way our block letter color project turned out! πŸ™Œ We even had a special guest who wanted to join in on this art project! ❀️
...
P.S. We also used Andrew’s free TPT handout on how to make block letters! The bundle includes bubble letters, cursive letters, graffiti letters, and more! πŸ‘
…
#blockletters #blocklettering #colors #color #colorful #artproject #artforkids #kidart #elementaryart #artactivity #artactivities #artactivitiesforkids #colorfun #homeschool #homeschoolart #homeschoolfun #capturingparenthood
We created self-portraits for our first art projec We created self-portraits for our first art project of our homeschool year...and we are pretty obsessed with them! 🀩✏️🀩
...
I love the idea of doing a self-portrait project at the beginning of the year, and then again at the end of the year...so that we can see how much we've grown and changed.
...
We used Kaitlyn's @artwithmrs.e Simple Self-Portrait Drawing Guide and it was so incredibly helpful (especially for this new homeschool teacher who wouldn't necessarily list drawing as one of her stronger suits). πŸ˜‰
We actually purchased her entire Guided Drawing Bundle (over on Teachers Pay Teachers) and we highly recommend it! πŸ™ŒπŸ™ŒπŸ™Œ
...
We looked through the self-portrait drawing guide to get different ideas for our eyes, nose, mouth, and hair. πŸ‘€πŸ‘ƒπŸ‘„
...
Now...if you caught our stories earlier this week, you know that our daughter recently made a pretty big change to her hair (that included a partial side-shave and bob-length cut - she also dyed it blue). πŸ’‡β€β™€οΈ
She was used to drawing pictures of herself with her long, blonde locks...and her new hairstyle proved rather difficult. But she persevered, and ended up with a self-portrait that she was truly proud of! πŸ₯°
...
When we were finished drawing our likenesses, we decided to cut them out and create a special background to glue them onto. I went with random black and white designs...and our nugget decided to draw various things that she loves (her family, winter, candy, books, dolphins...and more)! ❀️
...
It was such a fun project...and I can't wait to see what our self-portraits look like at the end of our school year! πŸ˜ƒ
...
#selfportrait #selfportraits #homeschool #homeschoolart #elementaryart #artactivities #artactivitiesforkids #artforkids #kidart #homeschoolfun #capturingparenthood
Follow on Instagram

Popular Posts

Virtual Spring Break: Day Five - New York City

Virtual Spring Break: Day Five – New York City

Virtual Spring Break: Day Four - Mexico

Virtual Spring Break: Day Four – Mexico

Virtual Spring Break: Day Three - India

Virtual Spring Break: Day Three – India

Join Us on Instagram

Ok...@artwithmrs.e Haunted House project is hands- Ok...@artwithmrs.e Haunted House project is hands-down the best Halloween-themed art project out there! πŸ™ŒπŸ™ŒπŸ™Œ
We had a blast creating haunted houses for homeschool art this month! 🧑
...
We followed Kaitlyn's extremely helpful Haunted House Drawing Guide (you can find it over on her Teachers Pay Teachers account) and completed the project over the course of 3 lessons.
...
During our first lesson, we sketched our houses in pencil, and added some eerie exterior landscaping. πŸͺ¦πŸ¦‡
We popped in a few spooky characters (ghosts, spiders, pumpkins, and a vampire). πŸ‘»πŸ•·πŸŽƒπŸ§›
And then we traced over our pencil lines with black Sharpie.
...
During our next lesson, we used a coloring technique that we learned from Kristian @friendsartlab ❀️ We colored our pictures with oil pastels...and then painted over the top of the oil pastels with baby oil...it causes the oil pastels to bleed and blend together! 🀩
...
During our final lesson...we added more spooky characters to the inside of our house...that can peek out behind the doors and windows. πŸ’€πŸ§™β€β™€οΈπŸ‘»
To do this...I used an X-acto knife and carefully cut around the outside edges of the doors/windows (leaving the hinge sides intact so that they could fold open and closed).
We placed yellow construction paper in the background...and added witches, ghosts, skeletons, a mummy, and a Frankenstein! 😍
This step made our haunted houses really come to life...and we just can't thank Kaitlyn @artwithmrs.e enough for sharing this awesome lesson and drawing guide! THE ABSOLUTE BEST! ❀️❀️❀️
...
It was very evident how much our daughter loved this project...as we worked through each step...but the thing that solidified just how much she enjoyed it was - one weekend morning I walked downstairs to find her and her dad sitting at the table - and she was very excitedly teaching him how to draw his own haunted house - while she drew a few more herself (scroll to the last picture in the carousel)! πŸ₯°
...
#hauntedhouse #hauntedhouses #hauntedhousedrawing #directeddrawing #spookyart #halloween #happyhalloween #halloweenart #halloweenfun #elementaryart #homeschoolart #homeschool #homeschoolfun #capturingparenthood
I decided that these six little pumpkins needed a I decided that these six little pumpkins needed a permanent place on our feed...because WE GREW THEM OURSELVES!!! πŸŽƒ
That's right...first-time pumpkin-growers over here...and it was all actually a bit of a surprise. πŸ˜ƒ
...
You see, when we went to prep our garden beds this spring, we noticed a plant that had already started growing. We assumed it was a cucumber plant, since it was in the same place we had cucumbers last year.
We left it alone and planted a couple of other cucumber plants nearby. πŸ₯’
At first, the leaves on our mystery plant looked very similar to the leaves on our other cucumber plants.
But a couple of weeks later the plant had grown A LOT bigger. It was now obvious that it was not a cucumber plant. But what was it? πŸ€·β€β™€οΈ
...
And that's when it suddenly dawned on these exhausted parents, that our daughter had spontaneously tossed seeds from her pumpkin (last Halloween), into the garden bed. πŸ€¦β€β™€οΈ The mystery was finally solved...and by the looks of the large golden flowers that were emerging all over the vines...we figured we might have a few pumpkins come fall! πŸ™ŒπŸŽƒπŸ™Œ
...
It was so much fun to watch the pumpkin plant grow! 🀩 We had to cut down the wire on one side of our garden bed to let the vines out...and they ended up growing 6-10 feet long in both directions! 😳 It was crazy!
They put out the most gorgeous flowers...that the bees absolutely loved! 🧑 And soon enough, we spotted a few round gourds growing at the base of some of the flowers. They grew quickly...and then turned a beautiful shade of orange! 😍
...
Needless to say, we are now officially pumpkin-growing people! πŸ˜‚ My husband can't wait to plant more next year...and he's already looking in to different varieties - hoping to grow some larger jack-o-lantern style ones next season! πŸŽƒ
…
#pumpkins #growingpumpkins #ourpumpkinpatch #homegrownpumpkins #homegrown #homegarden #pumpkingrowing #gardening #fallharvest #happyhalloween #timetocarvesomepumpkins #gardensurprises #gardenfun #capturingparenthood
Free the Frankensteins from the Frozen Rainbow Bra Free the Frankensteins from the Frozen Rainbow Brain! 😬🌈🧠
…
Yesterday, we shared how we made this colorful, frozen rainbow brain - full of Frankenstein mini erasers…and today we wanted to show you what became of our beautiful brain! πŸ˜ƒ
…
We popped it out onto a tray, grabbed a shaker of salt, a bottle of warm water (colored red for added effect), and some tongs.
And then it was time to Free the Frankensteins (our daughter coined the phrase)! πŸ˜‰
…
This spooky activity provides chilly sensory play, motor skills practice, and scientific exploration (salt and warm water speed-up the melting process)! πŸ™ŒπŸ™ŒπŸ™Œ
As an added bonus…you also get some color-mixing! And the addition of the salt makes it extra sparkly too! 😍🀩😍
…
Eventually, all you’re left with is some mini erasers floating in a pool of colorful water…and a happy kid! ❀️❀️❀️
…
#frozenbrain #rainbowbrain #frozenrainbowbrain #brains #freethefrankensteins #halloween #happyhalloween #halloweenactivities #halloweenactivitiesforkids #halloweensensoryplay #sensoryplay #sensoryexploration #motorskills #motorskillsdevelopment #scienceforkids #kidscience #funactivities #funactivitiesforkids #halloweenfun #capturingparenthood
We are definitely getting into the fall and Hallow We are definitely getting into the fall and Halloween spirit...so during a recent homeschool art session, we decided to make some air-dry clay pumpkins and jack-o-lanterns! πŸŽƒπŸŽƒπŸŽƒ
...
Back in 2019, Lauralee @2art.chambers shared several colorful, air-dry clay pumpkins that her students made...and after rediscovering the saved post, I decided that it would be a perfect October art lesson for us too! 🧑
...
We used various colors of air-dry clay, and rolled each color into whatever pumpkin shape we wanted...and then we added our lines/indentations using the side of a credit card. πŸ’³ The stems are just small, broken pieces of old crayons (another genius idea from Lauralee). πŸ– And we topped our stems with pieces of pipe cleaner, to create the little curly cues. 😍
...
Once we had our pumpkins...we decided to change things up a bit, and grabbed our stash of googly eyes. πŸ‘€ (Most of) our fall pumpkins then transformed into Halloween jack-o-lanterns! πŸŽƒ
We pressed the googly eyes into the clay, and we used a few small tools (that came with our box of air-dry clay) to add their mouths. πŸ˜ƒ
...
And now we have a cute and colorful crew of clay pumpkins adorning our mantle! πŸŽƒπŸ§‘πŸŽƒ
...
#pumpkins #jackolanterns #claypumpkins #airdryclay #airdryclaycreation #airdryclayart #airdryclaypumpkins #elementaryart #fallartprojects #fallartprojectsforkids #halloweenart #halloweenartprojects #halloweenartprojectsforkids #homeschool #homeschoolart #homeschoolfun #halloween #happyhalloween #capturingparenthood
Andrew from @elementaryarts shared a patterned, bl Andrew from @elementaryarts shared a patterned, block letter name project a couple of weeks ago (I'll share the post in stories today), and I immediately added it to our list of art projects to do this year! 😍
But we decided to switch things up a little bit! Instead of using our names, we each picked a color that we like...wrote the name of the color in block letters on our paper...and created our color patterns using at least two different shades of our chosen color. πŸ–
...
This colorful project ended up being a lot of fun, and also very relaxing...as we all quietly focused, and zoned in on adding the color patterns around all of our letters. It was actually a bit hypnotizing! 🀩
...
Needless to say, we are really happy with the way our block letter color project turned out! πŸ™Œ We even had a special guest who wanted to join in on this art project! ❀️
...
P.S. We also used Andrew’s free TPT handout on how to make block letters! The bundle includes bubble letters, cursive letters, graffiti letters, and more! πŸ‘
…
#blockletters #blocklettering #colors #color #colorful #artproject #artforkids #kidart #elementaryart #artactivity #artactivities #artactivitiesforkids #colorfun #homeschool #homeschoolart #homeschoolfun #capturingparenthood
We created self-portraits for our first art projec We created self-portraits for our first art project of our homeschool year...and we are pretty obsessed with them! 🀩✏️🀩
...
I love the idea of doing a self-portrait project at the beginning of the year, and then again at the end of the year...so that we can see how much we've grown and changed.
...
We used Kaitlyn's @artwithmrs.e Simple Self-Portrait Drawing Guide and it was so incredibly helpful (especially for this new homeschool teacher who wouldn't necessarily list drawing as one of her stronger suits). πŸ˜‰
We actually purchased her entire Guided Drawing Bundle (over on Teachers Pay Teachers) and we highly recommend it! πŸ™ŒπŸ™ŒπŸ™Œ
...
We looked through the self-portrait drawing guide to get different ideas for our eyes, nose, mouth, and hair. πŸ‘€πŸ‘ƒπŸ‘„
...
Now...if you caught our stories earlier this week, you know that our daughter recently made a pretty big change to her hair (that included a partial side-shave and bob-length cut - she also dyed it blue). πŸ’‡β€β™€οΈ
She was used to drawing pictures of herself with her long, blonde locks...and her new hairstyle proved rather difficult. But she persevered, and ended up with a self-portrait that she was truly proud of! πŸ₯°
...
When we were finished drawing our likenesses, we decided to cut them out and create a special background to glue them onto. I went with random black and white designs...and our nugget decided to draw various things that she loves (her family, winter, candy, books, dolphins...and more)! ❀️
...
It was such a fun project...and I can't wait to see what our self-portraits look like at the end of our school year! πŸ˜ƒ
...
#selfportrait #selfportraits #homeschool #homeschoolart #elementaryart #artactivities #artactivitiesforkids #artforkids #kidart #homeschoolfun #capturingparenthood
Follow on Instagram

Copyright © 2026 · glam theme by Restored 316

  • Policies + Disclosure
  • Contact