• Home
  • About
  • Kid Zone
    • Activities
    • Arts + Crafts
    • Books Books Books
  • Food
    • Family-Friendly
    • Kids
    • Sweets
    • Dog-Friendly
  • Life + Motherhood
    • Pregnancy
    • Parenting
    • House + Home
  • Let’s Party
    • Birthdays
    • Holidays
    • Instagram
    • Pinterest

Capturing Parenthood

Heart-Filled Valentine’s Day Crafts (2018)

in Arts + Crafts, Holidays, Let's Party on February 8, 2018

Love is in the air! We’ve been reading some wonderful Valentine’s stories (as you read on Tuesday), making some delicious Valentine’s goodies (coming next week)…and on a recent grocery shopping extravaganza, I cheated death when an adult-sized, heart-toting teddy bear fell off of the shelf. πŸ™‚ As 50 lbs. of soft, fluffy fur came barreling toward me I realized…it must be time to make some more Heart-Filled Valentine’s Day Crafts!

Heart-Filled Valentine's Day Crafts (2018) Β© Capturing Parenthood

So go grab your little ones…and all things pink, purple, and red…and let’s get crafting!


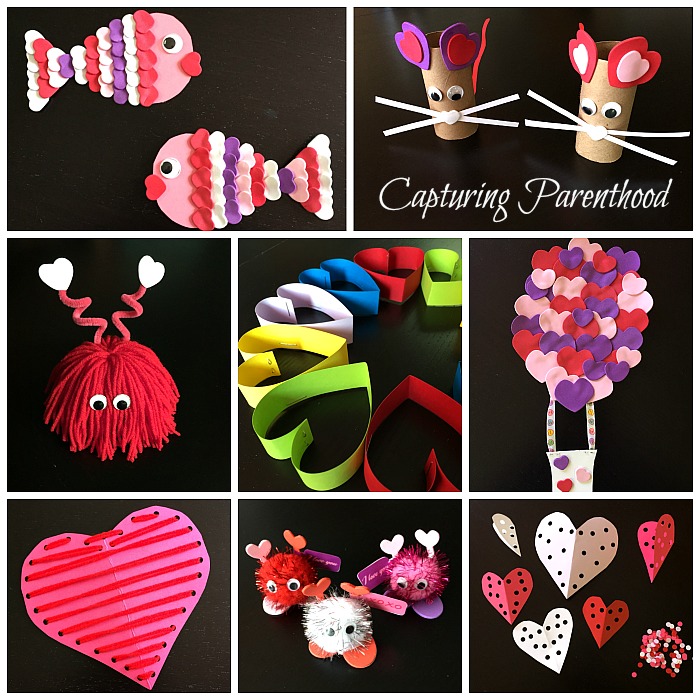
The Perfect “Catch” – Heart Fish

Heart-Filled Valentine's Day Crafts (2018) Β© Capturing Parenthood

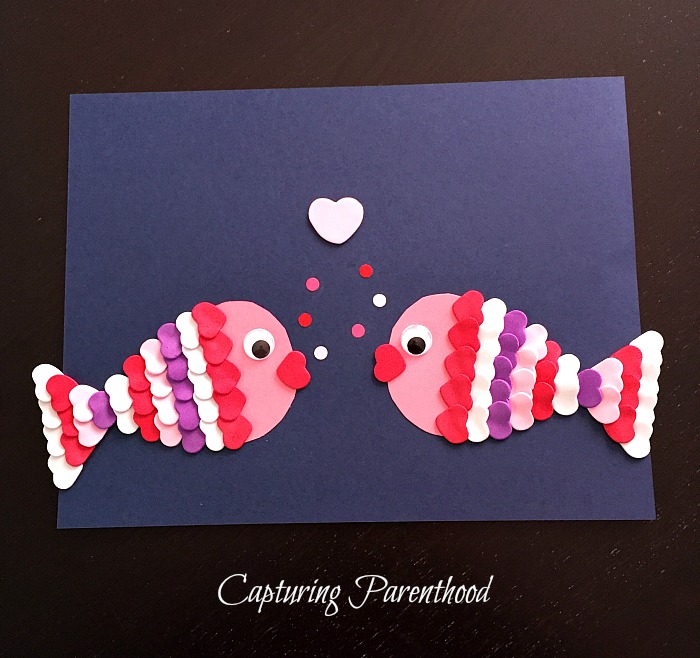
I fell in love with this adorable little heart fish in a bowl craft, over on Housing A Forest (as part of their 6 Heart Shaped Animals post). I wanted to create something similar, but I wanted to utilize some of the small foam sticker hearts (that came in my 400-count variety pack from Hobby Lobby). I thought it would be fun to use the hearts as fish scales (along with a fish mouth)!

Heart-Filled Valentine's Day Crafts (2018) Β© Capturing Parenthood

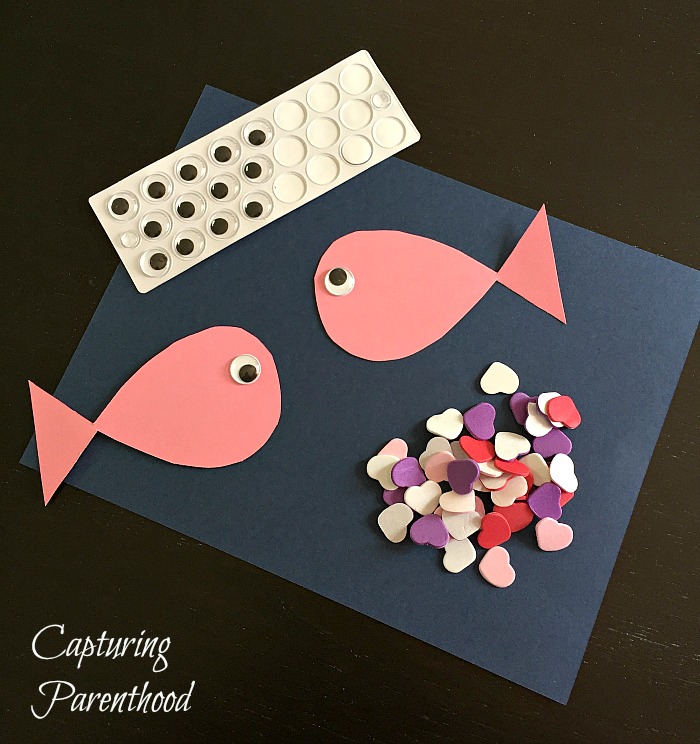
In order to create a pair of heart fish of your own, you will need the following: construction paper (I used pink for the fish and navy blue for the background), two googly eyes, small foam heart stickers, a glue stick, and a pair of scissors. Cut two fish from the pink construction paper, and apply one googly eye to each fish. Place one red heart sticker on the edge of the paper, below each eye (with the tip of the heart pointing in toward the fish) to create some kissy fish lips. Next, starting at the tail, place one row (of the same color) of heart stickers across the end of the tail fin (with the tip of the hearts also pointing in toward the fish). Continue adding rows of heart stickers, until all of the fish scales have been added (stopping just short of the fish eyes). Glue the fish (facing toward each other) to the navy blue construction paper. For the finishing touch, add a few air bubbles…I decided to utilize some little red, white, and pink circles that I had leftover from our Hole-Punched Heart Sun-Catchers (see below)…and then add one more heart sticker in the middle.

Easy Toilet Paper Roll Valentine’s Mice

Heart-Filled Valentine's Day Crafts (2018) Β© Capturing Parenthood

Our little nugget loved crafting these cute little Valentine’s Day mice! They were super quick and easy to put together…which often makes for the best crafts, when it comes to the toddler/preschool age group. I found this wonderful craft idea over on the Non-Toy Gifts blog. Thanks to Stef for sharing such a fun kids craft!

Heart-Filled Valentine's Day Crafts (2018) Β© Capturing Parenthood

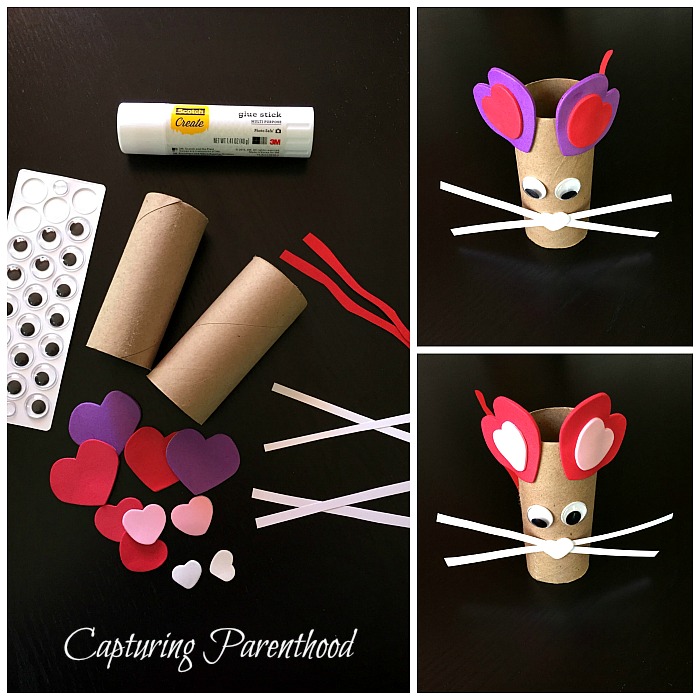
To create your own Valentine’s Day mice, you will need the following supplies: empty toilet paper tubes, googly eyes, foam sticker hearts (I utilized the same 400-count variety pack that I used for the heart fish), construction paper (red and white), scissors, and a glue stick. Start by cutting two strips from the white construction paper (per mouse) for the whiskers. Cut one red strip (per mouse) for the tail…I made the tails a little curvy, instead of completely straight like the whiskers. Remove the sticker-backing from two medium-sized foam heart stickers and stick them in the middle of two large foam heart stickers. Remove the backing from the large heart stickers and adhere them to the top of the empty toilet paper tube. These are the mouse ears. Below the ears, add two googly eyes. Grab two strips of white paper and shape them into an X. Apply a dab of glue to the center of the X and attach the whiskers to the tube. Place a small white heart sticker in the very center of the whiskers. Lastly, add a small dab of glue to the end of the red strip of paper and adhere the mouse tail to the back/bottom of the tube. TaDa!

Love Monsters

Heart-Filled Valentine's Day Crafts (2018) Β© Capturing Parenthood

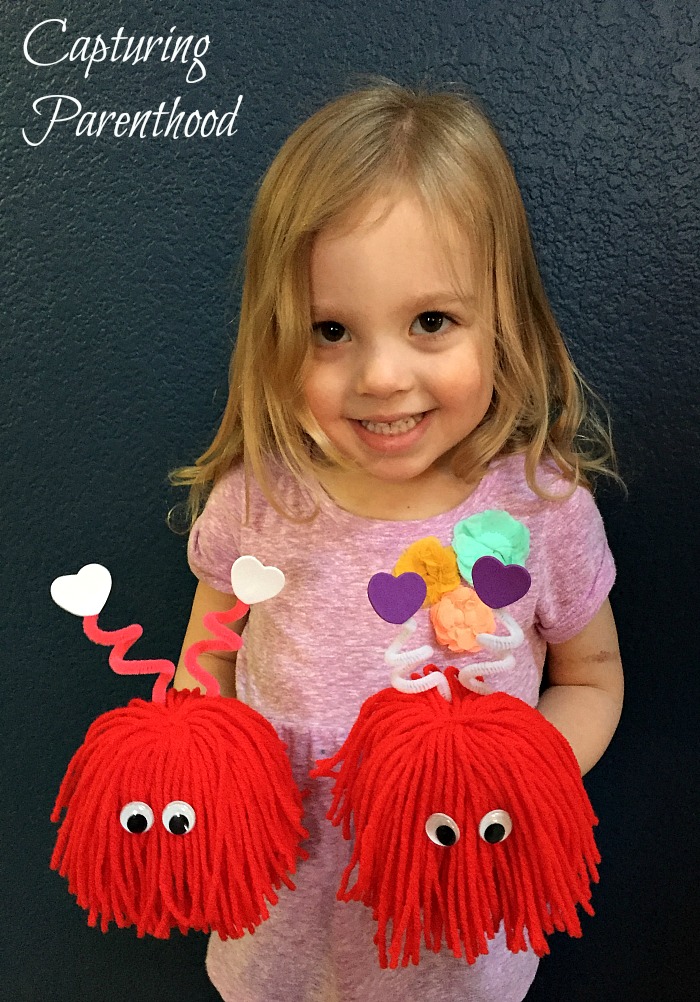
I came across the tutorial for these Lil Love Monsters over on Eighteen 25, and decided that we simply had to create a couple, to place on our dining room table for the month of February! Our little nugget is delighted with these love monsters…she carries them around the house, shaking their yarn hair to and fro…but this particular craft is one that requires some adult supervision and assistance (due to the use of the hot glue gun).

Heart-Filled Valentine's Day Crafts (2018) Β© Capturing Parenthood

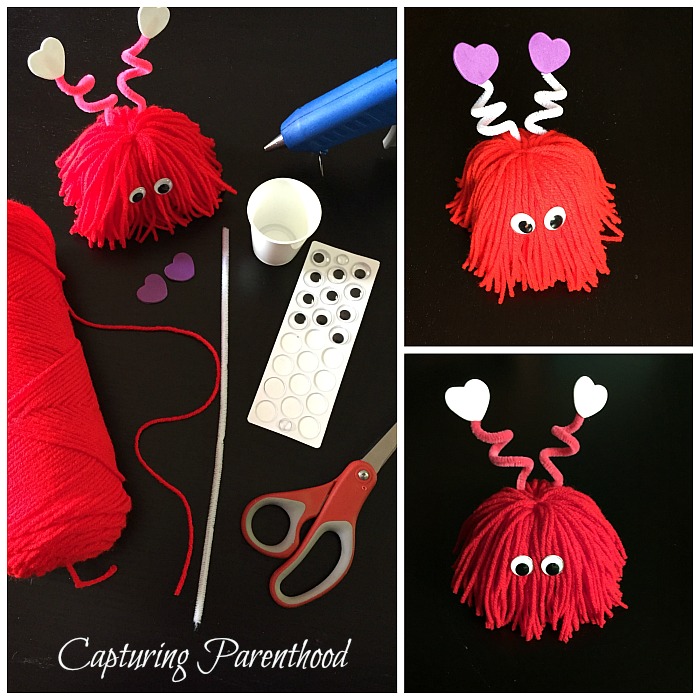
To make a love monster, you will need the following: a Dixie cup (or something similar), yarn (in the color of your choosing), googly eyes, a pipe cleaner (in the color of your choosing), two foam sticker hearts (I’m telling you, I got my money’s worth out of that variety pack), scissors, and a hot glue gun.

Heart-Filled Valentine's Day Crafts (2018) Β© Capturing Parenthood

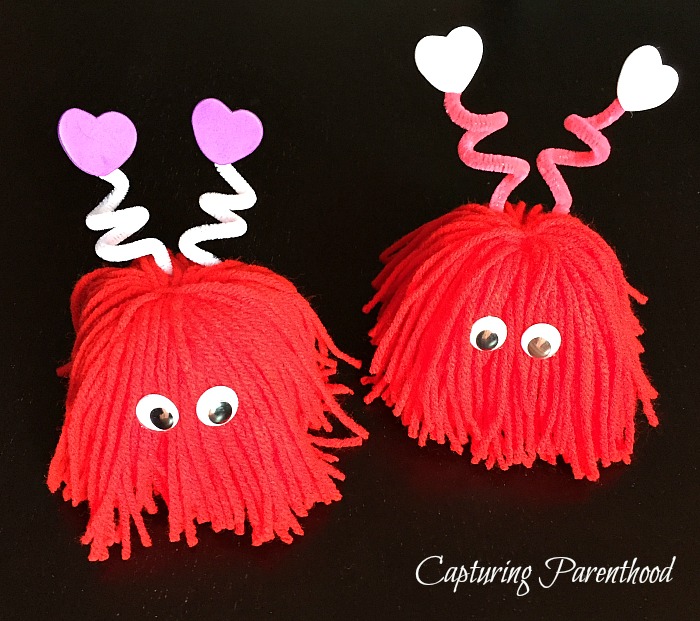
You want to start by wrapping the yarn around a relatively flat object that is approximately 2-1/2″ x 4″ (I used an old IPod…you could also cut a piece of cardboard to size). Wrap the yarn (long ways) approximately 150 times, and then snip the end. Slide a small (separate) piece of yarn under one side of the yarn ball, so that it is between all of the yarn and the cardboard/object on one side. Tie that piece of yarn up and around the yarn ball (away from cardboard/object) and knot it tightly. Flip the cardboard/object over and cut through the middle of the yarn on this side. You should now have the hairpiece for your love monster. Jodie and Jen (at Eighteen 25) created an additional set of yarn hair for their monsters, but I liked the way our monsters looked with one set of hair. Next, you want to carefully apply hot glue to the top of your Dixie cup and then glue the yarn hair bundle to the cup, so that the yarn falls evenly down every side of the cup. Feel free to move the yarn around, so that the cup is completely covered (you don’t want to see the cup underneath). Choose which side will be the front of your love monster, and carefully glue on two googly eyes (using the hot glue gun). Then it’s time for the antennae…cut your pipe cleaner in half and curl each half around your finger a few times. On one end of each antenna, attach a small foam heart sticker (I used a small dab of hot glue for this, because stickers don’t adhere to pipe cleaners all that well). Lastly, attach the antennae to the upper backside of the love monster, securing in place with a dab of hot glue. Set the monster aside for the hot glue to dry and set completely.

Paper Heart Wreath

Heart-Filled Valentine's Day Crafts (2018) Β© Capturing Parenthood

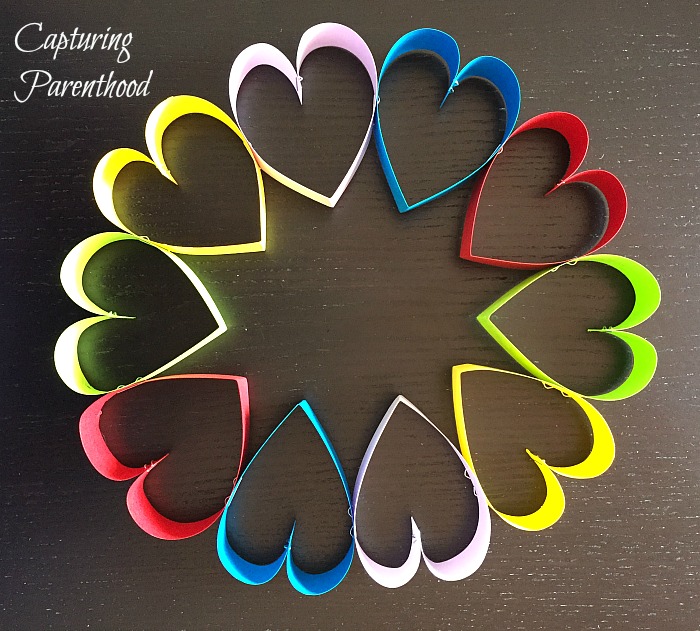
I love making hearts out of strips of construction paper. For the past two years, we’ve made this beautiful Valentine’s Day Heart Garland! This year, I wanted to change it up a bit. When I came across this adorable DIY Rainbow Paper Heart Pom Pom WreathΒ (over on hello, Wonderful), I knew that I had found our new take on paper hearts for this year!

Heart-Filled Valentine's Day Crafts (2018) Β© Capturing Parenthood

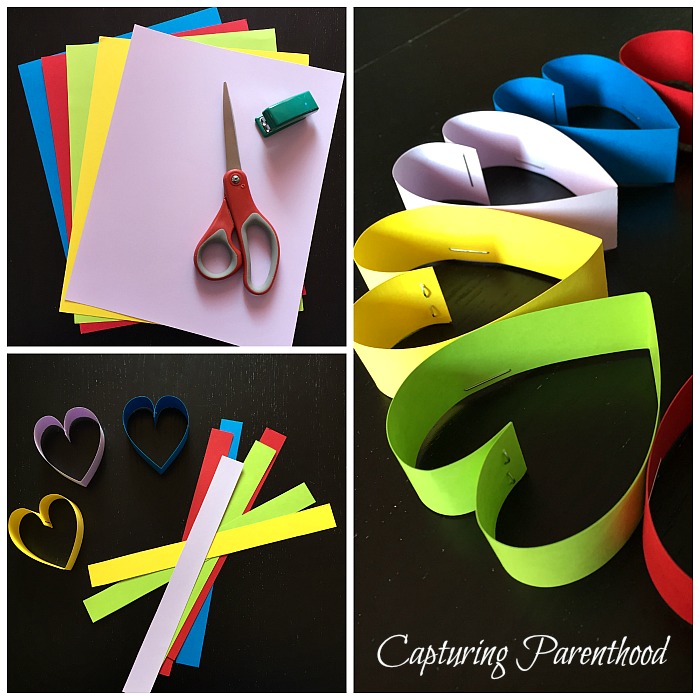
The only supplies that you need for this simple Valentine’s craft are: various colors of construction paper, a pair of scissors, and a stapler. You will also need a piece of ribbon, if you would like to hang your wreath. Start by cutting strips of construction paper (horizontally). I ended up with ten hearts in my wreath, with five different colors (I made two hearts of each color). To create each heart, simply fold a strip of paper in half (creating the tip of the heart) and then roll the two ends in toward one another to create the heart shape. Staple the two ends together in the middle. Repeat this process until all of your hearts are made. Then it’s time to put them all together. Making your way around in a circle, simply staple the sides of two different hearts together (with the tips of each heart pointing inward). Continue stapling the hearts together until you come full-circle. To attach a piece of ribbon (so that you can hang your wreath) tie one end of the ribbon in a small knot and then staple the ribbon to the underside of a heart, so that the knot catches on the staple and keeps everything in place. Repeat this process to attach the other end of the ribbon to the wreath. Hang on your front door, and let the love spill out into your neighborhood!

Heart Air Balloon

Heart-Filled Valentine's Day Crafts (2018) Β© Capturing Parenthood

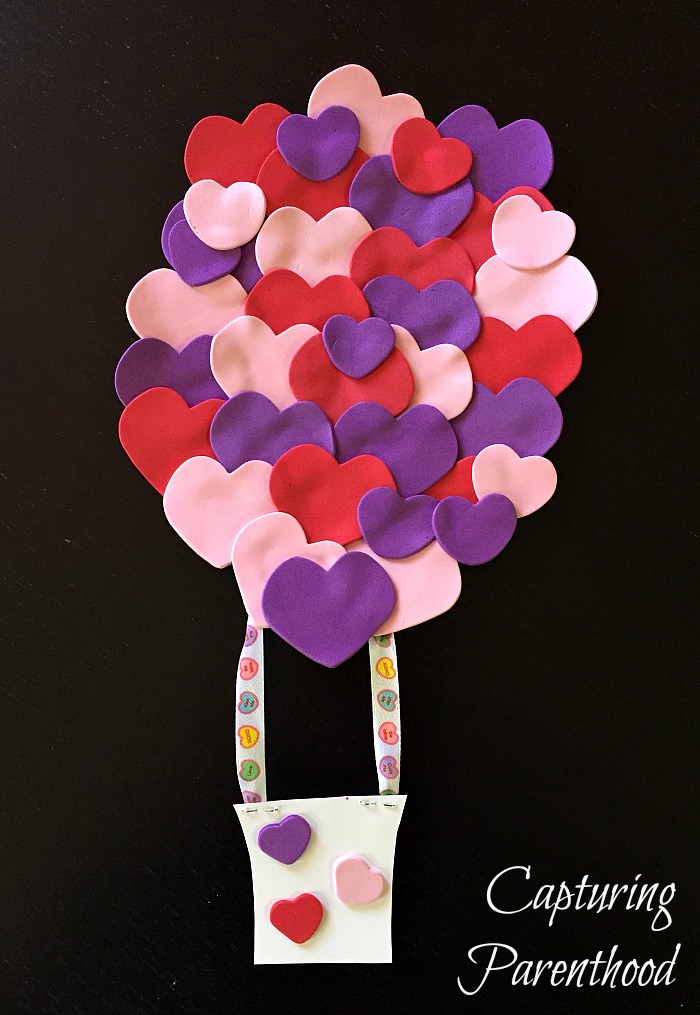
I came across a picture of this darling little Paint Swatch Heart Air Balloon Nursery Art one night when I was perusing Pinterest. The photo led me to Abbey’s blog, The Cards We Drew. I loved her nursery art so much, that I decided to create a Heart Air Balloon for Valentine’s Day! And as you may have already guessed…I (once again) put the foam heart sticker variety pack (that I bought at Hobby Lobby) to good use. πŸ™‚

Heart-Filled Valentine's Day Crafts (2018) Β© Capturing Parenthood

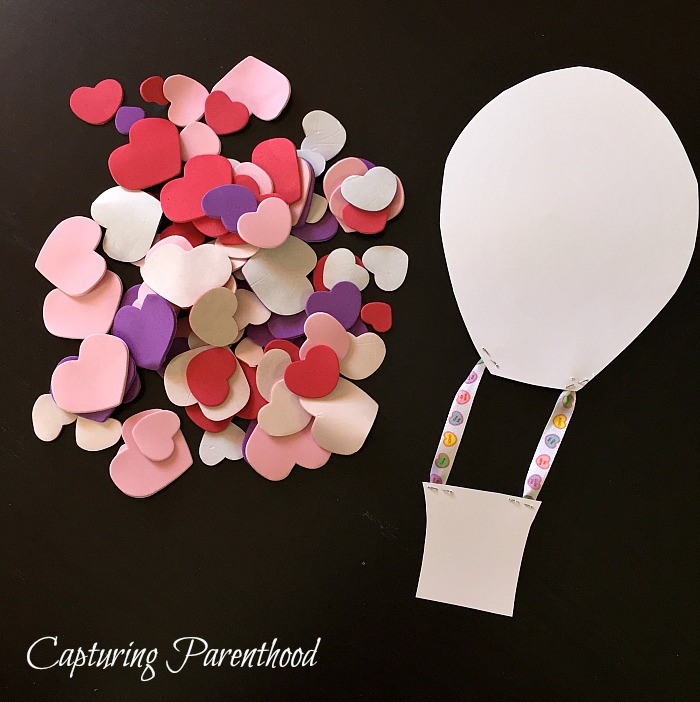
To make our heart air balloon, we utilized every size of the foam heart stickers (small, medium, and large), as well as some white card stock, and some fun Valentine’s ribbon. I cut out a rough outline of our balloon from the white card stock (so that we had something to adhere the stickers to), as well as the balloon basket. To attach our balloon to our basket, I simply knotted each end of two separate pieces of heart ribbon, and stapled each piece of ribbon to the bottom of the balloon. Then I stapled the other side of each ribbon to the top of the basket. Then it was time for the fun part…sticking all of the heart stickers on! Our little nugget was more than happy to help out with this part! We started at the top of the balloon and worked our way down to the bottom, until we had every piece of the white card stock covered in hearts. My little helper decided to add a few decorative hearts to the basket, as well.

Our daughter loves hot air balloons, so I knew this heart-filled craft would make her day!

Yarn Heart Lacing

Heart-Filled Valentine's Day Crafts (2018) Β© Capturing Parenthood

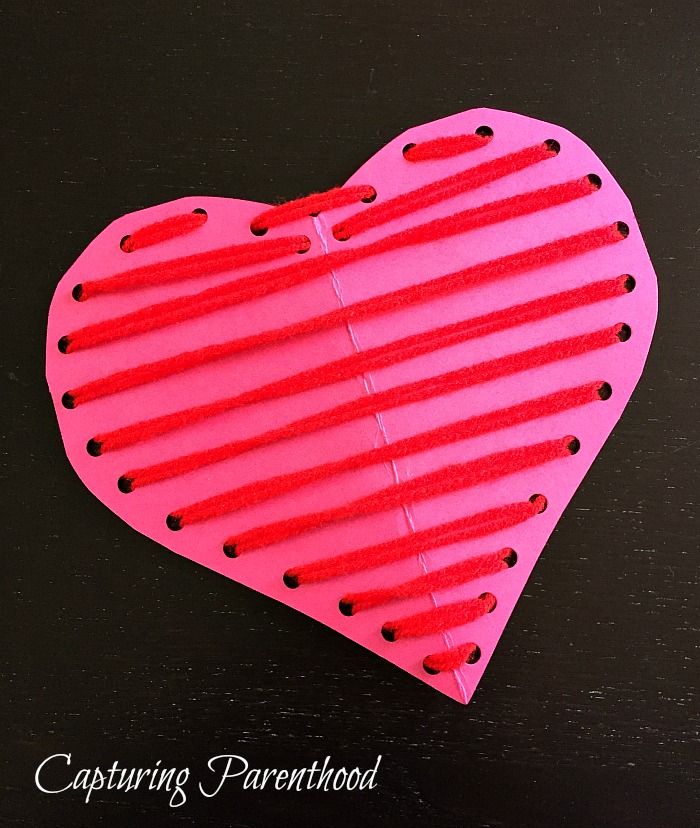
This Valentine’s themed fine-motor skills activity was a hit…and it was super simple to set up! All you need is a piece of construction paper, a hole punch, and some yarn.

Heart-Filled Valentine's Day Crafts (2018) Β© Capturing Parenthood

Start by folding a piece of construction paper in half. Along the folded edge, draw a half-heart shape. Cut the heart out with a pair of scissors. Keeping the heart folded in half (so that the holes are all symmetrical) punch holes along the outer edge of the heart. Unfold the paper to reveal the whole heart. Grab a lengthy piece of yarn and thread it through one of the bottom holes (on the tip of the heart), tie the end in a knot and tape it to the back of the heart. Hand the yarn and heart over to your kiddo and have them start lacing the yarn through the holes. They can lace the yarn in any fashion they desire. We decided to lace straight across. Tip: If the end of the yarn starts fraying and your little one is becoming frustrated with getting it through the holes, you can wrap the end in a piece of tape…works like a charm!Β We had a long enough piece of yarn that we decided to lace back through from the top. Once complete, knot the end of the yarn and tape it to the back of the heart. Display for the entire family to admire!

Love Bugs

Heart-Filled Valentine's Day Crafts (2018) Β© Capturing Parenthood

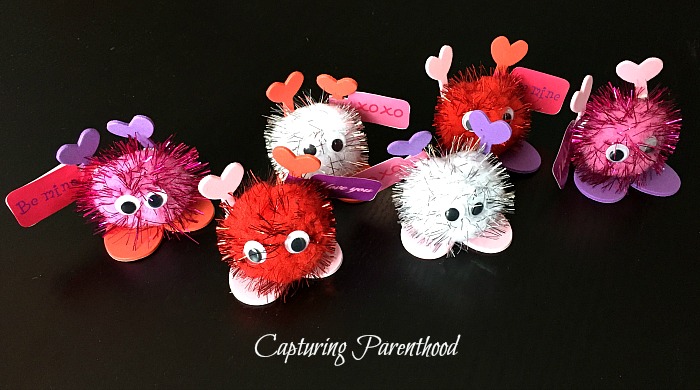
In all honesty, I was not planning on making any love bugs this year, but when I was at Hobby Lobby (buying my year’s supply of foam heart stickers) I came across a love bug kit. Everything we would need was inside the kit…how could I pass that up? Needless to say, a kit made its way into our cart and I’m so glad it did, because these cute little guys brighten our little nugget’s day!

Heart-Filled Valentine's Day Crafts (2018) Β© Capturing Parenthood

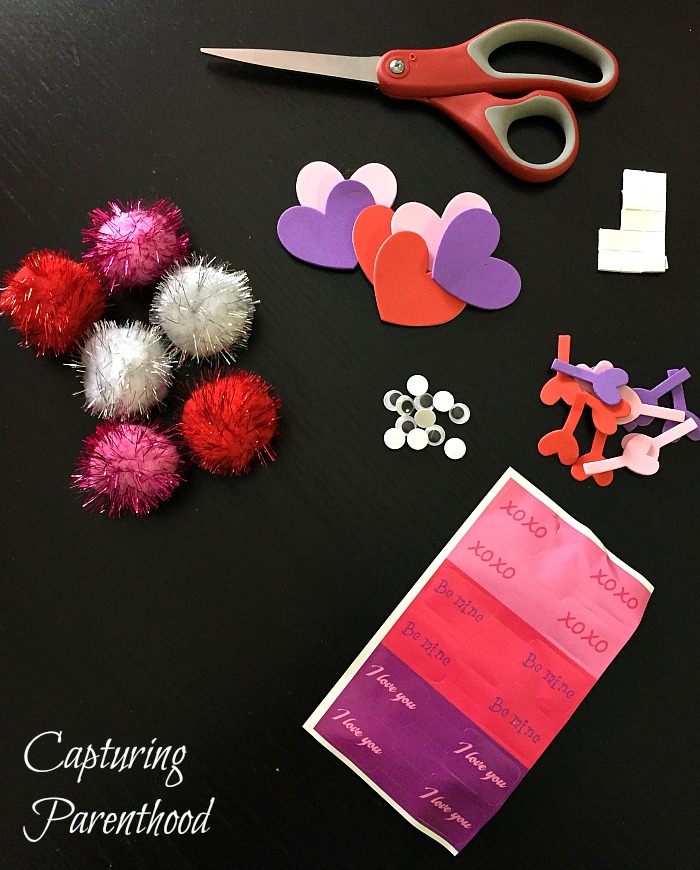
As I mentioned, everything required was included in the kit…so if you have a Hobby Lobby nearby, you can run and pick up a kit. If not…these can easily be made without a kit too! You need some foam hearts (for the base/feet of the love bugs), sparkly poms, googly eyes, and antennae (these can be created with pipe cleaners and small foam heart stickers…like our Love Monsters above). Our kit came with some love message stickers (to attach to one antenna on each bug). You could create your own with a small piece of construction paper and some tape or glue.

Heart-Filled Valentine's Day Crafts (2018) Β© Capturing Parenthood

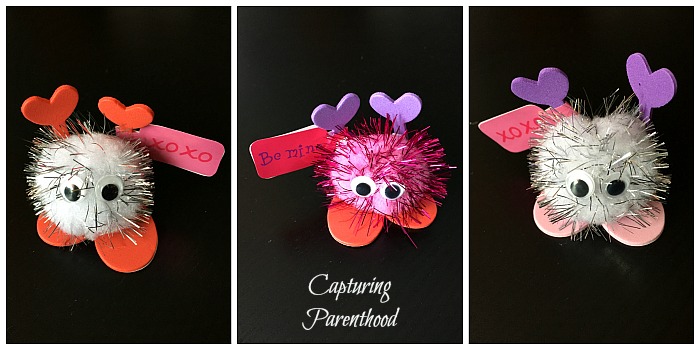
The love bug kit that we purchased came with some little foam sticker pads to adhere all of the components together…although, we found that these foam sticker pads don’t actually stick to the fuzzy poms all that well, so we ended up using our hot glue gun to keep our love bugs together. If you’re creating some love bugs from scratch, I highly recommend using a hot glue gun to attach everything to the poms. πŸ™‚

Hole-Punched Heart Sun-Catchers

Heart-Filled Valentine's Day Crafts (2018) Β© Capturing Parenthood

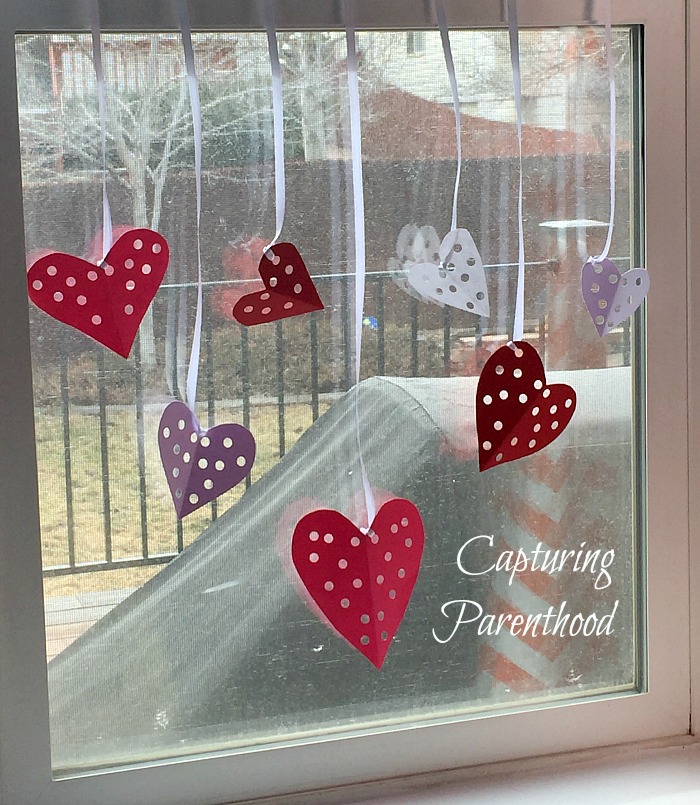
After removing our beautiful, wintry faux stained glass craft, we decided that we needed to make a Valentine’s Day sun-catcher to brighten up our living room window! And that’s when I came across these vibrant Hole Punched Hearts, over on No Time for Flash Cards.

Heart-Filled Valentine's Day Crafts (2018) Β© Capturing Parenthood

All you need is some construction paper (we used pink, red, purple, and white), a single-hole punch, some ribbon, and Scotch tape. Start by cutting out various sizes and colors of hearts from the construction paper.

Heart-Filled Valentine's Day Crafts (2018) Β© Capturing Parenthood

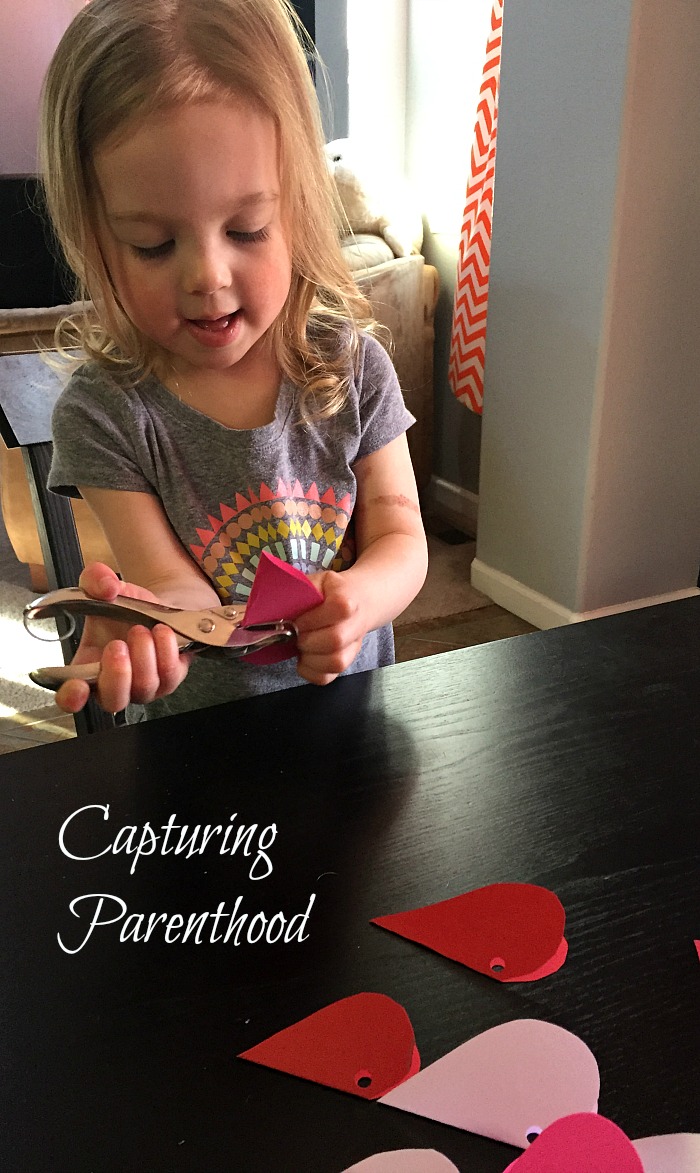
Next, punch several holes into each of the hearts. We found this to be easier if the hearts were still folded in half. Our little nugget gave it her very best effort with the single-hole punch, but it was just a little too tough for her to squeeze together, so I provided hole-punching assistance. πŸ™‚ Once the hearts are complete, cut various lengths of ribbon, and tie one end of each ribbon through a hole in a heart. We used small pieces of Scotch tape to attach the other ends of the ribbons to our window…and then we stood back to let the love (and sun) shine in!


We hope you’ve enjoyed all of our Heart-Filled Valentine’s Day Crafts for 2018! If you’re looking for more crafting inspiration…check out the Heart-Filled Valentine’s Day Crafts we made last year!

HAPPY VALENTINE’S DAY!

START SPREADING THE NEWS!

Related Posts

  • Pipe Cleaner Candy CanesPipe Cleaner Candy Canes
  • Our Favorite Fruit SmoothieOur Favorite Fruit Smoothie
  • Welcome to Capturing ParenthoodWelcome to Capturing Parenthood
  • Puffy Paint Window ClingsPuffy Paint Window Clings
« Celebrating Holidays Through Literature – Valentine’s Day 2018
M&M Chocolate Chip Valentine’s Cookies »

Hello! Nice to meet you!

Welcome to the Capturing Parenthood blog! I'm Stacey...wife and first-time parent, former full-time working mom, turned stay-at-home mom. Join me as I capture and share my thoughts and experiences on this crazy adventure we call parenthood! Click here to learn more about me!

Search Capturing Parenthood

Instagram

Ok...@artwithmrs.e Haunted House project is hands- Ok...@artwithmrs.e Haunted House project is hands-down the best Halloween-themed art project out there! πŸ™ŒπŸ™ŒπŸ™Œ
We had a blast creating haunted houses for homeschool art this month! 🧑
...
We followed Kaitlyn's extremely helpful Haunted House Drawing Guide (you can find it over on her Teachers Pay Teachers account) and completed the project over the course of 3 lessons.
...
During our first lesson, we sketched our houses in pencil, and added some eerie exterior landscaping. πŸͺ¦πŸ¦‡
We popped in a few spooky characters (ghosts, spiders, pumpkins, and a vampire). πŸ‘»πŸ•·πŸŽƒπŸ§›
And then we traced over our pencil lines with black Sharpie.
...
During our next lesson, we used a coloring technique that we learned from Kristian @friendsartlab ❀️ We colored our pictures with oil pastels...and then painted over the top of the oil pastels with baby oil...it causes the oil pastels to bleed and blend together! 🀩
...
During our final lesson...we added more spooky characters to the inside of our house...that can peek out behind the doors and windows. πŸ’€πŸ§™β€β™€οΈπŸ‘»
To do this...I used an X-acto knife and carefully cut around the outside edges of the doors/windows (leaving the hinge sides intact so that they could fold open and closed).
We placed yellow construction paper in the background...and added witches, ghosts, skeletons, a mummy, and a Frankenstein! 😍
This step made our haunted houses really come to life...and we just can't thank Kaitlyn @artwithmrs.e enough for sharing this awesome lesson and drawing guide! THE ABSOLUTE BEST! ❀️❀️❀️
...
It was very evident how much our daughter loved this project...as we worked through each step...but the thing that solidified just how much she enjoyed it was - one weekend morning I walked downstairs to find her and her dad sitting at the table - and she was very excitedly teaching him how to draw his own haunted house - while she drew a few more herself (scroll to the last picture in the carousel)! πŸ₯°
...
#hauntedhouse #hauntedhouses #hauntedhousedrawing #directeddrawing #spookyart #halloween #happyhalloween #halloweenart #halloweenfun #elementaryart #homeschoolart #homeschool #homeschoolfun #capturingparenthood
I decided that these six little pumpkins needed a I decided that these six little pumpkins needed a permanent place on our feed...because WE GREW THEM OURSELVES!!! πŸŽƒ
That's right...first-time pumpkin-growers over here...and it was all actually a bit of a surprise. πŸ˜ƒ
...
You see, when we went to prep our garden beds this spring, we noticed a plant that had already started growing. We assumed it was a cucumber plant, since it was in the same place we had cucumbers last year.
We left it alone and planted a couple of other cucumber plants nearby. πŸ₯’
At first, the leaves on our mystery plant looked very similar to the leaves on our other cucumber plants.
But a couple of weeks later the plant had grown A LOT bigger. It was now obvious that it was not a cucumber plant. But what was it? πŸ€·β€β™€οΈ
...
And that's when it suddenly dawned on these exhausted parents, that our daughter had spontaneously tossed seeds from her pumpkin (last Halloween), into the garden bed. πŸ€¦β€β™€οΈ The mystery was finally solved...and by the looks of the large golden flowers that were emerging all over the vines...we figured we might have a few pumpkins come fall! πŸ™ŒπŸŽƒπŸ™Œ
...
It was so much fun to watch the pumpkin plant grow! 🀩 We had to cut down the wire on one side of our garden bed to let the vines out...and they ended up growing 6-10 feet long in both directions! 😳 It was crazy!
They put out the most gorgeous flowers...that the bees absolutely loved! 🧑 And soon enough, we spotted a few round gourds growing at the base of some of the flowers. They grew quickly...and then turned a beautiful shade of orange! 😍
...
Needless to say, we are now officially pumpkin-growing people! πŸ˜‚ My husband can't wait to plant more next year...and he's already looking in to different varieties - hoping to grow some larger jack-o-lantern style ones next season! πŸŽƒ
…
#pumpkins #growingpumpkins #ourpumpkinpatch #homegrownpumpkins #homegrown #homegarden #pumpkingrowing #gardening #fallharvest #happyhalloween #timetocarvesomepumpkins #gardensurprises #gardenfun #capturingparenthood
Free the Frankensteins from the Frozen Rainbow Bra Free the Frankensteins from the Frozen Rainbow Brain! 😬🌈🧠
…
Yesterday, we shared how we made this colorful, frozen rainbow brain - full of Frankenstein mini erasers…and today we wanted to show you what became of our beautiful brain! πŸ˜ƒ
…
We popped it out onto a tray, grabbed a shaker of salt, a bottle of warm water (colored red for added effect), and some tongs.
And then it was time to Free the Frankensteins (our daughter coined the phrase)! πŸ˜‰
…
This spooky activity provides chilly sensory play, motor skills practice, and scientific exploration (salt and warm water speed-up the melting process)! πŸ™ŒπŸ™ŒπŸ™Œ
As an added bonus…you also get some color-mixing! And the addition of the salt makes it extra sparkly too! 😍🀩😍
…
Eventually, all you’re left with is some mini erasers floating in a pool of colorful water…and a happy kid! ❀️❀️❀️
…
#frozenbrain #rainbowbrain #frozenrainbowbrain #brains #freethefrankensteins #halloween #happyhalloween #halloweenactivities #halloweenactivitiesforkids #halloweensensoryplay #sensoryplay #sensoryexploration #motorskills #motorskillsdevelopment #scienceforkids #kidscience #funactivities #funactivitiesforkids #halloweenfun #capturingparenthood
We are definitely getting into the fall and Hallow We are definitely getting into the fall and Halloween spirit...so during a recent homeschool art session, we decided to make some air-dry clay pumpkins and jack-o-lanterns! πŸŽƒπŸŽƒπŸŽƒ
...
Back in 2019, Lauralee @2art.chambers shared several colorful, air-dry clay pumpkins that her students made...and after rediscovering the saved post, I decided that it would be a perfect October art lesson for us too! 🧑
...
We used various colors of air-dry clay, and rolled each color into whatever pumpkin shape we wanted...and then we added our lines/indentations using the side of a credit card. πŸ’³ The stems are just small, broken pieces of old crayons (another genius idea from Lauralee). πŸ– And we topped our stems with pieces of pipe cleaner, to create the little curly cues. 😍
...
Once we had our pumpkins...we decided to change things up a bit, and grabbed our stash of googly eyes. πŸ‘€ (Most of) our fall pumpkins then transformed into Halloween jack-o-lanterns! πŸŽƒ
We pressed the googly eyes into the clay, and we used a few small tools (that came with our box of air-dry clay) to add their mouths. πŸ˜ƒ
...
And now we have a cute and colorful crew of clay pumpkins adorning our mantle! πŸŽƒπŸ§‘πŸŽƒ
...
#pumpkins #jackolanterns #claypumpkins #airdryclay #airdryclaycreation #airdryclayart #airdryclaypumpkins #elementaryart #fallartprojects #fallartprojectsforkids #halloweenart #halloweenartprojects #halloweenartprojectsforkids #homeschool #homeschoolart #homeschoolfun #halloween #happyhalloween #capturingparenthood
Andrew from @elementaryarts shared a patterned, bl Andrew from @elementaryarts shared a patterned, block letter name project a couple of weeks ago (I'll share the post in stories today), and I immediately added it to our list of art projects to do this year! 😍
But we decided to switch things up a little bit! Instead of using our names, we each picked a color that we like...wrote the name of the color in block letters on our paper...and created our color patterns using at least two different shades of our chosen color. πŸ–
...
This colorful project ended up being a lot of fun, and also very relaxing...as we all quietly focused, and zoned in on adding the color patterns around all of our letters. It was actually a bit hypnotizing! 🀩
...
Needless to say, we are really happy with the way our block letter color project turned out! πŸ™Œ We even had a special guest who wanted to join in on this art project! ❀️
...
P.S. We also used Andrew’s free TPT handout on how to make block letters! The bundle includes bubble letters, cursive letters, graffiti letters, and more! πŸ‘
…
#blockletters #blocklettering #colors #color #colorful #artproject #artforkids #kidart #elementaryart #artactivity #artactivities #artactivitiesforkids #colorfun #homeschool #homeschoolart #homeschoolfun #capturingparenthood
We created self-portraits for our first art projec We created self-portraits for our first art project of our homeschool year...and we are pretty obsessed with them! 🀩✏️🀩
...
I love the idea of doing a self-portrait project at the beginning of the year, and then again at the end of the year...so that we can see how much we've grown and changed.
...
We used Kaitlyn's @artwithmrs.e Simple Self-Portrait Drawing Guide and it was so incredibly helpful (especially for this new homeschool teacher who wouldn't necessarily list drawing as one of her stronger suits). πŸ˜‰
We actually purchased her entire Guided Drawing Bundle (over on Teachers Pay Teachers) and we highly recommend it! πŸ™ŒπŸ™ŒπŸ™Œ
...
We looked through the self-portrait drawing guide to get different ideas for our eyes, nose, mouth, and hair. πŸ‘€πŸ‘ƒπŸ‘„
...
Now...if you caught our stories earlier this week, you know that our daughter recently made a pretty big change to her hair (that included a partial side-shave and bob-length cut - she also dyed it blue). πŸ’‡β€β™€οΈ
She was used to drawing pictures of herself with her long, blonde locks...and her new hairstyle proved rather difficult. But she persevered, and ended up with a self-portrait that she was truly proud of! πŸ₯°
...
When we were finished drawing our likenesses, we decided to cut them out and create a special background to glue them onto. I went with random black and white designs...and our nugget decided to draw various things that she loves (her family, winter, candy, books, dolphins...and more)! ❀️
...
It was such a fun project...and I can't wait to see what our self-portraits look like at the end of our school year! πŸ˜ƒ
...
#selfportrait #selfportraits #homeschool #homeschoolart #elementaryart #artactivities #artactivitiesforkids #artforkids #kidart #homeschoolfun #capturingparenthood
Follow on Instagram

Popular Posts

Virtual Spring Break: Day Five - New York City

Virtual Spring Break: Day Five – New York City

Virtual Spring Break: Day Four - Mexico

Virtual Spring Break: Day Four – Mexico

Virtual Spring Break: Day Three - India

Virtual Spring Break: Day Three – India

Join Us on Instagram

Ok...@artwithmrs.e Haunted House project is hands- Ok...@artwithmrs.e Haunted House project is hands-down the best Halloween-themed art project out there! πŸ™ŒπŸ™ŒπŸ™Œ
We had a blast creating haunted houses for homeschool art this month! 🧑
...
We followed Kaitlyn's extremely helpful Haunted House Drawing Guide (you can find it over on her Teachers Pay Teachers account) and completed the project over the course of 3 lessons.
...
During our first lesson, we sketched our houses in pencil, and added some eerie exterior landscaping. πŸͺ¦πŸ¦‡
We popped in a few spooky characters (ghosts, spiders, pumpkins, and a vampire). πŸ‘»πŸ•·πŸŽƒπŸ§›
And then we traced over our pencil lines with black Sharpie.
...
During our next lesson, we used a coloring technique that we learned from Kristian @friendsartlab ❀️ We colored our pictures with oil pastels...and then painted over the top of the oil pastels with baby oil...it causes the oil pastels to bleed and blend together! 🀩
...
During our final lesson...we added more spooky characters to the inside of our house...that can peek out behind the doors and windows. πŸ’€πŸ§™β€β™€οΈπŸ‘»
To do this...I used an X-acto knife and carefully cut around the outside edges of the doors/windows (leaving the hinge sides intact so that they could fold open and closed).
We placed yellow construction paper in the background...and added witches, ghosts, skeletons, a mummy, and a Frankenstein! 😍
This step made our haunted houses really come to life...and we just can't thank Kaitlyn @artwithmrs.e enough for sharing this awesome lesson and drawing guide! THE ABSOLUTE BEST! ❀️❀️❀️
...
It was very evident how much our daughter loved this project...as we worked through each step...but the thing that solidified just how much she enjoyed it was - one weekend morning I walked downstairs to find her and her dad sitting at the table - and she was very excitedly teaching him how to draw his own haunted house - while she drew a few more herself (scroll to the last picture in the carousel)! πŸ₯°
...
#hauntedhouse #hauntedhouses #hauntedhousedrawing #directeddrawing #spookyart #halloween #happyhalloween #halloweenart #halloweenfun #elementaryart #homeschoolart #homeschool #homeschoolfun #capturingparenthood
I decided that these six little pumpkins needed a I decided that these six little pumpkins needed a permanent place on our feed...because WE GREW THEM OURSELVES!!! πŸŽƒ
That's right...first-time pumpkin-growers over here...and it was all actually a bit of a surprise. πŸ˜ƒ
...
You see, when we went to prep our garden beds this spring, we noticed a plant that had already started growing. We assumed it was a cucumber plant, since it was in the same place we had cucumbers last year.
We left it alone and planted a couple of other cucumber plants nearby. πŸ₯’
At first, the leaves on our mystery plant looked very similar to the leaves on our other cucumber plants.
But a couple of weeks later the plant had grown A LOT bigger. It was now obvious that it was not a cucumber plant. But what was it? πŸ€·β€β™€οΈ
...
And that's when it suddenly dawned on these exhausted parents, that our daughter had spontaneously tossed seeds from her pumpkin (last Halloween), into the garden bed. πŸ€¦β€β™€οΈ The mystery was finally solved...and by the looks of the large golden flowers that were emerging all over the vines...we figured we might have a few pumpkins come fall! πŸ™ŒπŸŽƒπŸ™Œ
...
It was so much fun to watch the pumpkin plant grow! 🀩 We had to cut down the wire on one side of our garden bed to let the vines out...and they ended up growing 6-10 feet long in both directions! 😳 It was crazy!
They put out the most gorgeous flowers...that the bees absolutely loved! 🧑 And soon enough, we spotted a few round gourds growing at the base of some of the flowers. They grew quickly...and then turned a beautiful shade of orange! 😍
...
Needless to say, we are now officially pumpkin-growing people! πŸ˜‚ My husband can't wait to plant more next year...and he's already looking in to different varieties - hoping to grow some larger jack-o-lantern style ones next season! πŸŽƒ
…
#pumpkins #growingpumpkins #ourpumpkinpatch #homegrownpumpkins #homegrown #homegarden #pumpkingrowing #gardening #fallharvest #happyhalloween #timetocarvesomepumpkins #gardensurprises #gardenfun #capturingparenthood
Free the Frankensteins from the Frozen Rainbow Bra Free the Frankensteins from the Frozen Rainbow Brain! 😬🌈🧠
…
Yesterday, we shared how we made this colorful, frozen rainbow brain - full of Frankenstein mini erasers…and today we wanted to show you what became of our beautiful brain! πŸ˜ƒ
…
We popped it out onto a tray, grabbed a shaker of salt, a bottle of warm water (colored red for added effect), and some tongs.
And then it was time to Free the Frankensteins (our daughter coined the phrase)! πŸ˜‰
…
This spooky activity provides chilly sensory play, motor skills practice, and scientific exploration (salt and warm water speed-up the melting process)! πŸ™ŒπŸ™ŒπŸ™Œ
As an added bonus…you also get some color-mixing! And the addition of the salt makes it extra sparkly too! 😍🀩😍
…
Eventually, all you’re left with is some mini erasers floating in a pool of colorful water…and a happy kid! ❀️❀️❀️
…
#frozenbrain #rainbowbrain #frozenrainbowbrain #brains #freethefrankensteins #halloween #happyhalloween #halloweenactivities #halloweenactivitiesforkids #halloweensensoryplay #sensoryplay #sensoryexploration #motorskills #motorskillsdevelopment #scienceforkids #kidscience #funactivities #funactivitiesforkids #halloweenfun #capturingparenthood
We are definitely getting into the fall and Hallow We are definitely getting into the fall and Halloween spirit...so during a recent homeschool art session, we decided to make some air-dry clay pumpkins and jack-o-lanterns! πŸŽƒπŸŽƒπŸŽƒ
...
Back in 2019, Lauralee @2art.chambers shared several colorful, air-dry clay pumpkins that her students made...and after rediscovering the saved post, I decided that it would be a perfect October art lesson for us too! 🧑
...
We used various colors of air-dry clay, and rolled each color into whatever pumpkin shape we wanted...and then we added our lines/indentations using the side of a credit card. πŸ’³ The stems are just small, broken pieces of old crayons (another genius idea from Lauralee). πŸ– And we topped our stems with pieces of pipe cleaner, to create the little curly cues. 😍
...
Once we had our pumpkins...we decided to change things up a bit, and grabbed our stash of googly eyes. πŸ‘€ (Most of) our fall pumpkins then transformed into Halloween jack-o-lanterns! πŸŽƒ
We pressed the googly eyes into the clay, and we used a few small tools (that came with our box of air-dry clay) to add their mouths. πŸ˜ƒ
...
And now we have a cute and colorful crew of clay pumpkins adorning our mantle! πŸŽƒπŸ§‘πŸŽƒ
...
#pumpkins #jackolanterns #claypumpkins #airdryclay #airdryclaycreation #airdryclayart #airdryclaypumpkins #elementaryart #fallartprojects #fallartprojectsforkids #halloweenart #halloweenartprojects #halloweenartprojectsforkids #homeschool #homeschoolart #homeschoolfun #halloween #happyhalloween #capturingparenthood
Andrew from @elementaryarts shared a patterned, bl Andrew from @elementaryarts shared a patterned, block letter name project a couple of weeks ago (I'll share the post in stories today), and I immediately added it to our list of art projects to do this year! 😍
But we decided to switch things up a little bit! Instead of using our names, we each picked a color that we like...wrote the name of the color in block letters on our paper...and created our color patterns using at least two different shades of our chosen color. πŸ–
...
This colorful project ended up being a lot of fun, and also very relaxing...as we all quietly focused, and zoned in on adding the color patterns around all of our letters. It was actually a bit hypnotizing! 🀩
...
Needless to say, we are really happy with the way our block letter color project turned out! πŸ™Œ We even had a special guest who wanted to join in on this art project! ❀️
...
P.S. We also used Andrew’s free TPT handout on how to make block letters! The bundle includes bubble letters, cursive letters, graffiti letters, and more! πŸ‘
…
#blockletters #blocklettering #colors #color #colorful #artproject #artforkids #kidart #elementaryart #artactivity #artactivities #artactivitiesforkids #colorfun #homeschool #homeschoolart #homeschoolfun #capturingparenthood
We created self-portraits for our first art projec We created self-portraits for our first art project of our homeschool year...and we are pretty obsessed with them! 🀩✏️🀩
...
I love the idea of doing a self-portrait project at the beginning of the year, and then again at the end of the year...so that we can see how much we've grown and changed.
...
We used Kaitlyn's @artwithmrs.e Simple Self-Portrait Drawing Guide and it was so incredibly helpful (especially for this new homeschool teacher who wouldn't necessarily list drawing as one of her stronger suits). πŸ˜‰
We actually purchased her entire Guided Drawing Bundle (over on Teachers Pay Teachers) and we highly recommend it! πŸ™ŒπŸ™ŒπŸ™Œ
...
We looked through the self-portrait drawing guide to get different ideas for our eyes, nose, mouth, and hair. πŸ‘€πŸ‘ƒπŸ‘„
...
Now...if you caught our stories earlier this week, you know that our daughter recently made a pretty big change to her hair (that included a partial side-shave and bob-length cut - she also dyed it blue). πŸ’‡β€β™€οΈ
She was used to drawing pictures of herself with her long, blonde locks...and her new hairstyle proved rather difficult. But she persevered, and ended up with a self-portrait that she was truly proud of! πŸ₯°
...
When we were finished drawing our likenesses, we decided to cut them out and create a special background to glue them onto. I went with random black and white designs...and our nugget decided to draw various things that she loves (her family, winter, candy, books, dolphins...and more)! ❀️
...
It was such a fun project...and I can't wait to see what our self-portraits look like at the end of our school year! πŸ˜ƒ
...
#selfportrait #selfportraits #homeschool #homeschoolart #elementaryart #artactivities #artactivitiesforkids #artforkids #kidart #homeschoolfun #capturingparenthood
Follow on Instagram

Copyright © 2025 · glam theme by Restored 316

  • Policies + Disclosure
  • Contact