• Home
  • About
  • Kid Zone
    • Activities
    • Arts + Crafts
    • Books Books Books
  • Food
    • Family-Friendly
    • Kids
    • Sweets
    • Dog-Friendly
  • Life + Motherhood
    • Pregnancy
    • Parenting
    • House + Home
  • Let’s Party
    • Birthdays
    • Holidays
    • Instagram
    • Pinterest

Capturing Parenthood

Mix It Up! Color-Mixing & Art Project

in Activities, Arts + Crafts, Toddler Zone on January 9, 2018

In our household, there are two activities that we love the most…reading and art! When we get the opportunity to combine the two together, it’s perfection! And that’s exactly what happened when we conducted this Mix It Up! Color-Mixing & Art Project!

Mix It Up! Color-Mixing & Art Project ยฉ Capturing Parenthood

Mix It Up!ย is an irresistibly imaginative and engaging children’s book, written by Herve Tullet. The story playfully invites each reader to get creative with color…mixing up a new hue on each page! What happens when you combine yellow and red? Green and white? Blue and black? You quickly find out within the pages of this genius book! If you have not read Mix It Up! with your kiddos yet, I highly recommend snagging a copy from your local library…or you can purchase your own.

Mix It Up! Color-Mixing & Art Project ยฉ Capturing Parenthood

The book alone brought us loads of enjoyment, but I decided to take things a step further so that our little nugget could explore the wonders of color-mixing in real life! Since we had recently conducted our Walking Rainbow Experiment (that we shared with you last Thursday), I knew I wanted to create a color-mixing activity that didn’t involve coloring water. So, I chose to utilize one of our other favorite sensory materials…shaving cream!

Mix It Up! Color-Mixing & Art Project ยฉ Capturing Parenthood

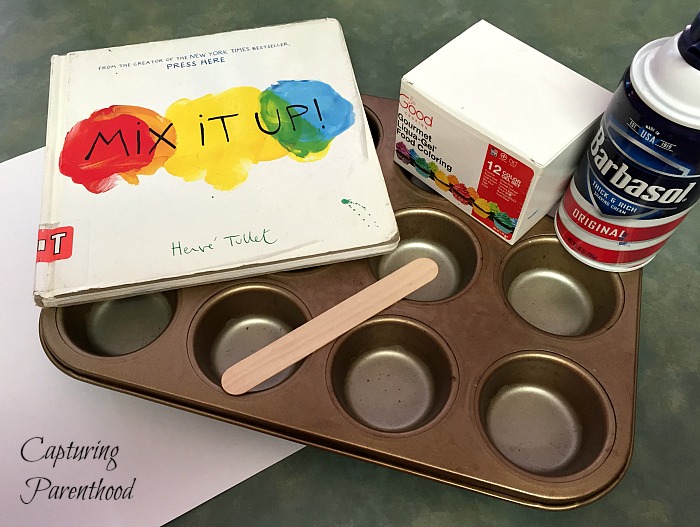
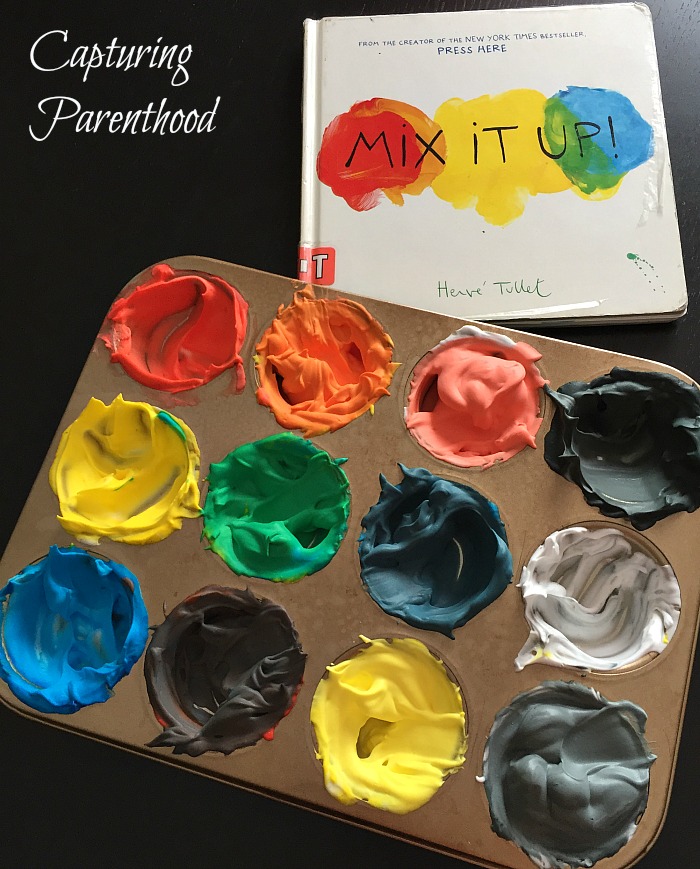
I grabbed our shaving cream canister, a few vials of food coloring, stir sticks, a muffin tin, and our copy of Mix It Up!…andย we set off on our creative adventure!


Mix It Up! Color-Mixing & Art Project

Supplies:

Mix It Up! Color-Mixing & Art Project ยฉ Capturing Parenthood

  • For the color-mixing component:
    • Muffin Tin
    • Shaving Cream
    • Food Coloring (I used Good Cooking Gourmet Liqua-Gel Food Coloring)
    • Stir Sticks (or spoons)
    • Mix It Up! by Herve Tullet
  • For the art project component:
    • Shaving Cream Colors (as created during the color-mixing activity)
    • White Paper or Cardstock
    • Ruler

Instructions:

Mix It Up! Color-Mixing & Art Project ยฉ Capturing Parenthood

For the color-mixing component:

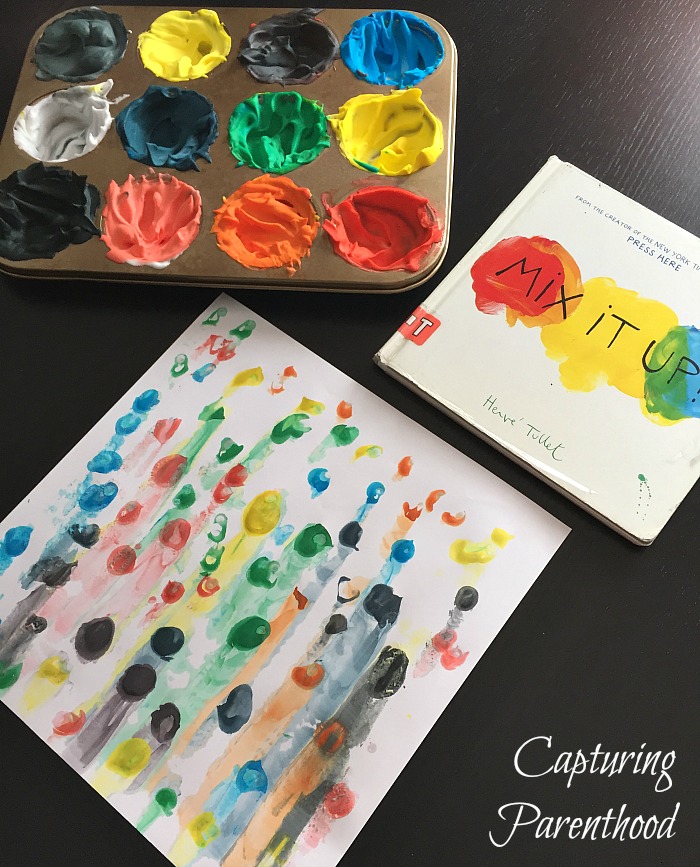
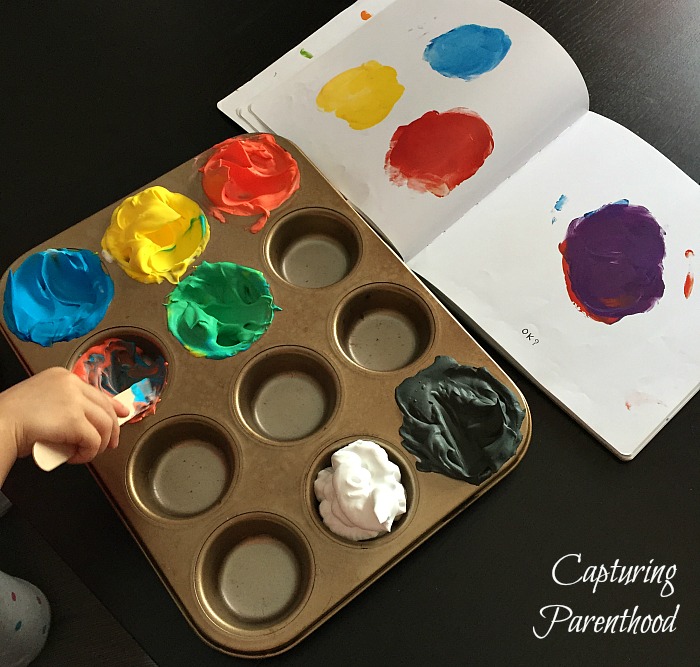
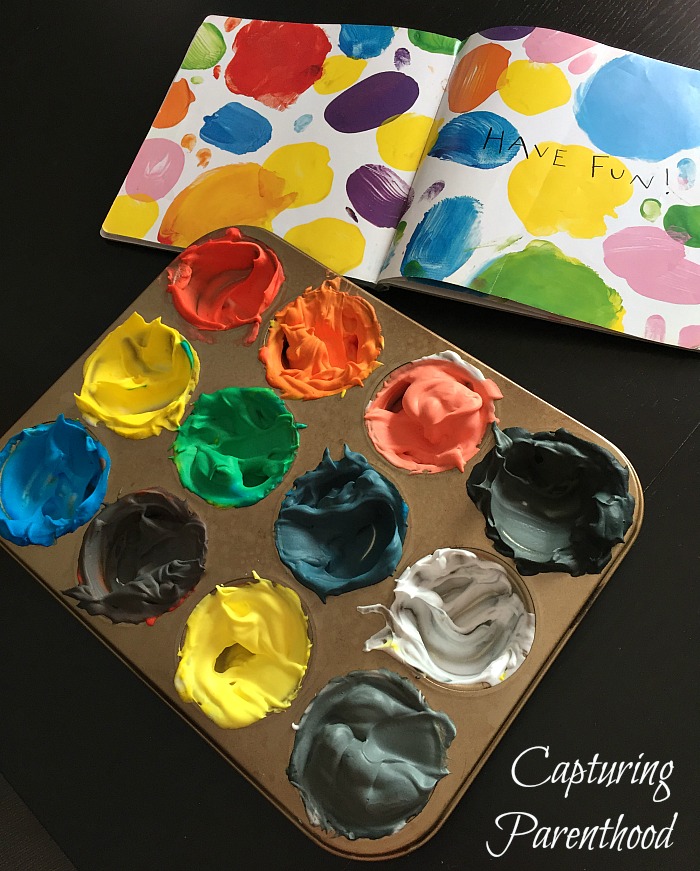
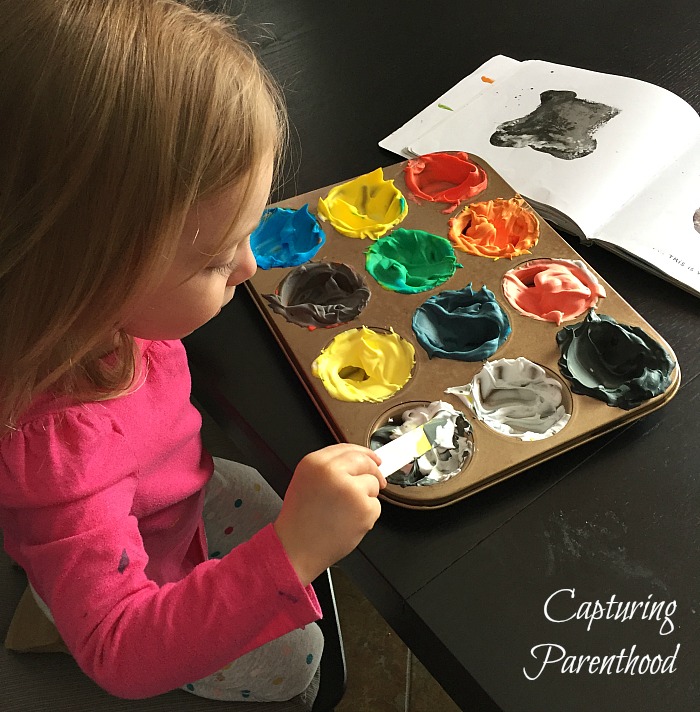
  1. Start by squirting shaving cream into five of the twelve muffin tin cavities. Using food coloring, color one shaving cream-filled cavity red, one yellow, one blue, one black, and leave one white. Mix each color into the shaving cream until they are thoroughly combined.
  2. Next, open up your Mix It Up! book and follow along, creating each color as you flip through the pages. Scoop some red into an empty muffin tin cavity and then add a scoop of yellow. Mix it all up and you’ve got a vibrant orange!
  3. Continue on until you’ve created the six colors of the rainbow. Then it’s time to discover what happens when you add white to a color. Choose one color and add a scoop of it to an empty cavity, then add a scoop of white. Mix them together! What happened? We combined red and white, and ended up with pink!
  4. Black is next on the list. Choose a color and add a scoop of it to another empty cavity. Then add a scoop of black. Mix the two together! What happened this time? We combined blue and black, and ended up with a beautiful navy blue!
  5. Lastly, stir a scoop of white together with a scoop of black and you’ve got…gray!
  6. At this point 11 of the 12 muffin tin cavities should be full. Let your little ones decide what color they want to create in the final slot. Once your muffin tin is completely full of color, you can move on to the art project!

Mix It Up! Color-Mixing & Art Project ยฉ Capturing Parenthood

For the art project component:

Mix It Up! Color-Mixing & Art Project ยฉ Capturing Parenthood

  1. Have your little ones apply dabs of shaving cream paint (using their finger tips) to the white paper, in whatever design they choose.
  2. When they are finished painting, grab a ruler. Press the edge of the ruler down firmly at the top of the paper, and slide it all the way down to the bottom of the paper. Ta Da!
  3. Set the piece of paper aside to dry completely. Once dry, proudly display the colorful masterpiece on your refrigerator or art wall!

Mix It Up! Color-Mixing & Art Project ยฉ Capturing Parenthood


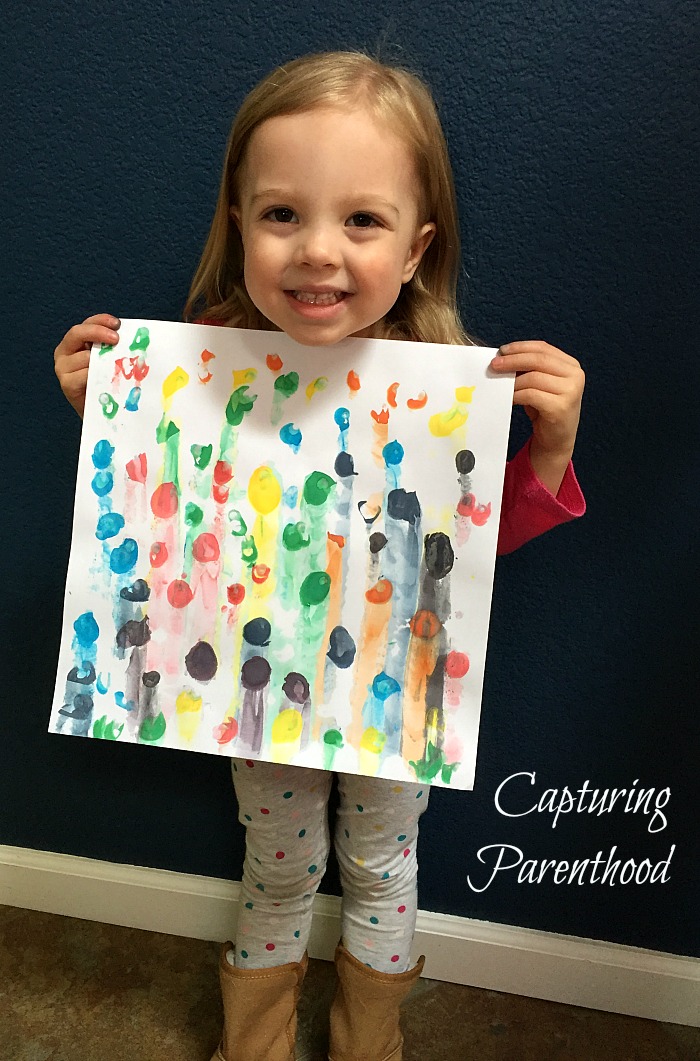
I can’t even tell you how much fun we had with this entire activity! Our little nugget was completely engaged, and super enthusiastic, the entire time! This Mix It Up! Color-Mixing & Art Project definitely ranks high on our list of favorite activities, and is one that I’m sure we will repeat often!

Mix It Up! Color-Mixing & Art Project ยฉ Capturing Parenthood

Make sure to check out our Instagram account (@capturingparent2016)ย tomorrow…we will be sharing another fun art activity, based on another popular Herve Tullet book, Press Here. It’s another fan favorite!

START SPREADING THE NEWS!

Related Posts

  • Chicka Chicka Boom Boom – Activities for PreschoolersChicka Chicka Boom Boom – Activities for Preschoolers
  • Slow Cooker Chicken Noodle SoupSlow Cooker Chicken Noodle Soup
  • Flower Pudding TartsFlower Pudding Tarts
  • Giant Painting & Coloring (2-in-1 Activity)Giant Painting & Coloring (2-in-1 Activity)
« Walking Rainbow Experiment
Bubble Wrap Painting »

Hello! Nice to meet you!

Welcome to the Capturing Parenthood blog! I'm Stacey...wife and first-time parent, former full-time working mom, turned stay-at-home mom. Join me as I capture and share my thoughts and experiences on this crazy adventure we call parenthood! Click here to learn more about me!

Search Capturing Parenthood

Instagram

Ok...@artwithmrs.e Haunted House project is hands- Ok...@artwithmrs.e Haunted House project is hands-down the best Halloween-themed art project out there! ๐Ÿ™Œ๐Ÿ™Œ๐Ÿ™Œ
We had a blast creating haunted houses for homeschool art this month! ๐Ÿงก
...
We followed Kaitlyn's extremely helpful Haunted House Drawing Guide (you can find it over on her Teachers Pay Teachers account) and completed the project over the course of 3 lessons.
...
During our first lesson, we sketched our houses in pencil, and added some eerie exterior landscaping. ๐Ÿชฆ๐Ÿฆ‡
We popped in a few spooky characters (ghosts, spiders, pumpkins, and a vampire). ๐Ÿ‘ป๐Ÿ•ท๐ŸŽƒ๐Ÿง›
And then we traced over our pencil lines with black Sharpie.
...
During our next lesson, we used a coloring technique that we learned from Kristian @friendsartlab โค๏ธ We colored our pictures with oil pastels...and then painted over the top of the oil pastels with baby oil...it causes the oil pastels to bleed and blend together! ๐Ÿคฉ
...
During our final lesson...we added more spooky characters to the inside of our house...that can peek out behind the doors and windows. ๐Ÿ’€๐Ÿง™โ€โ™€๏ธ๐Ÿ‘ป
To do this...I used an X-acto knife and carefully cut around the outside edges of the doors/windows (leaving the hinge sides intact so that they could fold open and closed).
We placed yellow construction paper in the background...and added witches, ghosts, skeletons, a mummy, and a Frankenstein! ๐Ÿ˜
This step made our haunted houses really come to life...and we just can't thank Kaitlyn @artwithmrs.e enough for sharing this awesome lesson and drawing guide! THE ABSOLUTE BEST! โค๏ธโค๏ธโค๏ธ
...
It was very evident how much our daughter loved this project...as we worked through each step...but the thing that solidified just how much she enjoyed it was - one weekend morning I walked downstairs to find her and her dad sitting at the table - and she was very excitedly teaching him how to draw his own haunted house - while she drew a few more herself (scroll to the last picture in the carousel)! ๐Ÿฅฐ
...
#hauntedhouse #hauntedhouses #hauntedhousedrawing #directeddrawing #spookyart #halloween #happyhalloween #halloweenart #halloweenfun #elementaryart #homeschoolart #homeschool #homeschoolfun #capturingparenthood
I decided that these six little pumpkins needed a I decided that these six little pumpkins needed a permanent place on our feed...because WE GREW THEM OURSELVES!!! ๐ŸŽƒ
That's right...first-time pumpkin-growers over here...and it was all actually a bit of a surprise. ๐Ÿ˜ƒ
...
You see, when we went to prep our garden beds this spring, we noticed a plant that had already started growing. We assumed it was a cucumber plant, since it was in the same place we had cucumbers last year.
We left it alone and planted a couple of other cucumber plants nearby. ๐Ÿฅ’
At first, the leaves on our mystery plant looked very similar to the leaves on our other cucumber plants.
But a couple of weeks later the plant had grown A LOT bigger. It was now obvious that it was not a cucumber plant. But what was it? ๐Ÿคทโ€โ™€๏ธ
...
And that's when it suddenly dawned on these exhausted parents, that our daughter had spontaneously tossed seeds from her pumpkin (last Halloween), into the garden bed. ๐Ÿคฆโ€โ™€๏ธ The mystery was finally solved...and by the looks of the large golden flowers that were emerging all over the vines...we figured we might have a few pumpkins come fall! ๐Ÿ™Œ๐ŸŽƒ๐Ÿ™Œ
...
It was so much fun to watch the pumpkin plant grow! ๐Ÿคฉ We had to cut down the wire on one side of our garden bed to let the vines out...and they ended up growing 6-10 feet long in both directions! ๐Ÿ˜ณ It was crazy!
They put out the most gorgeous flowers...that the bees absolutely loved! ๐Ÿงก And soon enough, we spotted a few round gourds growing at the base of some of the flowers. They grew quickly...and then turned a beautiful shade of orange! ๐Ÿ˜
...
Needless to say, we are now officially pumpkin-growing people! ๐Ÿ˜‚ My husband can't wait to plant more next year...and he's already looking in to different varieties - hoping to grow some larger jack-o-lantern style ones next season! ๐ŸŽƒ
โ€ฆ
#pumpkins #growingpumpkins #ourpumpkinpatch #homegrownpumpkins #homegrown #homegarden #pumpkingrowing #gardening #fallharvest #happyhalloween #timetocarvesomepumpkins #gardensurprises #gardenfun #capturingparenthood
Free the Frankensteins from the Frozen Rainbow Bra Free the Frankensteins from the Frozen Rainbow Brain! ๐Ÿ˜ฌ๐ŸŒˆ๐Ÿง 
โ€ฆ
Yesterday, we shared how we made this colorful, frozen rainbow brain - full of Frankenstein mini erasersโ€ฆand today we wanted to show you what became of our beautiful brain! ๐Ÿ˜ƒ
โ€ฆ
We popped it out onto a tray, grabbed a shaker of salt, a bottle of warm water (colored red for added effect), and some tongs.
And then it was time to Free the Frankensteins (our daughter coined the phrase)! ๐Ÿ˜‰
โ€ฆ
This spooky activity provides chilly sensory play, motor skills practice, and scientific exploration (salt and warm water speed-up the melting process)! ๐Ÿ™Œ๐Ÿ™Œ๐Ÿ™Œ
As an added bonusโ€ฆyou also get some color-mixing! And the addition of the salt makes it extra sparkly too! ๐Ÿ˜๐Ÿคฉ๐Ÿ˜
โ€ฆ
Eventually, all youโ€™re left with is some mini erasers floating in a pool of colorful waterโ€ฆand a happy kid! โค๏ธโค๏ธโค๏ธ
โ€ฆ
#frozenbrain #rainbowbrain #frozenrainbowbrain #brains #freethefrankensteins #halloween #happyhalloween #halloweenactivities #halloweenactivitiesforkids #halloweensensoryplay #sensoryplay #sensoryexploration #motorskills #motorskillsdevelopment #scienceforkids #kidscience #funactivities #funactivitiesforkids #halloweenfun #capturingparenthood
We are definitely getting into the fall and Hallow We are definitely getting into the fall and Halloween spirit...so during a recent homeschool art session, we decided to make some air-dry clay pumpkins and jack-o-lanterns! ๐ŸŽƒ๐ŸŽƒ๐ŸŽƒ
...
Back in 2019, Lauralee @2art.chambers shared several colorful, air-dry clay pumpkins that her students made...and after rediscovering the saved post, I decided that it would be a perfect October art lesson for us too! ๐Ÿงก
...
We used various colors of air-dry clay, and rolled each color into whatever pumpkin shape we wanted...and then we added our lines/indentations using the side of a credit card. ๐Ÿ’ณ The stems are just small, broken pieces of old crayons (another genius idea from Lauralee). ๐Ÿ– And we topped our stems with pieces of pipe cleaner, to create the little curly cues. ๐Ÿ˜
...
Once we had our pumpkins...we decided to change things up a bit, and grabbed our stash of googly eyes. ๐Ÿ‘€ (Most of) our fall pumpkins then transformed into Halloween jack-o-lanterns! ๐ŸŽƒ
We pressed the googly eyes into the clay, and we used a few small tools (that came with our box of air-dry clay) to add their mouths. ๐Ÿ˜ƒ
...
And now we have a cute and colorful crew of clay pumpkins adorning our mantle! ๐ŸŽƒ๐Ÿงก๐ŸŽƒ
...
#pumpkins #jackolanterns #claypumpkins #airdryclay #airdryclaycreation #airdryclayart #airdryclaypumpkins #elementaryart #fallartprojects #fallartprojectsforkids #halloweenart #halloweenartprojects #halloweenartprojectsforkids #homeschool #homeschoolart #homeschoolfun #halloween #happyhalloween #capturingparenthood
Andrew from @elementaryarts shared a patterned, bl Andrew from @elementaryarts shared a patterned, block letter name project a couple of weeks ago (I'll share the post in stories today), and I immediately added it to our list of art projects to do this year! ๐Ÿ˜
But we decided to switch things up a little bit! Instead of using our names, we each picked a color that we like...wrote the name of the color in block letters on our paper...and created our color patterns using at least two different shades of our chosen color. ๐Ÿ–
...
This colorful project ended up being a lot of fun, and also very relaxing...as we all quietly focused, and zoned in on adding the color patterns around all of our letters. It was actually a bit hypnotizing! ๐Ÿคฉ
...
Needless to say, we are really happy with the way our block letter color project turned out! ๐Ÿ™Œ We even had a special guest who wanted to join in on this art project! โค๏ธ
...
P.S. We also used Andrewโ€™s free TPT handout on how to make block letters! The bundle includes bubble letters, cursive letters, graffiti letters, and more! ๐Ÿ‘
โ€ฆ
#blockletters #blocklettering #colors #color #colorful #artproject #artforkids #kidart #elementaryart #artactivity #artactivities #artactivitiesforkids #colorfun #homeschool #homeschoolart #homeschoolfun #capturingparenthood
We created self-portraits for our first art projec We created self-portraits for our first art project of our homeschool year...and we are pretty obsessed with them! ๐Ÿคฉโœ๏ธ๐Ÿคฉ
...
I love the idea of doing a self-portrait project at the beginning of the year, and then again at the end of the year...so that we can see how much we've grown and changed.
...
We used Kaitlyn's @artwithmrs.e Simple Self-Portrait Drawing Guide and it was so incredibly helpful (especially for this new homeschool teacher who wouldn't necessarily list drawing as one of her stronger suits). ๐Ÿ˜‰
We actually purchased her entire Guided Drawing Bundle (over on Teachers Pay Teachers) and we highly recommend it! ๐Ÿ™Œ๐Ÿ™Œ๐Ÿ™Œ
...
We looked through the self-portrait drawing guide to get different ideas for our eyes, nose, mouth, and hair. ๐Ÿ‘€๐Ÿ‘ƒ๐Ÿ‘„
...
Now...if you caught our stories earlier this week, you know that our daughter recently made a pretty big change to her hair (that included a partial side-shave and bob-length cut - she also dyed it blue). ๐Ÿ’‡โ€โ™€๏ธ
She was used to drawing pictures of herself with her long, blonde locks...and her new hairstyle proved rather difficult. But she persevered, and ended up with a self-portrait that she was truly proud of! ๐Ÿฅฐ
...
When we were finished drawing our likenesses, we decided to cut them out and create a special background to glue them onto. I went with random black and white designs...and our nugget decided to draw various things that she loves (her family, winter, candy, books, dolphins...and more)! โค๏ธ
...
It was such a fun project...and I can't wait to see what our self-portraits look like at the end of our school year! ๐Ÿ˜ƒ
...
#selfportrait #selfportraits #homeschool #homeschoolart #elementaryart #artactivities #artactivitiesforkids #artforkids #kidart #homeschoolfun #capturingparenthood
Follow on Instagram

Popular Posts

Virtual Spring Break: Day Five - New York City

Virtual Spring Break: Day Five – New York City

Virtual Spring Break: Day Four - Mexico

Virtual Spring Break: Day Four – Mexico

Virtual Spring Break: Day Three - India

Virtual Spring Break: Day Three – India

Join Us on Instagram

Ok...@artwithmrs.e Haunted House project is hands- Ok...@artwithmrs.e Haunted House project is hands-down the best Halloween-themed art project out there! ๐Ÿ™Œ๐Ÿ™Œ๐Ÿ™Œ
We had a blast creating haunted houses for homeschool art this month! ๐Ÿงก
...
We followed Kaitlyn's extremely helpful Haunted House Drawing Guide (you can find it over on her Teachers Pay Teachers account) and completed the project over the course of 3 lessons.
...
During our first lesson, we sketched our houses in pencil, and added some eerie exterior landscaping. ๐Ÿชฆ๐Ÿฆ‡
We popped in a few spooky characters (ghosts, spiders, pumpkins, and a vampire). ๐Ÿ‘ป๐Ÿ•ท๐ŸŽƒ๐Ÿง›
And then we traced over our pencil lines with black Sharpie.
...
During our next lesson, we used a coloring technique that we learned from Kristian @friendsartlab โค๏ธ We colored our pictures with oil pastels...and then painted over the top of the oil pastels with baby oil...it causes the oil pastels to bleed and blend together! ๐Ÿคฉ
...
During our final lesson...we added more spooky characters to the inside of our house...that can peek out behind the doors and windows. ๐Ÿ’€๐Ÿง™โ€โ™€๏ธ๐Ÿ‘ป
To do this...I used an X-acto knife and carefully cut around the outside edges of the doors/windows (leaving the hinge sides intact so that they could fold open and closed).
We placed yellow construction paper in the background...and added witches, ghosts, skeletons, a mummy, and a Frankenstein! ๐Ÿ˜
This step made our haunted houses really come to life...and we just can't thank Kaitlyn @artwithmrs.e enough for sharing this awesome lesson and drawing guide! THE ABSOLUTE BEST! โค๏ธโค๏ธโค๏ธ
...
It was very evident how much our daughter loved this project...as we worked through each step...but the thing that solidified just how much she enjoyed it was - one weekend morning I walked downstairs to find her and her dad sitting at the table - and she was very excitedly teaching him how to draw his own haunted house - while she drew a few more herself (scroll to the last picture in the carousel)! ๐Ÿฅฐ
...
#hauntedhouse #hauntedhouses #hauntedhousedrawing #directeddrawing #spookyart #halloween #happyhalloween #halloweenart #halloweenfun #elementaryart #homeschoolart #homeschool #homeschoolfun #capturingparenthood
I decided that these six little pumpkins needed a I decided that these six little pumpkins needed a permanent place on our feed...because WE GREW THEM OURSELVES!!! ๐ŸŽƒ
That's right...first-time pumpkin-growers over here...and it was all actually a bit of a surprise. ๐Ÿ˜ƒ
...
You see, when we went to prep our garden beds this spring, we noticed a plant that had already started growing. We assumed it was a cucumber plant, since it was in the same place we had cucumbers last year.
We left it alone and planted a couple of other cucumber plants nearby. ๐Ÿฅ’
At first, the leaves on our mystery plant looked very similar to the leaves on our other cucumber plants.
But a couple of weeks later the plant had grown A LOT bigger. It was now obvious that it was not a cucumber plant. But what was it? ๐Ÿคทโ€โ™€๏ธ
...
And that's when it suddenly dawned on these exhausted parents, that our daughter had spontaneously tossed seeds from her pumpkin (last Halloween), into the garden bed. ๐Ÿคฆโ€โ™€๏ธ The mystery was finally solved...and by the looks of the large golden flowers that were emerging all over the vines...we figured we might have a few pumpkins come fall! ๐Ÿ™Œ๐ŸŽƒ๐Ÿ™Œ
...
It was so much fun to watch the pumpkin plant grow! ๐Ÿคฉ We had to cut down the wire on one side of our garden bed to let the vines out...and they ended up growing 6-10 feet long in both directions! ๐Ÿ˜ณ It was crazy!
They put out the most gorgeous flowers...that the bees absolutely loved! ๐Ÿงก And soon enough, we spotted a few round gourds growing at the base of some of the flowers. They grew quickly...and then turned a beautiful shade of orange! ๐Ÿ˜
...
Needless to say, we are now officially pumpkin-growing people! ๐Ÿ˜‚ My husband can't wait to plant more next year...and he's already looking in to different varieties - hoping to grow some larger jack-o-lantern style ones next season! ๐ŸŽƒ
โ€ฆ
#pumpkins #growingpumpkins #ourpumpkinpatch #homegrownpumpkins #homegrown #homegarden #pumpkingrowing #gardening #fallharvest #happyhalloween #timetocarvesomepumpkins #gardensurprises #gardenfun #capturingparenthood
Free the Frankensteins from the Frozen Rainbow Bra Free the Frankensteins from the Frozen Rainbow Brain! ๐Ÿ˜ฌ๐ŸŒˆ๐Ÿง 
โ€ฆ
Yesterday, we shared how we made this colorful, frozen rainbow brain - full of Frankenstein mini erasersโ€ฆand today we wanted to show you what became of our beautiful brain! ๐Ÿ˜ƒ
โ€ฆ
We popped it out onto a tray, grabbed a shaker of salt, a bottle of warm water (colored red for added effect), and some tongs.
And then it was time to Free the Frankensteins (our daughter coined the phrase)! ๐Ÿ˜‰
โ€ฆ
This spooky activity provides chilly sensory play, motor skills practice, and scientific exploration (salt and warm water speed-up the melting process)! ๐Ÿ™Œ๐Ÿ™Œ๐Ÿ™Œ
As an added bonusโ€ฆyou also get some color-mixing! And the addition of the salt makes it extra sparkly too! ๐Ÿ˜๐Ÿคฉ๐Ÿ˜
โ€ฆ
Eventually, all youโ€™re left with is some mini erasers floating in a pool of colorful waterโ€ฆand a happy kid! โค๏ธโค๏ธโค๏ธ
โ€ฆ
#frozenbrain #rainbowbrain #frozenrainbowbrain #brains #freethefrankensteins #halloween #happyhalloween #halloweenactivities #halloweenactivitiesforkids #halloweensensoryplay #sensoryplay #sensoryexploration #motorskills #motorskillsdevelopment #scienceforkids #kidscience #funactivities #funactivitiesforkids #halloweenfun #capturingparenthood
We are definitely getting into the fall and Hallow We are definitely getting into the fall and Halloween spirit...so during a recent homeschool art session, we decided to make some air-dry clay pumpkins and jack-o-lanterns! ๐ŸŽƒ๐ŸŽƒ๐ŸŽƒ
...
Back in 2019, Lauralee @2art.chambers shared several colorful, air-dry clay pumpkins that her students made...and after rediscovering the saved post, I decided that it would be a perfect October art lesson for us too! ๐Ÿงก
...
We used various colors of air-dry clay, and rolled each color into whatever pumpkin shape we wanted...and then we added our lines/indentations using the side of a credit card. ๐Ÿ’ณ The stems are just small, broken pieces of old crayons (another genius idea from Lauralee). ๐Ÿ– And we topped our stems with pieces of pipe cleaner, to create the little curly cues. ๐Ÿ˜
...
Once we had our pumpkins...we decided to change things up a bit, and grabbed our stash of googly eyes. ๐Ÿ‘€ (Most of) our fall pumpkins then transformed into Halloween jack-o-lanterns! ๐ŸŽƒ
We pressed the googly eyes into the clay, and we used a few small tools (that came with our box of air-dry clay) to add their mouths. ๐Ÿ˜ƒ
...
And now we have a cute and colorful crew of clay pumpkins adorning our mantle! ๐ŸŽƒ๐Ÿงก๐ŸŽƒ
...
#pumpkins #jackolanterns #claypumpkins #airdryclay #airdryclaycreation #airdryclayart #airdryclaypumpkins #elementaryart #fallartprojects #fallartprojectsforkids #halloweenart #halloweenartprojects #halloweenartprojectsforkids #homeschool #homeschoolart #homeschoolfun #halloween #happyhalloween #capturingparenthood
Andrew from @elementaryarts shared a patterned, bl Andrew from @elementaryarts shared a patterned, block letter name project a couple of weeks ago (I'll share the post in stories today), and I immediately added it to our list of art projects to do this year! ๐Ÿ˜
But we decided to switch things up a little bit! Instead of using our names, we each picked a color that we like...wrote the name of the color in block letters on our paper...and created our color patterns using at least two different shades of our chosen color. ๐Ÿ–
...
This colorful project ended up being a lot of fun, and also very relaxing...as we all quietly focused, and zoned in on adding the color patterns around all of our letters. It was actually a bit hypnotizing! ๐Ÿคฉ
...
Needless to say, we are really happy with the way our block letter color project turned out! ๐Ÿ™Œ We even had a special guest who wanted to join in on this art project! โค๏ธ
...
P.S. We also used Andrewโ€™s free TPT handout on how to make block letters! The bundle includes bubble letters, cursive letters, graffiti letters, and more! ๐Ÿ‘
โ€ฆ
#blockletters #blocklettering #colors #color #colorful #artproject #artforkids #kidart #elementaryart #artactivity #artactivities #artactivitiesforkids #colorfun #homeschool #homeschoolart #homeschoolfun #capturingparenthood
We created self-portraits for our first art projec We created self-portraits for our first art project of our homeschool year...and we are pretty obsessed with them! ๐Ÿคฉโœ๏ธ๐Ÿคฉ
...
I love the idea of doing a self-portrait project at the beginning of the year, and then again at the end of the year...so that we can see how much we've grown and changed.
...
We used Kaitlyn's @artwithmrs.e Simple Self-Portrait Drawing Guide and it was so incredibly helpful (especially for this new homeschool teacher who wouldn't necessarily list drawing as one of her stronger suits). ๐Ÿ˜‰
We actually purchased her entire Guided Drawing Bundle (over on Teachers Pay Teachers) and we highly recommend it! ๐Ÿ™Œ๐Ÿ™Œ๐Ÿ™Œ
...
We looked through the self-portrait drawing guide to get different ideas for our eyes, nose, mouth, and hair. ๐Ÿ‘€๐Ÿ‘ƒ๐Ÿ‘„
...
Now...if you caught our stories earlier this week, you know that our daughter recently made a pretty big change to her hair (that included a partial side-shave and bob-length cut - she also dyed it blue). ๐Ÿ’‡โ€โ™€๏ธ
She was used to drawing pictures of herself with her long, blonde locks...and her new hairstyle proved rather difficult. But she persevered, and ended up with a self-portrait that she was truly proud of! ๐Ÿฅฐ
...
When we were finished drawing our likenesses, we decided to cut them out and create a special background to glue them onto. I went with random black and white designs...and our nugget decided to draw various things that she loves (her family, winter, candy, books, dolphins...and more)! โค๏ธ
...
It was such a fun project...and I can't wait to see what our self-portraits look like at the end of our school year! ๐Ÿ˜ƒ
...
#selfportrait #selfportraits #homeschool #homeschoolart #elementaryart #artactivities #artactivitiesforkids #artforkids #kidart #homeschoolfun #capturingparenthood
Follow on Instagram

Copyright © 2025 · glam theme by Restored 316

  • Policies + Disclosure
  • Contact